
ATLANTIC WALL
France (Including the Channel Islands)
The Atlantic Wall was instigated in 1941 at the behest of Hitler and eventually ran for almost 3,000 miles from Norway in the north to the Spanish border. The most vulnerable section of the wall, and therefore the most heavily fortified, was in France, and in particular around Calais where the Channel is at its narrowest and where the threat of invasion was considered greatest. This stretch of coastline was replete with casemates for artillery, anti-tank guns and machine guns as well as command bunkers and troop shelters. Away from this concentration the defences, with one important exception, were on a smaller scale and were more thinly spread. The exception was the Channel Islands. Hitler was determined that this small, but psychologically important piece of the British Isles would not easily be recaptured by the Allies and in October 1941 he issued a directive to turn the Channel Islands into an impregnable fortress. The principal islands –Alderney, Guernsey and Jersey – were disproportionately equipped with artillery batteries, anti-aircraft installations and coastal defences. The same was true for the numbers of emplaced tank turrets, with over one hundred installed on the three main islands.
The tank turrets, which were all taken from obsolete French models captured in 1940, were employed in different roles according to need. Some were used independently to provide the main focal point of defence, for example in and around ports, some formed part of larger defensive positions while others were used to provide close-in support for some of the larger installations like artillery batteries.
Alderney
Although Alderney was the smallest of the three Channel Islands to be fortified by the Germans, for its size it had a greater concentration of defences than Jersey and Guernsey. To protect the island there were sixteen emplaced tank turrets (seven tank turrets with 3.7cm gun and machine gun (probably APXR turrets) and nine tank turrets with 3.7cm gun only (probably Renault FT17s)), which were largely concentrated around the coast. In addition the Germans had a mobile reserve of twelve to fifteen tanks (mostly FT17s) that were stored at three tank parks. At one of these, Strongpoint Rosenhof (Rose Farm), the tanks were simply dug in to strengthen the defences.1

Alderney1
1. Resistance Nest ‘Hafen’ Harbour area – 3 tank turrets. One of these was in a two-tiered emplacement on the tip of the breakwater. The tank turret was positioned above a machine gun with 180 degree traverse.2
2. Strongpoint ‘Hafen Süd York Hill – 1 tank turret.
3. Resistance Nest ‘Dohlenfeste’ Fort Doyle – 2 tank turrets
4. Resistance Nest ‘Müllerhof Bonne Terre – 1 tank turret
5. Resistance Nest ‘Steinfeste’ Fort Clonque – 1 tank turret
6. Resistance Nest ‘Süd’ Les Couriaux – 2 tank turrets
7. Flak Battery ‘Millionär’ and DeM Station Quatre Vents – 1 tank turret
8. Strongpoint ‘Südhafen’ Cachalière – 1 tank turret
9. 88mm Flak Battery ‘Höhe 145’ Mannez Garenne – 1 tank turret
10. Corblets Bay – 1 tank turret
11. Lager ‘Norderney’ Saye Bay – 1 tank turret
12. Strongpoint ‘Graue Häuser’ (South) Coast Guard Cottages –1 tank turret
1Festung, Alderney, The German Defences of Alderney by T. Davenport.
2Pantcheff states that the turret was fitted with a 2cm gun but this seems unlikely since all the turrets on the island seem to have been of French origin and fitted with 3.7cm guns. P51 Pantcheff.
An FT17 with riveted octagonal turret and 3.7cm KwK 144(f) gun. This example was installed at Resistance Nest Archirondel, Jersey. (CIOS, M. Ginns)
Guernsey
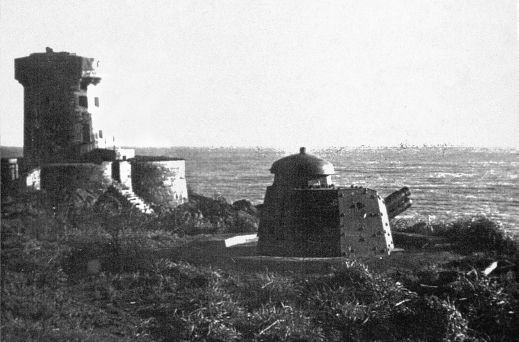
Although not having the same concentration of fortifications as Alderney, Guernsey nevertheless had an impressive array of artillery batteries, anti-aircraft installations, strong points(34) and resistance nests.(35) These defences were mostly located to the west, north and east of the island; cliffs to the south making any attack from that direction unlikely. To protect the batteries and provide added firepower to the coastal positions a number of tank turrets were installed. Somewhere in the region of 30 tank turrets, all taken from captured French tanks, were used. There were circa 20 FT17 turrets supplemented by a number of APX R turrets.2
Jersey
By far the largest number of tank turrets were installed on Jersey; sixty-one in total. The majority of the turrets, as was the case on the other islands, were taken from old French Renault FT17s with a few more modern APXR turrets.(36) These were located along the coast with particular concentrations in the north, east and southeast of the island which the Germans believed were the least likely avenues for an Allied attack.
Immediately after the war British forces removed most of the fixed weapons on the Channel Islands. Those that were not scrapped, including many of the tank turrets, were taken away in the 1950s in the postwar scrap-metal drive. A number of tank turrets did survive however. At least one FT17 turret on Jersey is in the hands of a private collector, and another, an octagonal turret that originally protected Fort Aubin, is on display at the Occupation Museum, St Ouen. Additionally, two of the APXR turrets can still be seen in their original locations protecting Elizabeth Castle and another at Les Creux, St Brelade. Two further examples can be seen on Guernsey where one turret (taken from Les Nicolles, the Forest) can be seen at the Guernsey Occupation Society Museum, Les Houards and another is on display at the Bunker Museum, St Peter Port.
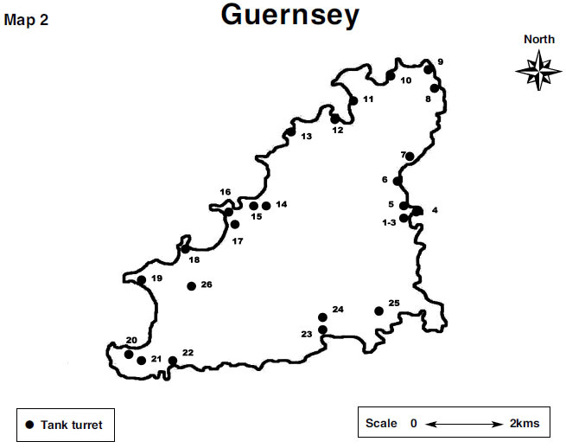
Guernsey3
1. Widerstandsnest (Resistance nest) Albert Pier – 1 tank turret with MG
2. Widerstandsnest Viktoria Pier – 1 tank turret with MG
3. Widerstandsnest Hafenreserve (White Hart Hotel) – 1 tank turret with 3.7cm PaK
4. Widerstandsnest Nordmole (White Rock) – 2 tank turrets with MGs
5. Widerstandsnest Peterseck (Salerie corner) – 1 tank turret with MG
6. Widerstandsnest Schonbucht-Mitte (Vale Road) – 1 Renault FT17 with MG
7. Widerstandsnest Richardseck (junction of Grandes Maisons Road and Bulwer Avenue) – 1 FT17 tank turret [Belle Greve Bay between Houge a la Perre and Mont Crevelt (p13 Occupuation Review 22)]
8. Widerstandsnest Schwarzenbeg (Bordeaux) – 1 tank turret with MG
9. Stutzpunkt (strongpoint) Nebelhorn (Fort Doyle) – 1 tank turret with MG
10. Widerstandsnest Dohlenfels (L’Ancresse Bay) – 1 tank turret with 3.7cm Pak and MG [p12 Occupation Review 22 see also map on page 27]
11. Widerstandsnest Garen – 1 tank turret with MG
12. Widerstandsnest Houmet (Rousse) – 1 FT17 tank turret with 3.7cm PaK (photo), 2 tank turrets. [FT17 Houmets Lane, (nr Rue de Picquerel), Vale (pg 23, Then and Now – photo)]
13. Widerstandsnest Fishcerberg (between Pecqueries Bay and Portinfer) – 2 tank turrets with 3.7cm PaK.
14. Widerstandsnest Cobogels (Le Guet) – 1 tank turret with MG.
15. Widerstandsnest Lowenfels (Albecq) – 1 tank turret with 3.7cm Pak
16. Stutzpunkt Rotenstein (Fort Hommet) – 1 tank turret with MG [Fort Hommet, Vazon (p83 (map) Occupation Review 24)]
17. Widerstandsnest Rundturm (Vazon Bay) – 1 tank turret with MG (built into the sea wall)
18. Widerstandsnest Krossen (Fort Le Crocq – 1 tank turret with MG (built into the sea wall)
19. Stutzpunkt Lagenberg Naval Tower MP2 (Fort Saumarez, L’Eree) – 1 tank turret with 3.7cm Pak APX [Perelle bay overlooking Lihou Island
20. Widerstandsnest Unter Westberg (La Rue de la Varde) – 1 tank turret with MG
21. Widerstandsnest Westberg Riegel (La Rue des Pointes) – 1 tank turret with MG
22. Widerstandsnest Schutzenhof (Les Tielles) – 1 tank turret
23. Widerstandsnest Grune Bucht (Petit Bot Bay) – 1 tank turret with 3.7cm Pak
24. Widerstandsnest Nicolaus (Les Nicolles) – 1 tank turet with MG
25. Widerstandsnest La Fosse (Moulin Huet) – 1 tank turret with MG
26. Batterie Mirus (pg 203, Then and Now – photo)
3A Guide to German Fortifications on Guernsey.
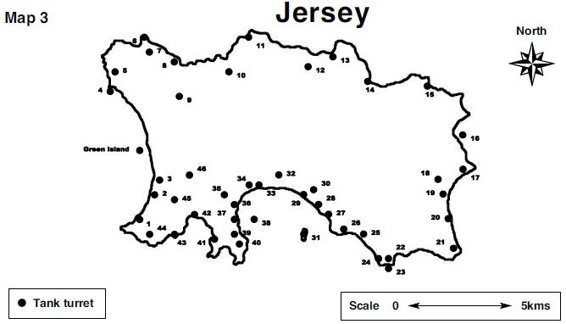
Jersey4
1. L’Oeilliere; ‡(pg 49 Occ rev 26 Resistance Nest L’Oeilliere consisted of a Type 631 casemate for 4.7cm Pak 36(t) anti tank gun backing onto another casemate for a 10.5cm (K331(f) beach defence gun. The tank turret sat in between and could be reached by means of a ladder from within the complex); p135 Jersey’s German Bunkers – diagram
2. La Carriere; ‡
3. Les Brayes; ‡
4. L’Etacquerel; †
5. Artillery Battery Moltke × 3; ‡ (Grid reference 547554 on the cliff top at Les Landes, St Ouen pg84 Occ rev 26)
6. and 7. Plemont 1 × FT17 ‡ at bottom of cliff and 1 × APX at top of cliff;
8. Greve de Lecq;*
9. Artillery Battery Ludendorff; ‡ (grid ref 579533 – at junction of La Cache de l’Eglise and La Rue de La Cour – pg 82 occ rev 26)
10. Jute; ‡ (La Hougue Mauger, St Mary (now with private collector) (p121 Jersey’s German Bunkers Archive Book No 9)
11. Sorel B; †
12. Jasmin × 2; ‡
13. Bonne Nuit; ‡
14. Bouley Hafen; †
15. Rozel 2 × Hafen and 1 × Fort; ‡
16. Archirondel (on unfinished breakwater); †
17. Gorey Hafen;*
18. Wiederstandsnest Krossen (Fort Le Crocq – 1 tank turret with MG (built into the sea wall)
19. Fort William; ‡
20. Le Hurel; †
21. La Rocque B × 2 (FT17† covering the main road and an APX turret facing the sea);
22. and 23. La Rocque A × 3 – 2 × FT ‡ (One positioned near the gateway of Platte Rocque House disguised as a water pump. This covered the east-west coast road (CIOS Occ review 1977 p 20 (Map), 22–23) One positioned at the end of the breakwater in the autumn of 1944 to cover the port, beaches and the rest of the ‘resistance point’. (CIOS Occ review 1977 p 20 (Map), 22–23)). 1 × APX turret positioned half way along the small pier;
24. Le Hocq; †
25. La Motte B; ‡
26. Grand Charriere; †
27. La Plage; †
28. South Hill Unten; †
29. Grand Hotel; †
30. Artillery Battery Endrass; ‡ (grid ref 643493 – Westmount, west of St Helier and 250 metres from St Aubins Bay – pg 83 occ rev 26)
31. Elizabeth Castle Süd;* [Still there – Zimmermann II pg 87 map pg 113 picture]
32. Artillery Battery Fritsch ‡ (grid ref 510623) north of The Grove at the top of Mont Cambrai/Mont Felard in St Lawrence – one static tank turret. Pg 80 Occ Rev 26
33. Third Tower; ‡
34. La Haule [pg 83 Then and Now – photo]; †
35. Artillery Battery Derfflinger; ‡
36. Bahnhof Aubin;*
37. Hafen Aubin × 2; ‡
38. Fort Aubin × 2; ‡ (One rusted away by 1986 the other was recovered by the CIOS and ultimately put on display at Artillery Batterie Moltke) 1 × APX (Removed to the CI Military Museum in St Ouen’s Bay)
39. Noirmont Manor; ‡
40. Artillery Battery Lothringen × 2; ‡ (Grid reference 607466 Noirmont, St Brelade p85 Occ Rev 26) [The two tank turrets were sited on either side of the spine road and covered the open ground to the north of the perimeter fence. Note the author mentions that these were not mounted on the usual Tobruk type shelter, but were mounted on a small concrete construction which are still visible today. (Batterie Lothringen Archive Book No 10)]
41. Schmugglersdorf (Ouaisne); †
42. Beau Rivage; †
43. Battery;* (At Les Creux, St. Brelade and is still there)
44. Artillery Battery Roon; ‡ (Grid reference 571480, La Moye Point –p97 Occ Rev 22) Now on display outside the Underground Hospital
45. Artillery Battery Hindenburg; ‡ (grid ref 576491 (off La Route Orange on the ground now covered by Elizabeth Avenue) pg 96 Occ Rev 22)
46. Peters Baracken 3 5 (3 3 FT17 with MG311 (f) and 2 3 FT 17 with 3.7cm KwK 144 (f))
Note: Green Island One 5cm Kwk 39 L/60 developed for the Panzer III (p88, German Fortifications in Jersey, M. Ginns)
4Order of Battle Chart of 319 Infantry Division – letter M. Ginns 23 February 2000.
*APX
†FT 17 with 3.7cm KwK 144(f)
‡FT17 with MG311 (f)
Normandy
French tank turrets were also widely used on the mainland. It would of course be impossible to list every one, but by concentrating on key areas it is possible to give a flavour of how these turrets were employed and on occasion how they fared in battle. Those turrets installed in Normandy, and in particular on the five beaches chosen for the D-Day landings,(37) offer a unique opportunity in this regard because so much has been written about the landings.
Utah Beach
This was the code name for the most westerly of the five landing beaches that lay along the eastern coast of the Cherbourg peninsula. Here men of the 4th US Infantry Division under Maj General Raymond O. Barton were to land on the gently sloping beaches to the south of Les Dunes de Varreville. The village was protected by Widerstandsnest 10 to the north and Stützpunkt 9 to the south. The former consisted of a number of casemates and field works as well as two tank turrets armed with 37mm guns, which were located on the coast so as to be able to cover the beach. Stützpunkt 9 also included a number of tank turrets in its arsenal with three emplaced to cover the beach – one at either end and another in the middle with a tunnel leading to a shelter at the rear – and a further two turrets approximately 100m further back. All were French turrets with 37mm guns – probably APXRs.(38)

A French Renault FT turret mounted on a U-shaped shelter. It was installed at Varreville-Nord – Utah Beach and in the distance is the American ‘Gooseberry’ breakwater. (Service Historique Marine)
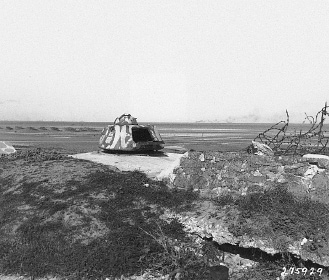
An APXR turret mounted at Quinéville north of Utah Beach. The turret retains its original commander’s hatch. A rudimentary camouflage pattern has been applied. (US National Archives)
The strong point was clearly a major obstacle to any successful landing and it was heavily bombed and shelled prior to the landing with, as was subsequently discovered, a considerable amount of success. The reason that this did not become evident until later was due to the fact that the landing force drifted a mile to the south of its original target. This brought the men of the Ivy Division up against the defences of Widerstandsnest 5 at La Grande Dune. Being only a resistance nest it was less well defended than the strongpoint at Varreville reflecting the fact that it only had a single road leading from the beach, which was flanked by inundations that made exploitation difficult. The defences consisted of a single casemate(39) and miscellaneous other defences including one tank turret. Thankfully for the men of 8th Infantry Regiment leading the assault, these defences had also been successfully targeted as part of the preliminary bombardment. Indeed the barrage was so successful that it left the defenders of the 3rd Battalion Infanterie Regiment 919 under Lt Arthur Jahnke completely shell-shocked and when the ramps were lowered on the first wave of landing craft not a single shot was fired. Eventually the young officer(40) and his men regained their composure and with the few weapons at their disposal they tried to repel the invasion force. The damaged 88mm gun hit one Sherman before it was put out of action, and Cpl Friedrich in the tank turret kept firing his machine gun cutting down a number of engineers before it was put out of action by a direct hit from a tank in the second wave. This effectively ended the German resistance on the beach. Engineers continued to clear obstacles while the infantry and tanks moved inland and by the end of the day almost 25,000 men were ashore at a cost of less than 200 casualties.
Omaha Beach
Ten miles or so along the coast was Omaha Beach, which lay between Port en Bessin, and the mouth of the River Vire. This stretch of the Normandy coastline was a far more daunting prospect for an invasion force. It had many more natural obstacles for the attacker to overcome and there was also a seawall. To make matters worse this stretch of beach had been heavily fortified with fourteen Widerstandsnester. These were principally located near the coast to cover the beach exits between the dunes. At Vierville there were three resistance nests, while exits on the beach in front of St Laurent sur Mer were protected by four more. A further three nests covered the exits from the beach at Colleville.

An FT17 that formed part of the defences of Utah Beach at Sainte Marie du Mont. The turret is of a riveted design and sits on a smaller version of the U-shaped reinforced concrete shelter. The turret is still in place today and can be found near the Musée du Débarquement. (Author)
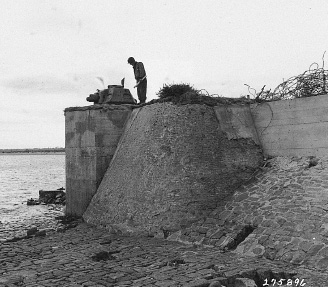
A GI examines an APXR turret mounted at the Le Grand Vey, which covered the estuary of the Vire and the entrance to the Carentan Canal. The original commander’s cupola has been replaced with a split hatch. (US National Archives)
Of the three resistance nests covering the exit from the beach in front of Vierville sur Mer – Widerstandsnester 71, 72 and 73 – only resistance nest 72 included a tank turret; an obsolete Renault FT17. Unusually it formed part of a casemate with double embrasure for 50mm KwK (See page 128). Four more turrets formed part of the defences of St Laurent sur Mer; two as part of Widerstandsnest 66 and two as part of the defences of Widerstandsnest 68.(41) These positions flanked the valley leading up to St Laurent and were built on two levels; on the beach itself and on the plateau above. One turret was positioned on each level. A further turret was to be installed at the top of the beach as part of the defences of Widerstandsnest 66 on 5 June 1944 but was not completed.(42) Just along the coast at Colleville were a further two tank turrets. Both of these were French APX turrets and were installed in Widerstandsnester 60 and 61 respectively. The turret in Widerstandsnester 61 did not overlook the beach but was mounted to the south east of the position and was most likely positioned to protect against an outflanking attack from the side or rear.
These positions, as they had been at Utah Beach, were bombed and shelled prior to the initial landing, but the bombardment was not as effective as it had been for 4th Division as a combination of low cloud and over-cautious air crews saw the majority of the ordnance miss the target or remain in the bomb bay of the aircraft. Consequently, when the defenders emerged from their shelters they found the defences were largely intact and they were able to wreak havoc on the men of 116th Regiment of 29th Infantry Division and 16th Regiment of 1st Infantry Division and their supporting tanks. It is unclear what, if any, impact the seven tank turrets had in the fighting on D-Day,(43) but by the end of the day – and despite suffering 2,000 casualties – the US forces had overrun the enemy coastal defences and over 34,000 men had been landed.
Gold Beach
By comparison with the defences of Utah and Omaha beaches, which had large numbers of tank turrets, the British and Canadian beaches had relatively few. Indeed, records seem to indicate that Gold Beach, which ran from Port en Bessin to the mouth of the River Provence, had none at all.
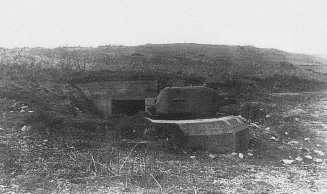
A French APXR turret mounted at Colleville-Est, near Omaha Beach. To the rear it is possible to see the entrance to a further concrete shelter, which might have been used for the crew or to store ammunition. (Service Historique Marine)
Juno Beach
Juno Beach ran from Courselles in the west, where it butted on to Gold Beach, through Bernières sur Mer to St Aubin sur Mer. These coastal resorts were defended by four Widerstandsnester: Widerstandsnester 29 and 31 protecting Courselles; Widerstandsnest 28 located at Bernières sur Mer; and Widerstandsnest 27 at St Aubin sur Mer.
The defences of Widerstandsnest 31, to the west of Courselles, consisted of a number of emplacements including a position mounting a 50mm gun and a Renault tank turret which was located on the front roughly in the middle of the resistance nest and to the west of the canal. This position was attacked by B Company of the Royal Winnipeg Rifles whose initial landing was met with a hail of bullets from the enemy coastal positions. In spite of this they managed to advance to the concrete fortifications and in hand-to-hand fighting cleared the position. The cost was high though with forty-eight men killed and eighty-five wounded from an original strength of 160.
Another tank turret, this time an obsolete French Renault FT17 armed with a machine gun, covered the beach at Bernières la Rive. The concrete emplace- ment was swathed in barbed wire to protect it against enemy infantry and over the top was stretched chicken wire to hold camouflage. Although they were not supposed to – they should have landed 200m to the west in order to avoid these defences – B Company of the Queens Own Rifles of Canada landed at Bernières. These fortifications were not particularly strong but the defenders still managed to inflict heavy casualties on the Canadians, a third of its number becoming casualties in the first few minutes. Nevertheless, Widerstandsnest 28 was soon captured and the Canadians moved inland.

A US soldier inspects a VK3001 turret that had been installed as part of the defences of Widerstandsnest 68 on Omaha Beach. In the foreground it is possible to see the entrance to the shelter. (US National Archives, courtesy of S. Zaloga)

An American GI examines an FT17 turret with 3.7cm KwK gun. This example was mounted at Grandcamp on the Normandy Coast. The bunker is one of the unique U-shaped designs used in the Atlantic Wall. (US National Archives)
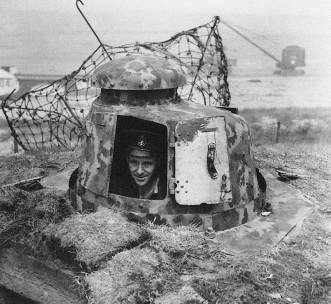
A British sailor peering through the open hatch of an FT17 turret that formed part of the Atlantic Wall defences. Although the photograph was taken in July 1944 it is still possible to see evidence of the landings in the background. (Imperial War Museum)
Sword Beach(44)
Sword Beach ran from La Brèche de Hermanville in the west, through Colleville Plage and then to Ouistreham on the Orne River. Protecting Ouistreham was Stützpunktgruppe Riva Bella, which was made up of a series of strong points and resistance nests. Stützpunkt 08 was furthest east and included a fire control tower and six emplacements for 15.5cm guns. To the east of the observation tower was a French tank turret. This was mounted on a locally designed bunker and somewhat unusually had a split hatch.(45)
At Hermanville la Brèche (Stützpunkt 18) another tank turret was installed that covered the western end of the beach. Neither this turret, nor the turret at Riva Bella seemed to have played a part in the fighting on 6 June and by the end of the day 28,845 men of the 3rd British Infantry Division and its supporting units had landed.
To the east of Sword Beach were a series of artillery emplacements whose guns covered possible landing sites. The six 15.5cm guns at Mont Canisy were protected by mines and a number of concrete positions including an emplaced Renault R35 tank turret. The turret has been restored and can be viewed today. The Merville battery, to the west of Mont Canisy and closer to Sword Beach, also posed a threat to the landing. Although no tank turrets were placed around the battery of four 10cm guns, the coast in front of the battery was protected by two strong points at Franceville Plage. Stützpunkt 05 included in its arsenal an emplaced tank turret.

A Renault R-35 turret located on Mont Canisy. The photograph was taken in June 2001 when the new turret was installed on the shelter. Alongside the turret are Mr Zarifian (the Mayor of Bernerville-sur-Mer), Mr Frederic Verbauwhede (president of the Mont-Canisy Association) and Col Olmer (the head of the Saumur Tank Museum). (B. Paich)

The original R-35 turret at Mont Canisy as it looked in 1947. (Service Historique Marine)

A German photograph taken on 6 June 1944 looking towards Sword Beach (from La plage d’Houlgate). In the foreground there is an FT17 tank turret. (Imperial War Museum)

One of the APX2B tank turrets that were installed by Belgium to defend the coast and which were later integrated into the Atlantic Wall defences. (Imperial War Museum)
Belgium and The Netherlands
The thirteen turrets built by the Belgians in the interwar period (see Chapter 2) were retained by the Germans and additionally, the defences around the major ports (Oostend, Zeebrugge, Hook of Holland, Vlissingen and the Walcheren Islands) were strengthened with the creation of a series of Widerstandsnester and Stützpunkte. These resistance nests and strong points included almost 4,000 ringstände, some with tank turrets, although it is unclear exactly how many.
Denmark3
Although not perhaps an obvious invasion target to the Allies, Denmark nevertheless was heavily fortified by the Germans. Somewhere in the region of 5,000 positions were constructed of which approximately 169 were emplaced tank turrets.(46) The majority of these were F Pz DT4803 (essentially modified Panzer I turrets), but there were also Panzer IIs and Panzer 35(t) and 38(t)s and uniquely, certainly in terms of numbers used, turrets from the VK901 (a prototype based on the Panzer II which did not see active service).(47)
Most of the turrets appear to have been located along the coast. For example eighty-nine of the F Pz DT 4803 turrets were installed in the 1. Stellung along the west coast of Jutland. Other turrets were used to defend roads and other key installations like the ferry crossing of the Lim Ford, which separated the Jutland peninsula, where a Panzer I and Panzer 38(t) turret were used.

The front view of a F Pz DT4803 turret (Panzer I) that was used to defend Aalborg airfield, Denmark. The commander’s hatch is missing. (A. Johansen)
The other use that tank turrets were put to was the defence of airfields. Flugplatz Aalborg–West had four Panzer II turrets as a perimeter defence. At Flugplatz Aalborg–Ost there were a further two turrets, both F Pz DT 4803s, one covering the road and the other the minefield.4 Three turrets of the same type were installed at Flugplatz Fredikshaven and another three at Flugplatz Rom. Three Panzer II turrets were also installed at Grove aerodrome as was an FT17 turret. This seems to have come from a scrapped tank since the turret is not mentioned in the official building programme and nor were any FT17 turrets specifically sent to Denmark for installation as fixed fortifications. However, in 1941 some one hundred FT17s were sent to Luftwaffe units in Denmark for airfield defence. For whatever reason one of these turrets was fitted to a Bauform 58c shelter using the tank’s turret race. The original frontispiece was replaced and a new plate fitted with a locally improvised gun mount.

A special bunker mounting an F.Pz.DT 4803 at Kærsgård Strand, Denmark. This bunker is very similar to the Bauformen 243, 244, 246, 248 and 251 but the only thing in common was the footprint. The internal layout was different and the extra room was for the crew, not an ammunition store. (Lars Bertelsen)
The majority of the tank turrets were mounted on standard structures or slight derivatives thereof. There were three basic structures: the Bauform 67; a slight variation on this design, but with a flat rather than a sloping roof over a slightly larger anteroom; and a more substantial structure with three rooms. This larger structure was based on the Bauform 67, and was very similar to the shelter for the T34, T70, VK3001 and KV1 tank turrets.(48) but there the similarities ended. The dimensions were quite different as were the locations of doors and, most importantly, the extra room in this type of shelter was used for crew accommodation rather than ammunition storage. This perhaps reflected the fact that, because of the extended coastline in Denmark, many of the shelters were constructed in isolated locations and therefore needed to be self-contained.
The larger bunker was principally used to mount the F Pz DT 4803 but also Panzer 38(t) and Panzer II turrets. It may be that the structure was originally designed for the F Pz DT 4803 turret since this design was the only one on the Baufortschrittsplan (building progress plan) that was designated as a Bauform 67. The Panzer 38(t) turrets did not have a Bauform number and the Panzer II turrets at Aalborg West were designated as ‘S’ or Sonder Konstruktion (special construction) and not a standard design.
The long stretches of isolated coastline also led to the development of another type of unique defensive structure. Every 400m or so from the border with Germany to the top of Jutland were constructed special groups of bunkers. Two Flankierungsstände or F Stände were located next to each other in such a way that they provided enfilade fire along the length of the beach. In the middle and to the rear of the two shelters was a tank turret, often a F Pz DT 4803, which protected the vulnerable area in between.
The unique designs were also seemingly often constructed in a fashion peculiar to the area using 60cm (2ft) rather than 40cm (1.5ft) thick walls and, where this was the case, they dispensed with the steel reinforcing rods. It is not clear whether this expedient was restricted to Denmark and Festungspionierstab 31 (Fortress Pioneer Staff) or whether it was common throughout the Atlantic Wall. What is clear, however, is that these structures tended to be built in the latter stages of the war so it is conceivable that this approach was dictated by either a lack of reinforcing rods, or may simply have been quicker and cheaper.
Norway
The very real possibility of Britain disrupting vital iron ore shipments from Sweden meant that Hitler made the defence of Norway a top priority and the vulnerability of this strategically important northern outpost was underlined following the battle for Narvik of April 1940 and the Vaagso raid of December 1941. However, poor communications and the unpredictable weather meant that a standing army was unsuitable for defending such a remote area and in December 1941 construction work began on a series of fortifications. These were concentrated around the fjord entrances and strategically important islands. In total some 225 batteries were constructed mounting over 1,000 medium and heavy pieces of ordnance.
As well as these larger fortifications, tank turrets mounted on concrete shelters were utilized. According to German sources 151 tank turrets were installed in Norway. Mostly they were Panzer 38(t) turrets, but there were also some Panzer II turrets (of various types) and also seemingly a number of Panzer 35(t) turrets. These are not shown in the official sources but a number are still there today! As was the case in Denmark, FT17s were also used in a fixed role often with whole tanks buried in the ground so that just the turret was visible. The majority of these turrets were positioned along the coast but they were also used to defend airfields. On the island of Lista the Germans constructed an airfield that was protected by at least three Panzer II Flamingo turrets. Further turrets were installed at Stavanger Sola and Forus, and also Herdla (north of Bergen) and Kjevik (in Kristiansand).

A rear view of a Panzer 38(t) turret installed by the Germans to cover the beach at Solastranda, Stavanger, Norway. The turret is still visible today. (Svein Wiiger Olsen)
Sudwall
In November 1942 the Germans occupied Vichy France, and soon after, work began to fortify the Mediterranean coast and the border with Spain. By the summer of 1943 some 500 positions had been constructed. After the Allied invasion of Sicily in July 1943 and the surrender of Italy this work was given added urgency. The coast was divided into seven coast defence sectors or Küsten Verteidigung Abschnitt. These were allocated letters A to G with A on the border with Spain and G on the border with Italy. In addition, special defensive zones were created around Marseilles and Toulon, which were considered to be of strategic importance. The Organization Todt (OT)(49) began work on submarine pens in Marseilles in the spring of 1943 and a number of tank turrets were installed to defend key locations around the city. A Panzer II turret was installed in the shadow of Fort St Nicolas which guarded the entrance to the harbour. In the city itself an APXR turret was installed on the Boulevard Ledru-Rollin and a Panzer II at Place des Abattoirs.
Further turrets were also installed at vulnerable points along the Mediterranean coast. At Collioure an APXR turret was installed together with a casemate for a 5cm KwK39/1. The emplacement was transformed into a restaurant after the war and although this work obscured the turret it is still accessible. Another French turret, this time from a Somua S35 tank, was located to cover the beach at Leucate. At Pla-d’en-Guirand a strong point was constructed which included an artillery battery that was protected by a Panzer II turret and another Panzer II turret was built into the sea wall at La Franqui. At Redoute St Pierre an APXR turret was installed which is now on display on the beach of St Pierre. Along the coast of the Camargue were four Somua turrets; fifteen APXR turrets and twenty-six Panzer II turrets. Of these, eight were deployed to defend the port of Grau du Roi including three that provided protection for the main casemates and a further four Panzer II turrets that covered the beach to the south of this position. At Port de Bouc, which lay on the opposite side of the mouth of the Rhône river, a Char B1 bis turret was installed on the sea wall. Another APXR turret was installed at Carry le Rouet (and is still there).
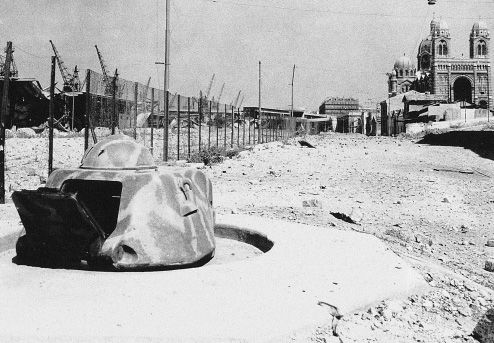
An APX R turret captured by the Americans in August 1944. It was installed on the dockside in the shadow of La Cathédrale de la Major, Marseille.
(US National Archives courtesy of S. Zaloga)
Between Marseilles and Toulon, at La Ciotat, an APXR turret was installed to cover the entrance to the port and other turrets, including Panzer II turrets, were also installed in the vicinity. At Cap Saint-Jean, to protect the casemates mounting 7.5cm guns, a Panzer II turret was installed. Finally, along Les Lecques bay were further APXR and Panzer II turrets.
Spanish Border
Although nominally an ally of Germany, Spain did not formally join the triple alliance (Germany, Italy and Japan). Franco’s reluctance to enter the war(50) caused something of a schism between the two leaders and prompted Hitler to extend his fortifications along the French border with Spain. The War Diary of Armeepionierführer AOK1 dated 5 July 1944 detailed the exact make up of these defences, which included a number of Panzer turrets:(51)
Panzer 38(t) – two completed.
Panzer II – eight planned of which one was ready for use, two were under construction and a further five assigned.
Panzer I – ten planned of which seven were ready for use, one was under construction and a further two assigned.
Today it is still possible to see the remains of some of these turrets. Around the strategically important town of Le Perthus, which is dominated by Fort de Bellgarde built by Vauban, it is possible to see a Ringstand for a Panzer II, which stands below the road leading to the site of the Roman monument known as the Trophée de Pompée. A second is in front of the hornwork, below the southeast glacis. A few kilometres away at Saint-Martin de l’Albère, a Panzer I on a ringstand is also still visible. This turret, overlooking a small valley, was located to cover a route that was used by people fleeing the German occupation in France. At Cerbère, close to the border at Col de Balistres, were constructed a Panzer II turret, a Czech Panzer 38 (t) turret and also an MG-Panzernest. Further along the coast road towards Port-Vendres, at Banyuls – Les Elmes beach, another Panzer II turret was installed. This covered the sea wall and is still in position today.5
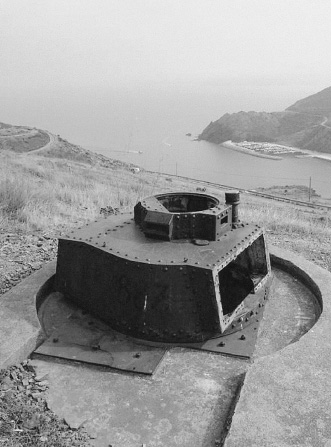
A Panzer 38(t) turret that formed part of the Sudwall defences at Cerbère on the French border with Spain. The base plate, which was formed from part of the tanks upper hull is clearly visible. Sadly the mantlet and main armament have been removed. (E Ritterbach)

A further view of the Panzer 38(t) at Cerbère, close to the border at Col de Balistres. This view clearly shows the entrance to the shelter under the turret. Hooks above the door would have been used to secure camouflage. (E Ritterbach)
EASTERN FRONT
In June 1941 Hitler invaded the Soviet Union. Despite a slight delay to the operation, the three-pronged attack made substantial inroads and by the end of the year Moscow was within artillery range and Leningrad was almost surrounded. When the offensive was resumed the following year the main focus was in the south and again good progress was made. However, the defeat at Stalingrad in January 1943 proved a watershed and despite a few minor victories, the German army was in full retreat from then on. To stem the tide Hitler ordered the construction of a series of defensive lines. These consisted mainly of field works rather than permanent fortifications, but did include large numbers of emplaced tank turrets. Indeed, according to German sources, the Eastern Front was where most tank turrets were emplaced – 694 in total – although physical evidence to support this is rare. These turrets were mostly taken from obsolete German tanks, primarily Panzer IIs (217), but not surprisingly captured Soviet turrets were also used.(52) Often they were emplaced as part of the so-called ‘hedgehog’ (igel) pattern of defence. These positions were all mutually supporting, providing fire for their own defence and cover for the flanks and rear of the adjacent units. The turrets were also used to protect key strategic targets like bridges, supply dumps and rail installations.
Soviet Union
In 1943 some 183 turrets were delivered to the Eastern Front for installation as fixed fortifications. The majority of these (143) were sent to Army Group North and the rest to Army Group Middle.(53) The majority of these turrets were Panzer II turrets (110 normal Panzer II turrets, twenty Flamingo turrets and a further thirteen with the main armament removed and adapted to take either an MG34 or MG42 machine gun). The balance included twenty-five Panzer I turrets, ten Panzer 38(t) turrets and five Soviet T70 turrets from the Panzer Repair Works at Riga.6
Little more is known about the use of these turrets. A number were installed on concrete bunkers along the Dnieper River and further turrets were located on one of its tributaries, the Berezina River. A Panzer II turret was emplaced at Borisov (modern day Boriszow) in Belarus7 and was one of a series of fortifications constructed to defend this strategically important town.(54)
Poland
The majority of the tank turrets were emplaced by the Germans in the southern part of the country in the so-called B1 line that broadly speaking ran from the Carpathian Mountains to Czestochowa. To the west of Krakow, in the Rudawa Valley, concrete shelters for mounting tank turrets were installed. One of these shelters that formed part of the Hill 280 defences may have been fitted with a T34 turret. Large stockpiles of Soviet T34 turrets were found at both Rudawa and
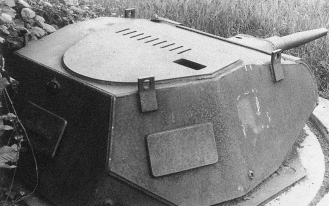
A F Pz DT 4804 (up-gunned Panzer II turret) installed to the north-west of Krakow, Poland. The turret hatch has been removed and replaced with a vent. There are additionally four lifting lugs, which have been welded to the turret top. The larger hole in the roof was where the periscope was fitted. (Waldemar Broskwinia)
Krzeszowice railway stations and it is assumed that they were destined for this and similar positions. However, the Soviet 59th Army captured these positions in January 1945 before the Germans had time to install them.8 Further north of Krakow a Panzer II turret armed with 37mm gun was emplaced(55) and another Panzer II turret was installed at Sulejow on the Pilica River. These turrets formed part of the defensive line that ran from Krakow to the Vistula, the so-called ‘Gouverment General Line’. It is also believed that turrets were used in Breslau, modern day Wroclaw.
Germany
By January 1945 the Red Army had already reached Prussia and was nearing the borders of Germany proper. The Oder Warthe Bogen line, which had been built before the war to protect Germany’s eastern frontier, had, like the West Wall, been abandoned in the intervening period. Now work to strengthen the defences was begun with the addition of tobruks and field works. Included in the building programme was a plan to install a number of dug-in tanks and in a section of the line running north from Starpel (modern day Staropole) to Kainscht, twelve such positions were to be constructed, although it is unclear whether they were completed.9

As the Germans became increasingly desperate, tanks – minus their running gear – were used as improvised fixed fortifications. In Berlin a Panzer IV has been used in this way. (Imperial War Museum)
As the Germans became increasingly desperate, major cities were turned into fortresses. In the spring of 1945 Frankfurt an der Oder was afforded this status and work started on a number of emplacements on the ridge running parallel to the River Oder on the Kliestower Road. One of the positions constructed was a Panzer 38(t) turret mounted on a wooden pedestal. This was one of two that arrived in the city by the beginning of April 1945(56) and was installed by Panzerturm Kompanie 1312. According to witnesses who lived near the Kliestower Road at the time this turret engaged enemy troops on the eastern bank of the Oder. In response, the besieging Soviet units attempted to silence the position but without success. Eventually the crew of the turret and the rest of the city’s garrison were forced to withdraw, but the turret survived.(57)
In addition to the tank turrets mounted on specially designed shelters, disabled tanks with their running gear removed were used as improvised strongpoints.(58) They tended to be placed at road intersections to cover all approaches and to provide the position with some added protection cobbles and masonry were heaped around the structure.
MEDITERRANEAN
Italy
Following the defeat of the Afrika Korps in May 1943 the Allies decided to launch an attack on Italy with a view to eliminating Mussolini’s Fascist state from the war and maintaining pressure on German forces in order to create the conditions required for ‘Overlord’ and an invasion of southern France. Less than two months later the Allies landed on Sicily and advanced towards Messina. The German and Italian defenders had had little time to construct extensive fortifications but they did manage to dig in a company of Fiat 3000 tanks (similar to the French Renault FT17) to counter the expected invasion.10 However, this improvisation did little to stem the Allied advance and eventually the Anglo-American armies captured the island. The Allies now prepared for the invasion of the Italian mainland with a view to advancing rapidly up the peninsula. Hitler, however, had other ideas and already in June 1943 construction units of the Organization Todt had been sent to Italy to work on coastal fortifications.(59) Hitler was determined that the symbolically important city of Rome should not fall to the Allies without a fight. Nor was he prepared to see the creation of Allied air bases in Italy capable of attacking industrial targets in southern Germany, or, more importantly, the Ploesti oilfields in Romania. Consequently, German forces were rushed south and began a series of delaying actions as more elaborate defences were constructed further north.
The topography of Italy was ideally suited to the German defensive strategy. The Apennines, which form the backbone of the Italian peninsula, ensured that the Allies could only advance along the narrow coastal plains or through mountain passes that were not suited to a modern mechanized army. These potential avenues of attack were protected by a series of defensive lines that were constructed in considerable depth. An integral part of these defences were emplaced tank turrets. In all 191 turrets were installed, mostly F Pz DT4803 (Panzer I) turrets (ninety-one in number) but also a significant number of Panther turrets (see Chapter 3, Part 3, below).
The first major defensive line that the Allies encountered was the Bernhardt Line, which broadly followed the Sangro and Gargliano Rivers from Fossacesia on the Adriatic to Minturno on the Tyrrhenian Sea. The western end of this line was particularly strong, especially around the town of Cassino where a switch position known as the Gustav Line was constructed. This consisted of a thick and continuous network of wire and minefields together with carefully sited weapon positions and deep shelters to protect the defenders against air and artillery bombardment. A number of Italian P40 tanks were also used here (and at Anzio) as static fortifications.11 Behind this position was the Hitler Line, that was also anchored on Monte Cassino. Located across the floor of the Liri Valley it relied on man-made fortifications for its strength and included in its arsenal were a number of Panther turrets, which are covered in more detail later in the book. No other turrets are detailed as being used in the Line,(60) but they were further north in the Gothic or Green Line.
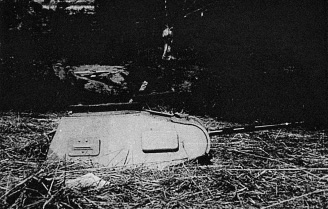
A Panzer II turret which formed part of the Gothic Line defences. Although the weaponry was obsolete by the standards of the day the armour provided valuable protection for the crew. This example was captured by Allied forces in September 1944. (National Archives)
Work had continued intermittently on the Gothic Line since late 1943 but it was not until June 1944 that a concerted effort was made to complete the defences. The Organization Todt and army engineers, supplemented by civilian labourers worked on the defences, mostly during the night to avoid the threat from Allied aircraft. The defences stretched from La Spezia in the west to Pesaro in the east, a distance of some 300km (190 miles) and in places were 30km (18 miles) deep. Particular emphasis was placed on strategically important points, like mountain passes and the coastal plains, which were heavily fortified.
Already by early July some progress had been made on the defences. In 10th Army’s (AOK 10) zone eight Panzer II turrets had been completed and a further twelve were under construction.12 During the rest of the summer the work continued apace. In addition to the emplaced Panther turrets, eighteen Panzer I(61) and Panzer II turrets had been completed by 28 August 1944 with a further fifteen under construction and thirteen more planned. Eight Italian tanks had also been installed in the Gothic Line, although the type is not stated.13 Lemelsen, the commander of 14th Army (AOK 14), was also promised, at some indeterminate future date, a number of obsolete 3.7cm tank gun turrets which were to be installed at the rear of the more vulnerable sectors of the line.14 These were undoubtedly Panzer 38(t) turrets, twenty-five of which were later stated as having been installed in Italy, although it seems unlikely that they were ever installed in the Gothic Line.
Behind the Gothic Line, the last defensive position was the Voralpenstellung, which ran along Italy’s northern border. As well as emplacing Panther turrets in this position, it was planned to install 30 tank turrets mounting machine guns (turret type unknown), 100 Italian M42 and 100 P40 turrets, although it is unclear whether this work was completed.
The Balkans
Like Italy, the Balkans offered the Allies an opportunity to strike at the ‘soft underbelly’ of the Third Reich. To counter this threat Hitler issued Directive Number 40 in March 1942, which called for the construction of defences in the Balkans and the Aegean. Plans were established to fortify the Greek mainland, Peloponnese, Crete and the Aegean Islands. However, only the defences on the island of Crete, which had been designated a fortress, were completed.
Because of the extensive coastline, the poor communications and the remoteness of many of the positions, tank turrets, which were largely self-contained fighting positions, were ideally suited and were extensively used. In total 409 turrets were installed in the Balkans. These were mostly Panzer I, Panzer II (including forty specially designed F Pz DT 4804 which were derivatives of the Panzer II) and Panzer 38(t) turrets. A number of the latter were used on Crete15 and were installed on the mainland along the Athens – Thessaloniki railroad line and other turrets were also used to protect strategically important installations like airfields – for example Hazani airfield, Athens (now called Helinikon).

A Panzer I turret installed in Greece. The twin MGs have been removed and the main hatch is missing. The entrance is just visible in the background with hooks inserted in the concrete to attach camouflage nets.
(T. Tsiplakos)
North Africa
The arrival of Rommel and his Afrika Korps had reversed the tide of the war in North Africa and Churchill was keen to regain the initiative. In May 1941 Operation Brevity was launched. This was not a success and the British lost a number tanks including nine Matildas. After the battle the Germans began to construct a line of strongly fortified posts, particularly at the Halfaya Pass, but this work was not complete when the British launched their next attack in June.16 Operation Battleaxe was an even greater failure than Brevity and the British lost sixty-four Matildas. The Germans were able to recover many of these and some were used against their former owners in later battles. The position was successfully held against a further offensive in November 1941 when more Matilda tanks were captured, before the position finally fell to British and Commonwealth forces in January 1942.
At some point during the second half of 1941 it seems that the Germans dug in some of the captured Matilda tanks and used them as strong points in the defensive line around the Halfaya Pass and Capuzzo. Undoubtedly some of the Beutepanzer (‘booty tanks’) might have been damaged beyond repair and therefore only fit for this purpose, but there is another factor that might have persuaded the Germans to use the tanks in this way. British tanks were fitted with diesel engines whereas the German tanks used petrol and it would have been difficult for them to keep so many tanks running without a guaranteed supply of fuel.17

A Panzer 38(t) turret that is still in situ in Greece. The main and coaxial armament have been removed. Just discernible on the side of the turret is its original number.
(T. Tsiplakos)
Note: It has been suggested that the British might have been responsible for employing the Matildas as a fixed fortifications. Certainly the British used them to provide added strength to the so-called Gazala Line, but this was the exception rather than the rule; tanks were normally held in reserve for any possible counter-attack.18
WEST WALL
Construction work on the West Wall began in 1936 and continued through until 1940 when work was suspended following the German invasion of France and the Low Countries. The successful conclusion of the campaign in the west meant that the border defences had seemingly served their purpose; the West Wall was abandoned and the weapons and fittings were removed and either placed in store or later used in the Atlantic Wall. But the decision to abandon the West Wall proved premature. In June 1944 the Allies landed in France and by August they had reached Paris. In that same month a study was carried out to establish the state of Germany’s border defences. This concluded that urgent remedial action was needed if the line was to slow let alone stop the Allied advance. Where possible the existing structures were to be renovated and elsewhere, new fortifications were to be built with particular emphasis on anti-tank defence.
Not surprisingly, considering the widespread use of tank turrets across the Third Reich, it was decided that this expedient would be adopted to strengthen the West Wall. However, although the onus was to be placed on anti-tank defence the tank turrets ready for use were not always suitable for this role. According to an inventory produced in early October 1944 the most widely available turret was the F Pz DT4803, based on the Panzer I and armed with a single machine gun. Notwithstanding this, it was planned to install fifty-five of these turrets in the Eifel and forty in the Niederrhein (Lower Rhine). Work on the turrets in the Eifel, under the auspices of Fest Pi Kdr XIX, was disrupted by the enemy and only forty-four of the turrets had been emplaced by the end of February 1945.19 As in the Eifel, work in the zone of Fest Pi Kdr XXI to the north fell some way short of the target with only thirty-two of the forty turrets completed by the beginning of March.20 It was also planned to install nineteen F PzDT 4010 turrets, a specially designed armoured hood for a machine gun, and by the end of 1944 work had begun on eleven of these positions.21

A Valentine tank passes a British Matilda tank turret that was captured by the Germans in the fighting in North Africa and emplaced at the Halfaya Pass. The picture was taken after the position had been recaptured by the Eighth Army in February 1942. (Imperial War Museum)

An F.Pz.DT 4803 (Panzer I) turret that was hastily employed as part of the West Wall defences. The turret appears to be mounted on its steel base plate, which in turn appears to be mounted on a wooden framework. This turret is armed with the older MG34. The position was captured by men of the 30th US Infantry Division near Niederzier, Germany in February 1945. (US National Archives courtesy of S. Zaloga)
Because the F Pz DT4803 and 4010 were only armed with machine guns these positions did nothing to alleviate the desperate need for anti-tank weapons. This deficiency was partially satisfied with the plan to install F Pz DT4804 turrets, which were essentially Panzer II turrets fitted with a 3.7cm KwK gun. It was hoped to install sixty of these turrets, but initial progress was slow and between October and December work had only begun on ten of them. In the New Year, galvanized by the grave situation, work on the turrets was accelerated and by the beginning of March, Fest Pi Kdr XIX, which was tasked with installing twenty turrets,22 had installed thirteen, and Fest Pi Kdr XXI a further eleven.23
Together with the Panther turrets the VK3001 turret with its 7.5cm gun provided the defences with much needed anti-tank firepower. However, because the VK3001 was only a prototype the turrets were only available in very small numbers. Indeed only two VK3001 turrets, that had initially been earmarked for the Atlantic Wall, and which had been stored at the Fortifications HQ Homburg, were available for use and only at the beginning of March 1945 were they emplaced in the Niederrhein (Fest Pi Kdr XXI).24
After the war much of the West Wall ended up in the French occupation zone and in October 1946 an agreement was signed with Mitalfer of Paris to dismantle the defences. Under the terms of the contract the company was tasked with the removal and destruction of all the armoured turrets. Some defences did survive, however, including a Panther turret that can be seen at the West Wall Museum, Niedersimten.
FINLAND
The Nazi-Soviet Pact of August 1939 left Finland in Stalin’s sphere of influence and in the following November a contrived border incident sparked the outbreak of hostilities between the two nations in what became known as the Winter War. The fighting continued until March 1940 and despite inflicting a number of embarrassing defeats on her much larger neighbour, Finland was forced to accept punitive peace terms. The loss of territory and the demands of the war weakened an already fragile economy, but the national will to survive enabled the country to overcome these difficulties and Finland even began to rebuild her armed forces, aided by the Germans. At the same time the Finns began the construction of a new series of border defences(62) called the Salpa Line. This ran from the Gulf of Finland to Lapland(63) and when work was suspended in September 1944 some 800 permanent concrete defences had been constructed including a number of emplaced Soviet tank turrets.25 (64)
In June 1941 hostilities began again in the so called ‘Continuation War’. This fighting saw the Finns capture a number of the forward positions of the Karelian UR (near Leningrad), which included T18 tank turrets used as fixed fortifications. Although the Finns held this position for over two years they did not attempt to destroy these emplacements(65) and this may have been the inspiration for using the idea in the Salpa Line.

A BT-5 tank, or early BT-7 turret that formed part of the Salpa Line defences. The turrets were not mounted on concrete shelters, rather the tank hull was cut just after the drivers compartment and before the engine compartment and was dug in. The turrets were positioned behind bunkers, as here, so that they were never exposed to direct fire. This example is located at Luumäki, near the town of Lappeenranta in eastern Finland. (Markku Airila)
During this fighting the Finns also captured a number of Soviet tanks and it was planned to modify them and integrate them into the Finnish Army. The Fortifications Division hoped that this might result in a number of surplus turrets that it planned to use as fixed fortifications. However, this did not prove to be the case and a request to the Ordnance Division in September 1942 for the provision of turrets was not fulfilled. It was not until June 1944 when the decision was taken to scrap the Soviet BT tanks that the turrets were released for use in the Salpa Line. In July fifty-eight turrets were made available and, according to the statistics of the Fortifications Planning Staff, by September 1944 thirty-eight turrets armed with 45mm guns and twenty turrets armed with 37mm guns had been installed.
Most of the positions were constructed using turrets taken from Soviet BT-5 (1933 and 1934 models) and BT-7 1935 model tanks. Turrets from earlier models in the BT series were also used including the BT-2 fitted with a 37mm Bofors gun. The turrets were mainly taken from obsolete BT tanks rather than the T26 because this model was used to equip Finnish Tank Divisions. Turrets taken from T-37 and T-38 amphibious tanks armed with 7.62mm DT machine guns were also used as fixed fortifications and it is possible that turrets from captured FAI, FAI-M and BA-20M armoured cars were used in this way too.
To install the BT-5 and BT-7 turrets the main body of the tank was cut away leaving little more than the section mounting the turret race. Of the original fittings of the turret and the main body, only the periscopes, sights and the ammunition racks were retained. The body of the BT2 tank was similarly cut away but additional changes needed to be made to the turret to accommodate the 37mm Bofors gun. A steel front plate was fitted to take the new main armament and the original ball-mounted machine gun was removed. When mounting the BT2 turret the section of the main body of the tank on which the turret sat was affixed to a timber framework so that only the turret was visible above the ground. A trench was dug leading to the rear of the emplacement, which obviated the need for using the turret hatches. The preparation of the T-37 and T-38 positions was slightly different with the turrets being removed completely. Four lugs were then welded onto their sides as a means for attaching them to their shelter. Because the machine gun was fitted in a ball mounting that gave it a 90-degree arc of fire it was not deemed necessary for the turret to turn.
Generally speaking the tank turrets were positioned so that they were not exposed to direct enemy fire. In some cases a wall was built to provide flank protection for the turret or alternatively, they were often set behind a concrete dugout.
The inability of the Fortifications Division to secure the release of the BT turrets until the summer of 1944 and the fact that Finland sued for peace in September 1944 meant that the turrets were seemingly never used in action and as such many of them have survived. As many as fifty turrets have been identified and are still visible today in Finland, some emplaced and others that were transported to their final location but which were not installed when work was suspended after the cessation of hostilities. The main weaponry and other fittings were removed from the turrets at the end of the war.
FAR EAST
In the second half of the 1930s Japanese forces swept all before them on the Asian mainland and on the islands of the Pacific. The European powers, who had for so long held sway in the region, now found their interests in the Far East threatened at the very same time as they were fighting for survival at home against Nazi Germany. Unable to conduct operations in two theatres, their dependencies were lost one after the other. However, one obstacle threatened Japanese ambitions and that was the might of the United States and more particularly its Pacific Fleet. In December 1941 the Japanese attacked Pearl Harbour in a calculated gamble that they hoped would destroy America’s capital ships and carriers. But the operation was only partially successful and once this sleeping giant mobilized for war it was only a matter of time before the Japanese would be defeated. Determined not to relinquish its Far-Eastern empire the Japanese turned each island into a fortress and fought fanatically, defending every position literally to the last man.
By this stage of the war much of the equipment that had been superior or at least comparable to the enemy’s at the outbreak of war, was now outdated and this was certainly true of much of Japan’s armoured force. The Type 95 (1935) Ha Go was the army’s principal light tank and was armed with a 37mm gun, while the Type 97 (1937) Chi Ha the main medium tank was only armed with a 57mm gun. They both had very thin armour and were only available in very small numbers. To use these precious resources in open combat was suicidal as was found on Saipan and Peleliu where the obsolete Japanese tanks were used in uncoordinated counter attacks in a desperate attempt to repel the US invasion force. They were targeted by everything from Sherman tanks to hand-held bazookas and were decimated.
A better use of the tanks was to employ them in a hull-down position in open pits that were supported by rifle and light machine gun positions. By installing them in this way it ensured that the tank survived longer and inflicted more casualties on the enemy. Furthermore, because they were simply positioned in shell holes and were not ‘dug in’ in the strictest sense of the phrase, they retained the ability to manoeuvre out of the position if necessary. Both the Type 95 Ha Go tank and the Type 97 Chi Ha tank were used in this way.
In the defence of San Manuel village on Luzon the Japanese used more than forty tanks – some were used in their traditional role but most were dug in.26 Dug-in tanks were also used on Guam and on the Marshall Islands. Three Type 95 (1935) Ha Go tanks were emplaced on each of the main islands: Parry Island; Eniwetok Island and Engebi Island. However, they were easily knocked out by the US Shermans.27
ADDENDUM
Sockellafetten
As well as tank turrets used as fixed fortifications, the Germans also employed surplus tank guns fitted on pivot mounts, or sockellafetten. A series of mountings were developed to take 5cm, 7.5cm and 8.8cm guns produced in the main by Rheinmetal Borsig (see Table 1 below). The guns were often fitted with shields of varying designs to provide the crew with a modicum of protection, but later in the war, as the situation became more desperate, these were dispensed with completely. The shortages at the end of the war were also reflected in the mounting to which the gun was fitted. At the outset the guns were mounted on pedestals or cruciform platforms,(66) but later a simple extemporized framework was developed. The sockellafetten were sometimes mounted in specially designed bunkers but were more often located in open pits. Initially, and particularly in the Atlantic Wall, these tended to be constructed from reinforced concrete but later, simple field works were used and this was especially true of their use in the West Wall in late 1944 and 1945.
Table 1 Sockellafetten
|
Designation |
Weapon |
|
Sockellafette Ia |
5cm KwK 39/1 |
|
Sockellafette Ib |
5cm KwK 39 |
|
Sockellafette Ic |
5cm KwK 39, 39/1, 40 |
|
Sockellafette Id |
7.5cm KwK 67 |
|
Sockellafette IIa |
8.8cm KwK43 (and PaK 43) |
|
Sockellafette III |
7.5cm KwK42 |
Atlantic Wall
The 5cm Sockellafetten were used extensively along the length of the Atlantic Wall. They were mounted in a series of positions including a specially designed ringstand and in various Regelbau or standard constructions. The ringstand (the old designation was Bauform 65a and was later changed to Bauform 221) consisted of an open pit constructed from reinforced concrete. The gun was mounted centrally and the position additionally incorporated a munitions room and a shelter for the crew, however, the crew’s living quarters were in a separate concrete bunker.
A standard construction (Regelbau 600) to mount a 5cm KwK in an open position was also designed with accommodation underneath for the crew and ammunition. Numerous variants of this shelter were built including one where the fighting position was fitted with a concrete roof. The Regelbau 653 was an embrasured emplacement with a fighting compartment and separate crew and ammunition rooms. It also had a close defence position covering the main entrance and an observation post. The Regelbau 654 was the same but the stand to area was omitted and the Regelbau 667 was a much simplified shelter with an embrasure but no ammunition store or guardroom.
Two Doppelschartenstände (double loophole shelters) were also developed to mount the 5cm KwK. The Casemate SK was not a standard construction per se (or Regelbau) but was a Sonder Konstruktion’ (special construction). Access to the shelter was from the rear via a staggered passageway that led into the main fighting compartment, which housed the 5cm KwK. This could be brought to bear on either flank through embrasures on both sides. A passageway led from here to a tank turret mounted at the front, which could cover the entire beach. The turret could be traversed through 360 degrees but could not fire to the rear because of the main structure of the bunker. An example of this type of structure was constructed at Anse de Vauville and another at Biville (on the Cotentin peninsula). An alternative Doppelschartenstand design had the turret positioned at the rear of the shelter. On the seaward side a low concrete wall was constructed. This meant that the crew of the turret was only able to enfilade the beach, but it did protect the turret from direct enemy fire. An example of this type of structure can be seen at Vierville (part of Omaha Beach).

Casemate SK – FT17 turret with 5cm KwK in double embrasure shelter.
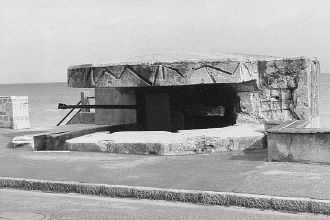
A 5cm KwK 39 L/60 in a Type 600 open shelter with reinforced roof. This example is located at St Aubin sur Mer and formed part of the defences of Juno Beach. (Author)

The rectagonal base plate (now capped) for a tank turret that was positioned to the rear of a 5cm KwK Doppelschartenstand on Omaha Beach. The concrete wall facing the sea would have protected the turret from direct fire, but meant the turret was only able to enfilade the beach. (Author)
Eastern Front
Tank guns used in this way were also employed on the Eastern Front. At the beginning of April 1945 Frankfurt an der Oder was defended by a hotchpotch of units including Festungs PaK Verband 26 (Fortification anti-tank gun unit 26) and Panzerturm-Kompanie 1312 (Tank turret company 1312). These units were equipped with an assortment of makeshift fixed weapons including a number of Panther and Panzer 38(t) tank turrets but also twenty-four 7.5cm KwK 51 L/24 guns and ten 5cm 39/1 L/60 guns.
The 7.5cm gun had previously been mounted on a wide range of armoured vehicles including the Schützenpanzerwagen Sdkfz 250/8 and Sdkfz 251/9 and the Panzerspähwagen Sdkfz 234/3. Now the weapon was mounted on a makeshift Y-shaped carriage that was secured in place by piles rammed into the ground. The weapon was comparatively heavy (2 tonnes) and had no wheels, which made the piece difficult to transport even with a crew of ten (one non-commissioned officer and nine members of crew).
The value of using of these slightly outdated weapons in the latter stages of the war was questionable because the 7.5 cm 38 HL/C shell could only penetrate 100mm (4in) of armour at a distance of 500m (1,640ft), while the 38 HL/B, which was supplied to units defending the city, could only penetrate 75mm (3in) of armour. However, by the latter stages of the war the Germans were so desperate that even obsolete guns were pressed into action and it did have the advantage of a low profile, rising to less than a metre off the ground, which made it difficult for the enemy to see let alone hit.
A 7.5cm KwK 51 L/24 on this type of makeshift platform has been on permanent exhibition at the Militärhistorischen Museum, Dresden since December 1990. The example on display was constructed from a gun found at Usedom and another example found at much the same time and that had formed part of the Frankfurt an der Oder defences in the spring of 1945.28

7.5cm KwK 51 L/24 mounted on special platform.
West Wall
On the western front plans were drawn up to use sockellafetten as part of the renovated defences of the West Wall. These were to be installed either in open pits, which were often little more than fieldworks, or in concrete bunkers. Many of the existing structures were unsuitable for the more powerful weapons so a series of new standard constructions were designed. One, the Regelbau 703, was developed to mount the 8.8cm KwK with crucible platform. This measured 9.3m × 7.5m (30ft 5in × 24ft 6in) and used some 370m3 (1,214ft3) of concrete. As well as the main fighting compartment there was a small munitions room capable of storing 180 rounds of ammunition.29(67) The lack of time and materials and the proximity of the enemy meant that the construction of new positions, like the Regelbau 703, was extremely difficult and so further consideration was given to the possibility of using existing structures. Two standard constructions – Regelbauten 18 and 22 – offered genuine potential and with some minor adjustments, including new concrete foundations, these shelters were suitable for mounting the 8.8cm KwK 43 and KwK 43/3.
In spite of the desperate position on the western front in the autumn of 1944 work on the defences pressed ahead. On 27 November 1944 it was reported that some 350 Sockellafette IIa with 8.8cm KwK43/3 were available for use and of these sixty-five were en-route to the front, 185 had arrived, sixty were being installed and thirty-six were ready for action.(68) These were to be reinforced with PaK 40 anti-tank guns and, as will be seen later, emplaced Panther tank turrets.30
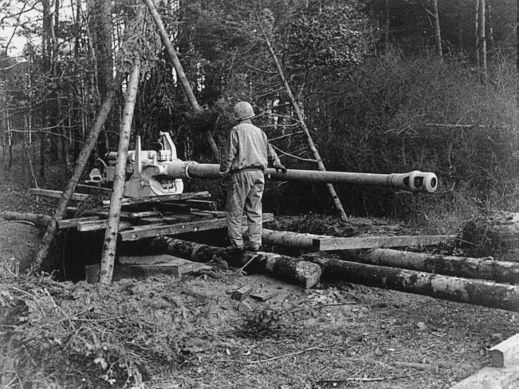
A GI inspects a hastily installed 8.8cm gun (probably a Sockellafette IIa). This emplacement formed part of the Vogesenstellung and was captured by US forces in November 1944. (US National Archives)
At the express order of Hitler on 28 November these anti-tank defences were to be further strengthened. In total some 450 Sockellafetten IIa with 8.8cm KwK43/3 were to be installed along the length of the West Wall together with 300 Sockellafette Ic with 7.5cm KwK 67 and 150 Sockellafette Ia with 5cm KwK 39/1.31 But in spite of Hitler’s direct intervention, progress was painfully slow and even in January 1945 relatively few of the positions were ready for action (see Table 2 below).
Table 2 West Wall Dispositions as at 18 January 194532
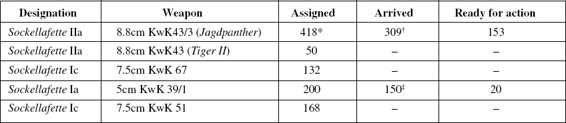
*Plus a further 32 not assigned to fortifications command.
†19 had been destroyed by enemy action.
‡50 were missing or defective.
Tanks
Even before the idea of using tank turrets as fixed fortifications had been widely adopted, the Germans had developed a number of tanks with turrets that could be removed from the chassis and used independently. In 1941 Krupp designed a self-propelled gun based on the Panzer IV chassis to mount the 10.5cm leFH18/1 L/28. A number of test units were produced, but it did not enter full production. Instead, attention was turned to weapons with all round traverse (the original design could only traverse through 70 degrees) with the possibility of dismounting the weapon. The Heuschrecke 10(69) was developed by Krupp in 1942 again using the Panzer III/IV chassis developed for the Hummel self-propelled gun. Externally the Heuschrecke 10 looked like a typical tank, but to dismount the turret the chassis was fitted with a folding gantry with a block and tackle assembly. Once the gantry had been assembled the crew could lift the turret from the superstructure and emplace it on the ground. The tank also carried a set of wheels and a carriage, which could be used to tow the turret to a new location without the need to reinstall it on its normal mounting. Internally, the turret could not be fitted with a power traverse, but instead was rotated by hand. The weapon could also not be depressed below the horizontal but could be elevated to +68 degrees.
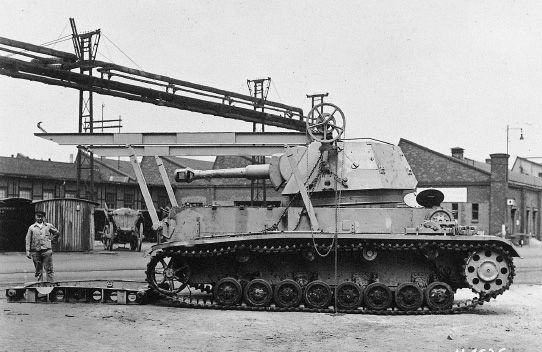
A Heuschrecke 10 or 10.5cm leFH18/1 L/28 auf Waffenträger GWIVb at the Krupp factory. The gantry is in place to lower the turret to the ground. (Imperial War Museum)
This innovative design overcame one of the major drawbacks of emplaced tank turrets, which was their lack of mobility; the turret could be deployed, used, recovered and installed elsewhere. However, although the idea was good in principle, in practice the actual installation and recovery of the turret was a long and convoluted process, exposing the crew to enemy fire. This meant that the operation either had to be carried out under the cover of darkness or covered by supporting fire. This was not a major problem because although an armoured pillbox, the turret mounted a light field howitzer and was primarily designed for indirect rather than direct fire support. The turret also had an open top making it unsuitable for close engagements with the enemy. However, these difficulties were clearly considered to be a sufficient handicap that none of the designs entered full production.(70) Only three prototypes of the Heuschrecke 10 were built in 1943.
Armoured Trains(71)
Before the First World War the Germans had used Grüson turrets, or Fahrpanzer, to provide additional firepower for German fortifications. These turrets with their 53mm gun proved highly versatile and during the war they were used on armoured trains. The turret sat on a wagon with armoured sides so that just the revolving hood was visible. Double doors in the centre of the wagon enabled the turret to be removed from the vehicle as and when necessary. Two of the larger 77mm guns, each fitted in a rotating armoured box mounted on a flatbed wagon, provided the main firepower of the armoured train which was ideally suited for use on the eastern front.34
33
After the First World War, Germany was ordered by the victorious Allies to dismantle the armoured trains it possessed.(72) The German High Command did not mourn the demise of the armoured train. They were expensive to build and maintain and offered little to the fluid, expansive type of warfare that they now favoured, bound, as they were, to the railway network. Moreover, they presented a large target not only to ground forces but also the new menace of ground attack aircraft. Yet, despite these reservations a number of armoured trains were retained. These trains were given further protection and more heavily armed and played minor roles in the Polish campaign and the fighting in the Low Countries.
The German successes saw further armoured trains fall into their hands, notably from Czechoslovakia and Poland, and these were absorbed into the German armoury. These and other German trains were seen as being of some use in the forthcoming Russian campaign (despite the difference in rail gauge) because of the vast distances involved. The decision to use armoured trains, however, came very late in the day and necessitated a series of improvisations to increase the train’s firepower. This included mounting two, sometimes three, French Somua S35 tanks on open wagons with added side armour to protect the tanks’ exposed running gear. This improvisation provided the added advantage of mobility, although unloading the tank from the wagon was slow and difficult and exposed the crew to enemy fire.(73)
These trains were not widely used in the early stages of Operation Barbarossa, largely being kept in reserve. This was in marked contrast to the Soviets whose armoured trains inflicted some notable reverses on German forces. However, such successes were never likely to stem the German advance and as the Soviets retreated many of their armoured trains were captured and put to use against their former owner. Some of these, like the ‘Stettin’, or ‘A’, renamed by the Germans as Eisenbahn Panzerzug Nr 51 or Armoured Train 51, were fitted with four BT7 tank turrets which mounted 4.5cm guns. These were fitted to wagons in a stepped formation so that the turrets could be deployed to the front at the same time.(74)
Later the more powerfully armed BP42 train was introduced. This included two specially designed flat wagons to accommodate a Panzer 38(t) tank. The tank sat in a lowered area that provided protection to the tank’s running gear. The tanks bow gun was removed and the opening covered by an armoured plate. Loading ramps enabled the tank to be quickly deployed against partisans.(75) Previously bicycle mounted infantry had been the only means of taking the fight to the enemy. These trains with their thin armour (limited because no further weight could be added to the axles) and their lack of weapons that could fire armour-piercing rounds meant that they were susceptible to attack by enemy armour. As a consequence the trains were later provided with flat wagons mounting Panzer IV (Ausf F or H) turrets with 7.5cm KwK L/48 guns(76) and were renamed Type BP44.
In 1943 a completely new concept was introduced: the Panzerdraisinen (or armoured trolley), which was constructed by Steyr of Austria. These were self-contained armoured vehicles with their own crew (eight men – two non-commissioned officers and six ranks), weaponry and an air-cooled 76-hp Steyr motor which could propel the unit at a top speed of 70km/h (43mph).(77) These armoured railcars could be used individually or as part of longer trains. Of special note were the armoured cars mounted with a tank turret. These were fitted with either a Panzer III Ausf N or Panzer IV turret with the short KwK L/24 gun, although a number were also constructed using captured Soviet T34 turrets. Only a few of these units reached the front before the war ended.
In the spring of 1944 the Italian firm Ansaldo received an order from Germany for nine ALn56 armoured railcars, similar to the five built for the Italian army.(78) These were fitted with two Italian M13/40 tank turrets mounting 4.7cm guns. They were used in the final months of 1944 in the Balkans to escort larger armoured trains. Not all of the units were finished by the time the war came to an end. A similar German version of this train was built by Steyr at the very end of the war. It mounted two Panzer IV Ausf H turrets with 7.5cm KwK L/48 guns. Only one of the three planned was actually built and was captured by the Americans at the end of the war in the Steyr works
In addition to the specially designed and produced armoured rail vehicles, improvised vehicles were also constructed. Panzer Zeppelin, a self-propelled armoured railcar, was constructed from scrap material from destroyed tanks and was armed with a Soviet BA10 turret with 37mm gun. The track protection train ‘Michael’, which was deployed in the Crimea from November 1943 until it was destroyed the following May, had an armoured wagon fitted with a T34/76 turret.35
Patrol Boats
Another less widely known use for tank turrets was as the main armament for patrol boats or river monitors. Again, as with the use of tank turrets as fixed fortifications, the lead was taken by the Soviets. The Russian landscape is criss-crossed with mighty rivers and studded with great lakes. With few roads, these waterways provided a vital communication link and as such were of great strategic importance. Before the First World War, Tsarist units patrolled these inland waterways and during the Civil War the Red Army continued the tradition.
In the years before the German invasion of the Soviet Union the naval forces were strengthened but much of its fighting strength was lost in the early part of the war as the Germans captured huge tracts of land. To make up for these losses a new vessel was designed. It was to have a shallow draft and a flat bottom which meant that the boat could be transported from one river system or lake to another and was to be capable of mounting more than machine guns. This led to the development of the Type 1124 and 1125 Armoured Motor Gun Boats. These vessels were armed with one or two tank turrets. Initially they were fitted with T35 turrets but its main armament proved less than satisfactory and as spare T34 turrets became available they were used. Where a single turret was fitted this was located at the prow and where two were mounted one was fore and one aft. Sometimes the aft turret was dispensed with and replaced with a multiple rocket launcher. Machine guns, varying from two to six in number, were used as secondary armament and were also often enclosed in armoured turrets.(79)
Table 3 Soviet patrol boats
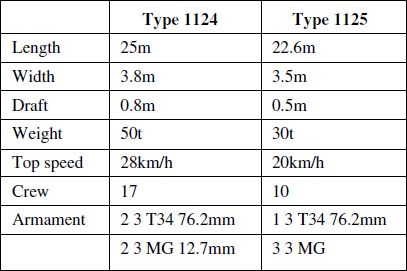
In 1942 the Germans began work on a similar gunboat, the Pionier Sicherungsboot, or PiSi-boot. The boat was initially to be armed with a Panzer III turret fitted with a 5cm Kwk L/42 gun mounted forward but concerns over weight necessitated the replacement of the main armament with a 3.7cm U-boat gun mounting. At the stern there was to be either a 2cm quadruple flak mount or a Drilling MG151. A specially designed hull, which had removable sections, meant that the boat could be moved by rail.
Initial development and construction work was carried out in Hamburg before the boat was moved to the Elbe for trials in May 1944. Later it was moved once again, this time to Lake Constance, where the tests were completed before finally being transported to Denmark where it was handed over to the Amphibious Engineers Regiment. The gunboat still had a number of teething problems which had not seemingly been resolved when the boat was destroyed in an Allied air raid.(80)36