Appendix 5
The Roman road system is fractal: the more closely it is examined, the greater the detail that can be seen. This is what the Viatores, Waddelove, and Allan have all found and the same principle can probably be applied to any area of Britain occupied by the Romans. As a convenient case study, the likely prehistoric, Roman, and medieval network north of Hadrian’s Wall and east of Dere Street as outlined here is both an indicator of the potential of even the most cursory of such studies, but also serves to show how much remains to be done just for this one small region.
None of these roads are proven to the degree of five stars outlined by the NEHHAS guidelines listed above (page 128). Most only qualify for a three-star rating, but then, as has been pointed out, the same is true of much of Margary’s network.
All of the following roads saw use by medieval armies so were clearly medieval roads. Some may well be prehistoric in origin, retained as an informal part of the Roman network outlined by Margary. Additionally, some – perhaps all – may be Roman in origin, in the sense that they were newly surveyed and laid out on courses that approximated to prehistoric routes, rather than just a resurfacing of an existing prehistoric track or road (a process Margary tended to refer to by calling a route ‘Romanized’). The evidence is set out in summary form below to illustrate how the demonstrable use of Roman roads in medieval and post-medieval warfare can be used to suggest previously unidentified ancient routes. It is intended that all will be published in detail elsewhere.1
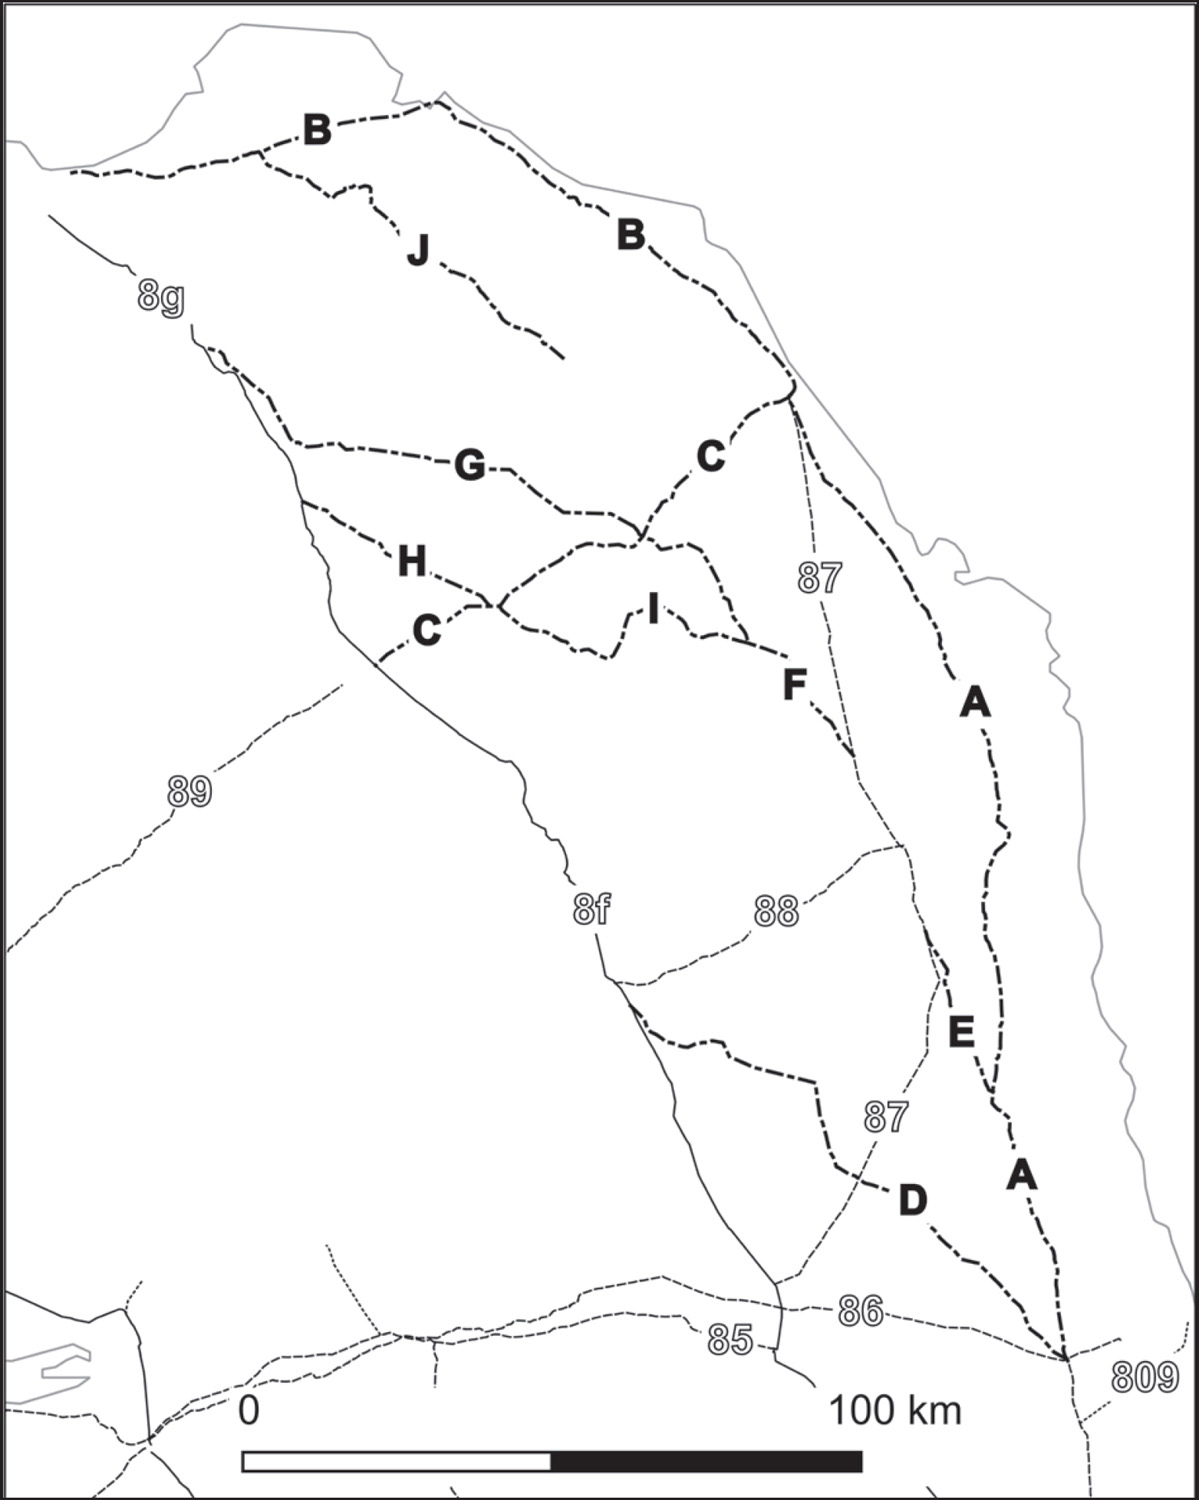
Figure 33: Possible Roman roads in the south-east of Scotland.
Route A: Newcastle to Tweedmouth (Figure 33, A)
Summary
This route links the northern end of the Pons Aelius (the bridge across the Tyne) at Newcastle with the northern end of the Devil’s Causeway at Tweedmouth.
Introduction
The course of the Great North Road between Newcastle and Berwick shows sufficiently convincing signs of alignment and place-name evidence to suggest that it too was part of the system. The first part of this route, between Newcastle and Morpeth, was accepted by Codrington, ignored by Margary, but subsequently reinstated by Hafemann, although viewed sceptically by Bidwell and Holbrook, who judged Margary 80 to have been an unimportant route in the Roman period. However, Codrington thought it veered across north-westwards from Morpeth to join the Devil’s Causeway, effectively following the line of the present A697 where it diverges from the A1. If, on the other hand, the route is projected northwards, it would have provided a direct link between the Antonine fort at Newcastle and the Tweed crossing, and ultimately to Inveresk and Cramond, also Antonine foundations. Since it would then form a northern extension of Margary 80, these roads would provide a direct route between York and the eastern flank of the Antonine Wall. As such, this is the route surveyed by Ogilby.2
Historical role
There were two medieval battles at Alnwick, both with unfortunate results for Scottish kings. The first (1093) led to the death of Malcolm III ‘Canmore’, whilst the second (1174) saw the capture of William I ‘the Lion’. This route can also be matched with the movement of armies and the royal itineraries of Edward I in 1296, 1298, and 1299 as well as on numerous other occasions up to the preparations that culminated in the battle of Pinkie Cleugh in 1547.3
Place-name evidence
There are several chester place-names along the route, as well as a coldharbour and a causey (causeway), and two -peth names at Morpeth and Hemelspeth.4
Brief description
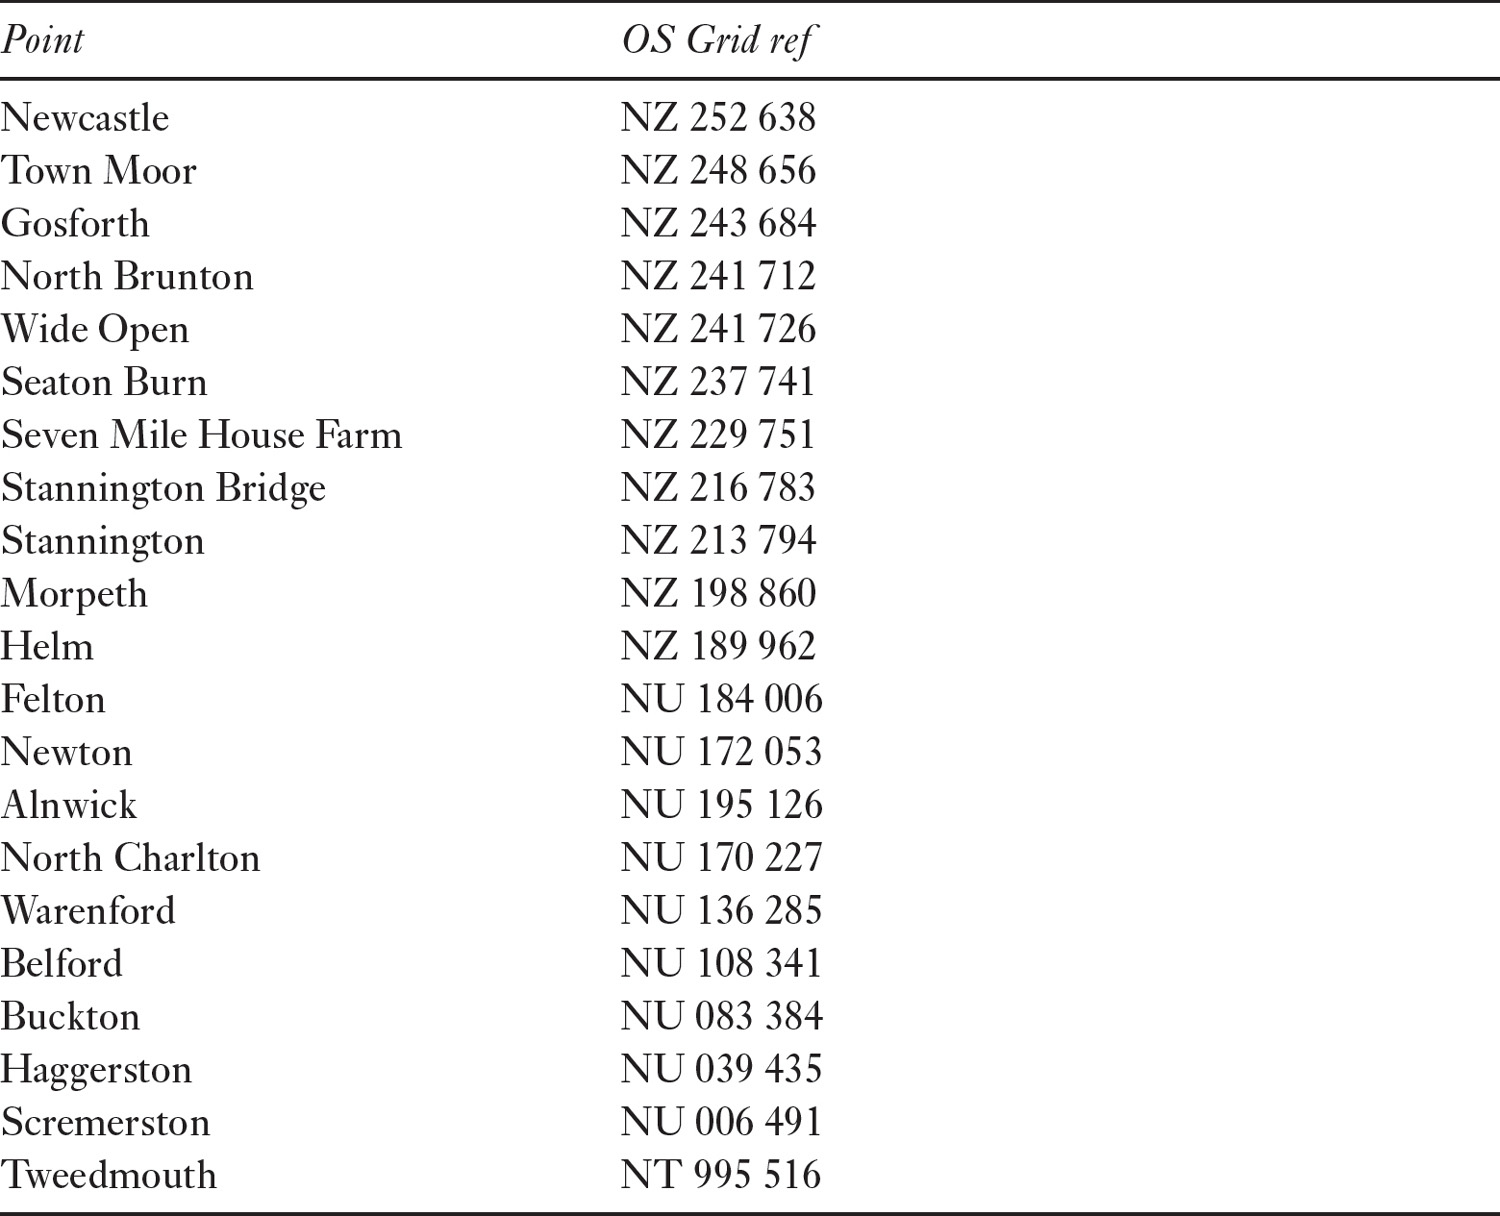
The route approximates closely with that surveyed by Ogilby. Having crossed the Tyne somewhere in the vicinity of the swing bridge, the road probably headed up Pilgrim Street and thence onto Town Moor where a straight alignment took it through Gosforth, North Brunton, Wide Open, Seaton Burn, then Seven Mile House Farm, before crossing the Blythe near Stannington Bridge, and on through Stannington. The course through Morpeth itself is unclear but the alignment continues to the north of it through Helm, where the Ogilby line probably departs from it but the alignment is still marked by field boundaries between Helm and Eshott airfield. Felton, Newton, Alnwick, Charlton, Wainford, Belford, Buckton, Haggerston, Scremerston, and so to Tweedmouth. The modern A1 veers off the Ogilby line just south of Helm and does not rejoin it until near Shilbottle, having been straightened over this section (and in some places looking more Roman than the likely Roman alignment). Other bypasses occur around Alnwick and Belford.5
Table of key locations
Route B: Berwick to Inveresk (Figure 33, B)
Summary
This route links the northern end of the Devil’s Causeway and the Newcastle/ Tweedmouth route, via Dunbar, to Dere Street at Inveresk.
Introduction
Cul-de-sacs are unusual in the Roman road system, and one of the most prominent is the Devil’s Causeway (Margary 87) which runs from just north of Hadrian’s Wall to Tweedmouth. A limited number of first century AD Roman sites are known along it, including Longshaws and Learchild, whilst finds from Wooperton may indicate the proximity of another such site. However, it is a road with no purpose: no major site has as yet been identified at Tweedmouth and, as was noted earlier in relation to Bewcastle, roads that appear to be dead-ends may in fact have continued in antiquity. Because of the supposed absence of Roman roads in the south-east of Scotland (north of the Tweed, south of the Forth, and east of Dere Street), that region has often been thought of as an ally of Rome which did not require pacification, but is the lack of roads real or illusory?6
Much of the course of this route has already been identified and published, albeit without recognizing its significance as part of the Roman road network. If this road is Roman in origin or at least use then the Devil’s Causeway ceases to be a cul-de-sac and starts to make sense as part of a communication system running up through the eastern lowlands.7
Historical role
Historically, the movements of a saint and of kings and their armies have already been alluded to as significant indicators of a route between Newcastle upon Tyne and Tweedmouth and, north of the Tweed, between Berwick-upon-Tweed and Dunbar and then west towards Edinburgh. The first indications come from the perambulations of St Cuthbert’s corpse, first withdrawn west and then south to avoid Viking incursions in AD 875, and then taken north to avoid William’s harrying of the north, before ultimately ending up in Durham. Athelstan’s campaign into Scotland, accompanied by a fleet, suggests he will have kept to an east coast route. King John’s journey up to Norham extends the route whilst the itinerary of Edward I confirms that and extends it north of the Tweed to Dunbar and then west to Edinburgh. Edward I’s siege of Berwick-upon-Tweed and battle at Dunbar are of note, as of course is Edward III’s victory over the Scots at Halidon Hill, just west of Berwick. The Battle of Piperdean occurred to the north of Coldingham, where our putative road would cross the moor, whilst the seventeenth century Battle of Pinkie and eighteenth century Battle of Prestonpans ocurred on the route.
The suggested location of Tweedmouth castle may also have been the site of a Roman fort and was well-placed to supervise the southern terminus of a crossing of the Tweed.8
Brief description
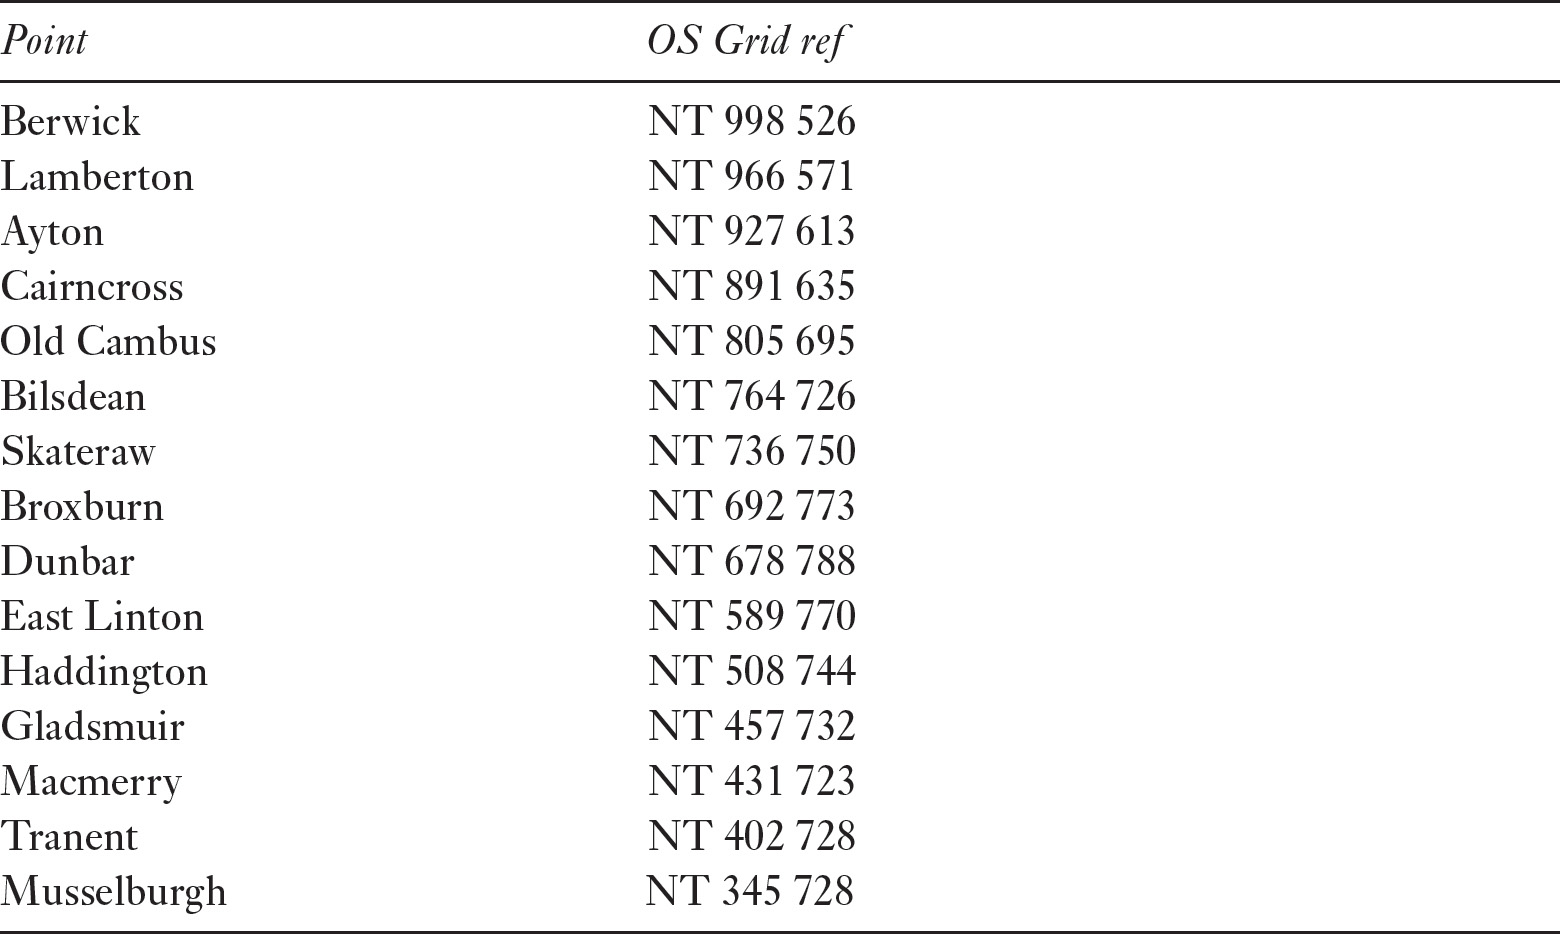
The most likely Roman bridging point would have coincided with the lowest ford of the Tweed, between Tweedmouth church and Sandgate in Berwick. The subsequent medieval and post-medieval bridges were moved slightly upstream, but the prominence of the route through Sandgate, Hide Hill, Church Street, Wallace Green and Low Greens (the line now partly obliterated by both the medieval and Elizabethan defences but evident on Speed’s map of the town) to rejoin the Great North Road near Bede Avenue must be more than coincidental.9
Archaeologically, an appropriate route of some antiquity has long been identified to the north of Berwick that not only pre-dates the construction of the new Berwick to Dunbar post road, opened around 1810 but seems to be earlier than the turnpike trusts in this area. The road runs from Berwick, up to Lamberton, past the nineteenth century Ayton Castle (which displaced the original village of Ayton, through which the road ran) and onto Coldingham Moor. It leaves the higher ground, crosses the Piperdean Burn at Head Chester, near Cockburnspath, and its course is then rejoined by the replacement post road (which has instead avoided the higher ground by following the line of the Eye Water). It next has to negotiate the Pease Burn before it proceeds via Skateraw to Dunbar in straight stretches, and thence westwards towards Inveresk.10
In terms of its alignment, it resembles other known and proven Roman roads in that it utilizes straight lengths of road where possible. There is also a limited amount of place-name evidence to support the identification, including Chester Hill fort (NT 952 601), Chesterdale Plantation (NT 937 604), The Chesters (NT 800 675), and – as has just been mentioned – Head Chester on the Piperdean Burn (NT 816 693).
This route passes standing stones at Kirklandhill (near Dunbar) and Pencraig Hill (East Linton), and a hoard of Roman-period metalwork was found near to it on Lamberton Moor. The Coldingham Moor section was replaced as the principal post road from Berwick to Edinburgh by the new mail road in 1810, the course of which was for many years reflected by the A1 and stretches of which are still shadowed by the A1(M) between Dunbar and Tranent.11
Table of key locations
Route C: Tweedmouth to Maxton via Cornhill (Figure 33, C)
Summary
This road forms a direct link along the Tweed from the northern end of both the Devil’s Causeway and the Newcastle/Tweedmouth route to Dere Street at Newstead.
Introduction
The likelihood that there was at the very least a prehistoric route up the south side of the Tweed valley is betrayed by a series of Roman camps, including Norham, East Learmouth, Mindrum, Carham, Wooden House Farm, and (assuming it does not relate to Dere Street and is indeed a camp) Maxton. The turnpike road, followed now by the course of the A698, shows every sign of being an aligned Roman successor which met Margary 8 south of Maxton and was probably contiguous with Margary 89. The latter road had its own series of associated camps at Milrighall, Oakwood, Eastcote, and Cavers Mains. A separate series of camps continued up the Tweed beyond Newstead, at Innerleithen and Eshiels, linking with Lyne.12
Historical role
The Battle of Carham in 1018 between the Scots and Northumbrians may show a use of this road, but without any information about army movements, it can really only be noted. Carham is 2.5 km from Wark, with its important ford of the Tweed, so the armies’ movements could have been east–west or north–south. An important sequence of medieval fortifications lay along the Tweed which, for part of its length, formed the border between England and Scotland, as a direct result of that 1018 Scots’ victory. These included Tweedmouth, Norham, Twizell, Cornhill, Wark, and Roxburgh, and most of them either guarded fords or bridges across the river and some were equipped with both. The value of these sites is demonstrated by repeated Scottish attacks on them and typified by the Franco-Scottish foray along the Tweed in 1385 and the English use of the route that culminated in the Battle of Haddon Rigg (near Carham) in 1542 and the attack on Kelso shortly after.13
Brief description
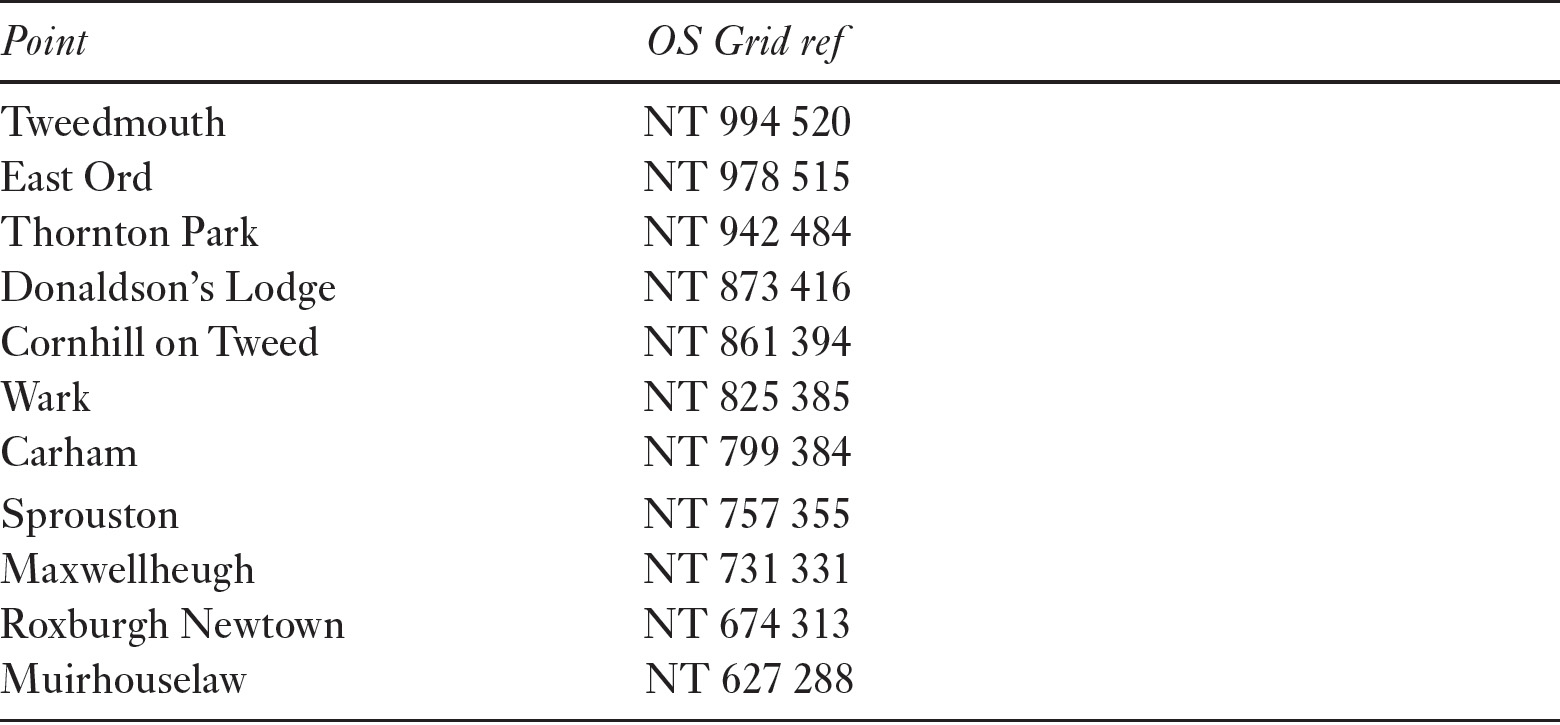
The road leaves Tweedmouth near the putative site of the medieval castle and its route is marked first by field boundaries before being taken up by the turnpike road through East Ord and continuing towards Thornton Park. Crossing the Till at Twizel, it proceeded through Donaldson’s Lodge on its way to Cornhill and a junction with route F. Passing next through Wark, Carham, and Sprouston, it must have arrived at Maxwellheugh prior to crossing the Teviot somewhere near Roxburgh castle. It probably continued past Trows and Rutherford, ultimately joining Margary 8 (Dere Street). A further continuation to the west seems likely to join Margary 89, traced to just 3.6 km to the south-west of the main road.
Like other Roman roads, it makes use of straight lengths of road where possible and there is some place-name evidence to support its identification as Roman, including Holy Chesters near Donaldson’s Lodge.14
This route passes within 3 km of a stone circle at Duddo but this seems unlikely to be significant unless it relates to the earlier prehistoric route exploited by the Roman camps along the Tweed (East Learmouth camp is a similar distance south of the proposed Roman route).15
Table of key locations
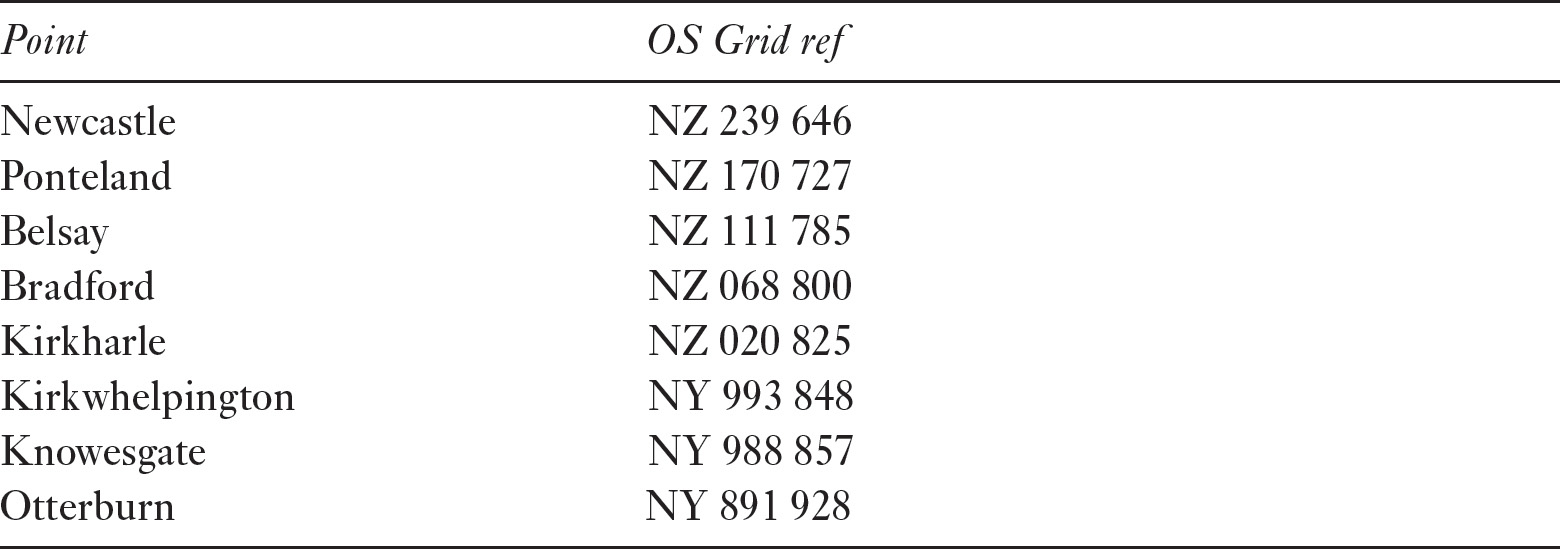
Route D: Newcastle to Otterburn (Figure 33, D)
Summary
This road forms a direct link from Newcastle to the southern middle section of Dere Street.
Introduction
Given the certainty of a Tyne crossing at Newcastle, this forms a convenient and logical link to join with Margary 8 (Dere Street), close to the site of the Battle of Otterburn. The proximity of the battle site to the better-known road means this route could be dismissed, were it not for its use by both the Scots and English, moving north-westwards from Newcastle.16
Historical role
The route only really features in that one major conflict, which comprised the Scots’ withdrawal from Newcastle and their pursuit by the English, culminating in the Battle of Otterburn in 1388. Initially, the Scots mustered for their raid at Southdean (near Hawick) then attacked Prudhoe, demonstrating the use of Dere Street on their way south, but chose to use a different route back – via Ponteland – which was more direct. This may have had something to do with the fact that the Duke of Northumberland was occupying Alnwick and thereby blocking the east coast route (A).17
Brief description
The route would presumably have passed through Hadrian’s Wall by means of the same gateway as route A, but then headed north-westwards along what is now the A189, the B6918 (formerly the A696) to Ponteland, and then the A696 proper. It then passes through Belsay and Cambo before turning onto a more easterly course, crosses the line of the Devil’s Causeway (Margary 87) near a (tentatively dated) Roman-period rectangular earthwork at Edgehouse (NZ 053 806), just south of Ferney Chesters farm. On through Kirkharle, Kirkwhelpington, and Knowesgate, it passes the significantly named Raechester before reaching Otterburn and a junction with the Dere Street (Margary 8).
There is some place-name evidence that seems to support the case for the route, including Ferney Chesters and Raechester.18
Table of key locations
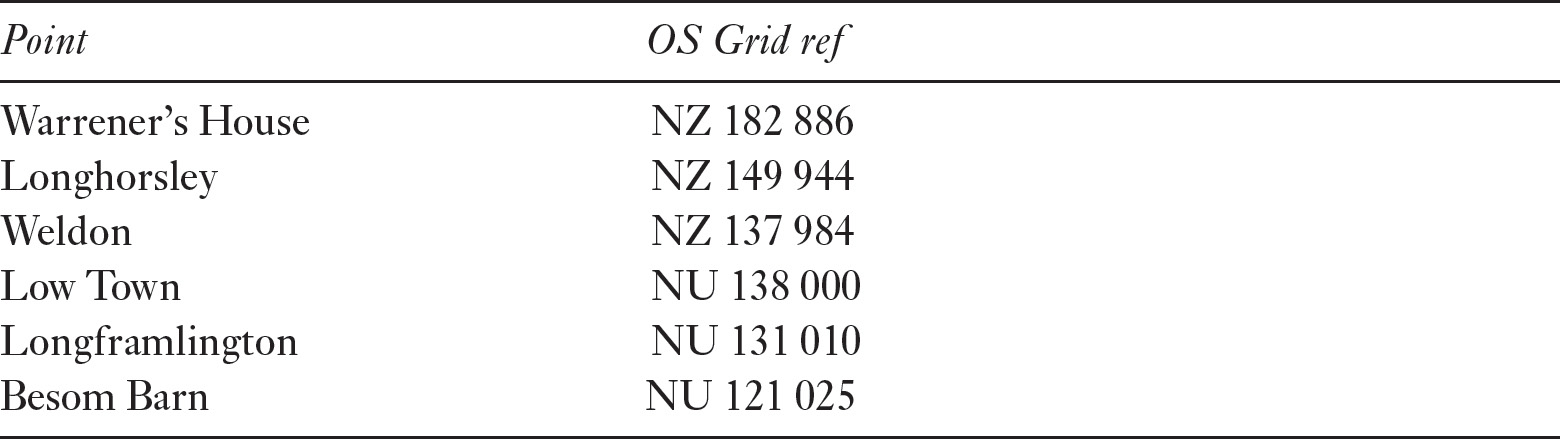
Route E: Morpeth to Longhorsley (Figure 33, E)
Summary
This road provides a link from the east coast route (A) to the Devil’s Causeway (Margary 87) and is now followed by the southern portion of the A697.
Introduction
As with the first part of the Newcastle to Berwick route, this road was included by Codrington, ignored by Margary, but subsequently reinstated.19
Historical role
The Scottish raid that culminated in the Battle of Homildon Hill in 1402 involved a return march from Newcastle which was intercepted by Hotspur near Wooler, so the Morpeth to Longhorsley spur would have been used for that. Similarly, when the Marquis of Montagu led his Yorkist force north from Newcastle in 1484 to arrive at Hedgeley Moor on their way to Norham, he would have taken this road.20
Brief description
The road forks from the Great North Road (Route A) at Warrener’s House, to the north-west of Morpeth. It then continues to Longhorsley and on to cross the Coquet near Weldon (the modern road has been artificially straightened now so that it resembles a Roman road but the true alignment lay obliquely to it). It continues through Low Town to Longframlington to join the Devil’s Causeway just to the north of the village near Besom Barn.
No appropriate place-name evidence is recorded.
Table of key locations
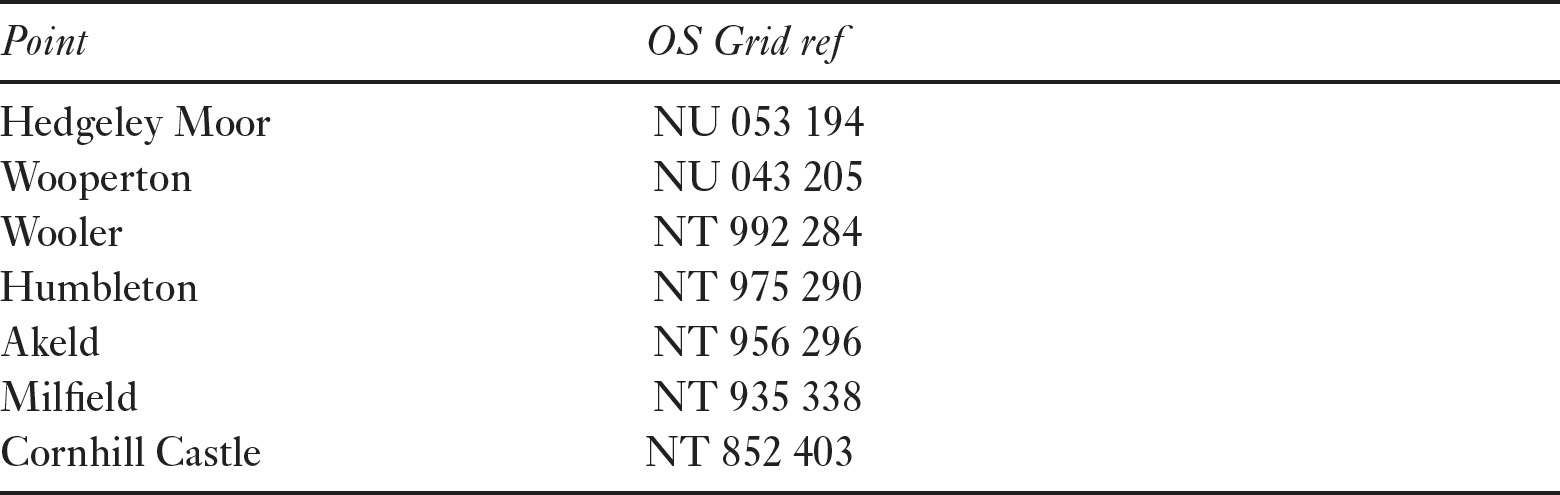
Route F: Percy’s Cross to Cornhill (Figure 33, F)
Summary
This road, together with the Coldstream to Carfraemill section, is a part of a link from the Devil’s Causeway to the northern middle section of Dere Street.
Introduction
The modern A697 road, still on Telford’s line, diverges from the Devil’s Causeway at Hedgeley Moor and a possible Roman course can be detected for much of its length towards Cornhill.21
Historical role
The battles of Homildon Hill, Hedgeley Moor, Flodden, and Yeavering all took place close to the course of this route and most depended upon its existence.
The location of Cornhill Castle (possibly only ever a timber fortification, being replaced after 1385 by a stone tower in Cornhill itself) downstream on the Tweed now seems slightly incongruous, given the location of the eighteenth century bridge over the river at Coldstream, but makes more sense when it is understood to have been placed to control an older crossing point (the other medieval castles along the Tweed are all placed at crossing points, either by bridge or ford).22
Brief description
From the junction at Percy’s Cross on Hedgeley Moor, the route heads through Wooperton and on to Wooler where it changes to a more easterly course. Passing Humbleton it reaches Akeld and changes back to a more northerly course again, although the continuation of a branch road through Kirknewton and Kirk Yetholm may be indicated by its use by Edward I in August 1304 on his way from Jedburgh to Bolton in Northumberland. The main road continues in a north-westerly direction through Milfield, after which it continues to Cornhill, perhaps by the modern route of the A697, although a more direct north-easterly route passing to the south of Branxton and avoiding that dog-leg is also a possibility. As it nears Cornhill it continues on to cross the Tweed near Cornhill Castle.
There is a Bowchester place-name near Humbleton, whilst the so-called Battle Stone near Homildon Hill is prehistoric and may indicate an early route.23
Table of key locations
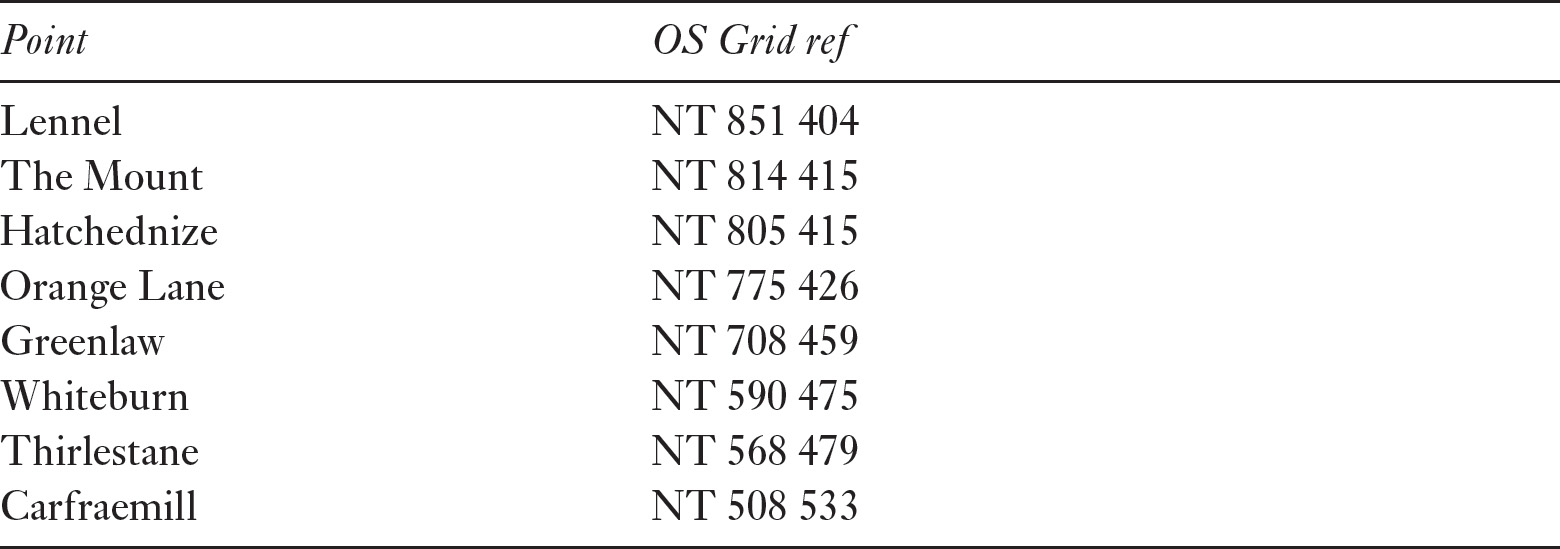
Route G: Coldstream to Carfraemill (Figure 33, G)
Summary
This road, together with the Percy’s Cross to Cornhill section, is a part of a link from the Devil’s Causeway to the middle section of Dere Street.
Introduction
For the most part, this road coincides with Telford’s alternative to the Great North Road, now the A697.24
Historical role
Although the bridge at Coldstream is eighteenth century in date, there have long been at least two crossings of the Tweed in the vicinity and, as has already been discussed, one probably lay close to Cornhill Castle, where there was a ford to Lennel. Just north-west of Coldstream, the road passes close to the site of the motte and bailey castle of The Mount, near The Hirsel, clearly demonstrating the importance of the route in the medieval period.25
Brief description
From a crossing point near Lennel on the modern Scottish side, the road may have passed to the north of the Hirsel, to join the route of the A697 near Hatchednize, proceeding through Orange Lane to Greenlaw, to pass through Whiteburn and Thirlestane but turn northwards before reaching Lauder.
Place-name evidence includes Darnchester and Belchester near The Hirsel and Rowchester just south of – and Chesters north-east of – Greenlaw.26
Table of key locations
Routes H to J are much harder to define than the other routes with few characteristic straight sections to give them away (and in the Scottish Borders, straight road lengths were frequently a by-product of enclosure and estate formation). Nevertheless, their historical use suggests that something approximating to the following routes existed.
Route H: Birkenside to Springhill (Figure 33, H)
Summary
This road, together with the Maxwellheugh to Akeld section, is a part of a link from the Devil’s Causeway to the southern middle section of Dere Street.
Introduction
This road may have approximated to the course of the modern B6397 from Earlston to Kelso.27
Historical role
Edward I passed from Lauder to Roxburgh in 1296 and a French force under Jean de Vienne may have used the same route in 1385.28
Brief description
The route forked from Dere Street somewhere in the region of Nether Blainslie and Birkenside, passing Smailholm on its way down to the well-attested Tweed crossing near Floors Castle that gave access to the strategically significant Roxburgh Castle.
There are no characteristic straight sections of road and no place-name evidence to support the suggested route.
Table of key locations

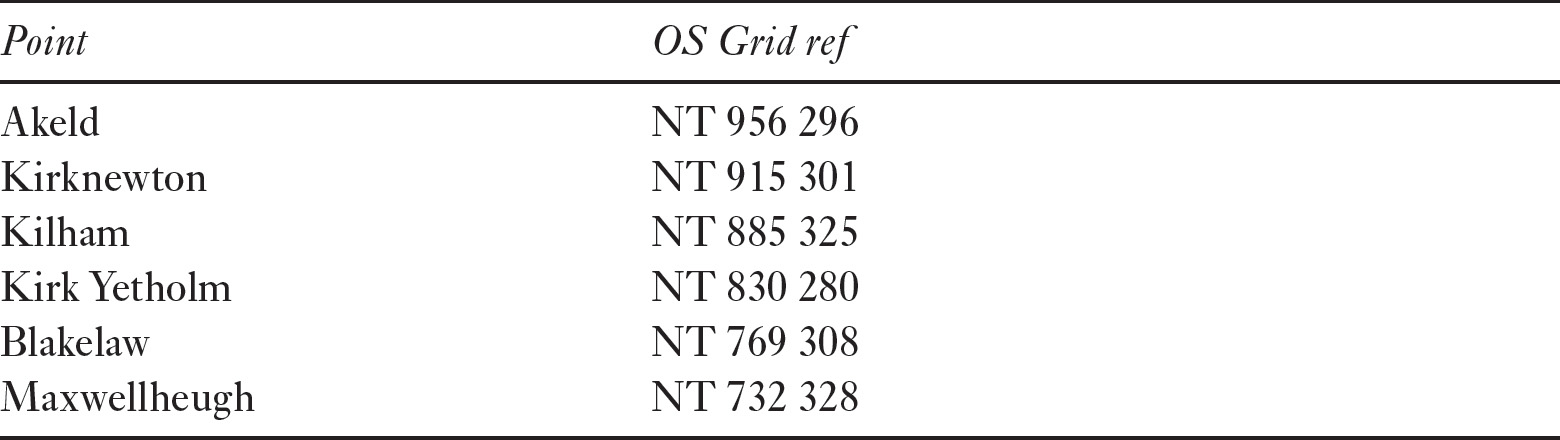
Route I: Maxwellheugh to Akeld (Figure 33, I)
Summary
This route, together with the Birkenside to Springhill section, is a part of a link from the Devil’s Causeway to the southern middle section of Dere Street.
Introduction
There are few very obviously straight stretches here so this may well just have been a prehistoric track that continued in use as a convenient shortcut through the Cheviots.
Historical role
As mentioned above, Edward I’s route from Jedburgh to Bolton in 1304 must have used this route.29
Brief description
This route continues the line of Route F from Akeld and probably passed through Kirknewton, Kilham, Kirk Yetholm, Blakelaw and finally Maxwellheugh. There is no place-name evidence to assist in the identification of the course, but the generalities of the route seem likely.
Table of key locations
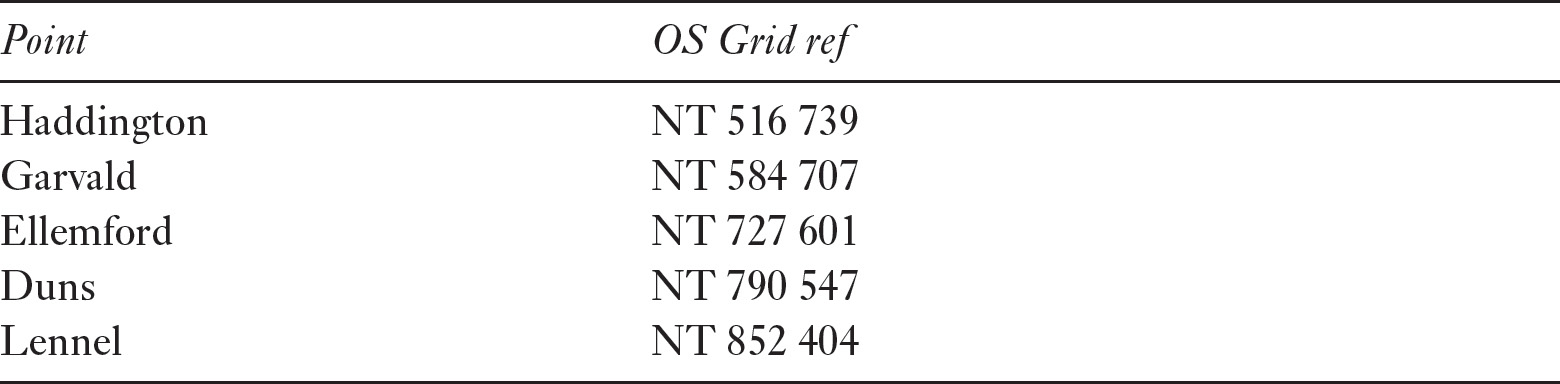
Route J: Haddington to the Whiteadder (Figure 33, J)
Summary
This route would link the east coast route to a possible Tweed crossing, perhaps at Wark (where the castle guarded a ford). It evidently began at Haddington and crossed the Lammermuirs to descend into the Merse somewhere near Duns, possibly making for the ford at Lennel.
Introduction
The fact that it is only used twice that we know of, and by the same monarch, suggests it did not enjoy the popularity (and familiarity) of the east coast and central routes, but a Roman origin is nevertheless rendered likely by its use to haul artillery on both occasions. The modern (and turnpiked) road followed the river valleys, but – in the central portion at least – an earlier cross-country route can be discerned.30
Historical role
The route was used by James IV first for hauling his artillery to attack Norham Castle in 1497 and next when he mustered his forces at Ellemford.31
Brief description
The route evidently began at Haddington and crossed the Lammermuirs via Ellemford and Duns, probably leading down to a crossing of the Tweed near Coldstream. Between Haddington and Ellemford the route is very unclear, but may have passed Garvald before crossing the moors north-west of Ellemford. A Whitchester place-name to the south-east of Ellemford is of interest, as is Chesters near Whitelaw Hill, as well as Stoneypath to the east of Garvald.32
Table of key locations
Conclusion
It can be seen, therefore, that sufficient evidence, in terms of discernible alignments, place-names, and (most notably) frequent use by armies in the medieval and post-medieval period, is available to suggest that a network of Roman roads existed north of Hadrian’s Wall and east of Dere Street. This notion finds some support in the list of military movements and especially battles – including the battles of Dunbar (1296, 1650), Halidon Hill (1333), Piperdene (1436), Pinkie (1547), the siege of Haddington (1548–9), and the Battle of Prestonpans (1745) and part at least even appears on the fraudulent Bertram map (probably more a matter of coincidence or clairvoyance than accurate reportage: see page 112). From an archaeological point of view, there is at the very least a good case for further investigation.
There is however more to this than meets the eye, for the network described here is clearly phased and each component can be seen to have had a specific purpose. The Roman preference for the east coast route to Newcastle (Margary 80) during the Antonine period is indicated by the provision of new forts at both Chester-le-Street and Newcastle at this time. It is possible that the bridge over the Tyne, the Pons Aelius, may also date to this period but in the absence of any physical verifiable remains until now, incapable of proof.33
The proposed network north of the Tyne would thus have overcome one of the major weaknesses of the established Dere Street route into Scotland: its all-weather failings. At two points, in the hills south of the Tyne valley and at Soutra, Dere Street was (and still is) vulnerable to closure by snow during the winter months. Margary 80 south of the Tyne and the network described here would have worked around these shortcomings to provide better access to the north at such times, whilst tying the new alternative routes into the existing system in as many places as possible.