

If you’re comfortable with iWeb, let’s start blogging! You’ll be amazed at how easy it is. This chapter assumes you know how to edit text and graphics, as explained in detail in Chapter 2.
These are the steps you’ll go through to set up your blog:
1. Create a “Blog” set of pages in your new site.
2. Edit the text and graphics on the “Entries” page.
3. Click the button to publish it.
Create a Blog!
Okay, there is lots more to tell you about designing the pages in iWeb, but we know your point in reading this book is to set up a blog (and/or a podcast). So let’s do it. We assume you now have a Welcome page and that you feel fairly comfortable with editing the text and graphics.
To add a blog page:
1. In iWeb, click the + button at the bottom-left of the screen.
2. In the sheet that drops down, shown below, your template master is probably already highlighted on the left (if not, find it and single-click on it).
On the right side of the pane, double-click on the “Blog” page, shown circled below.
3. Now edit your blog as you learned in Chapter 2 (see the opposite page)!

You really don’t have to make sure all of your pages are from the same template—feel free to mix and match.
Edit your Blog
The “Entries” page shows up waiting for you to replace the existing text with your own words. In the example below, the title of the blog is even highlighted for you. Replace, edit, and customize the text and graphics just as you learned in the previous chapter.
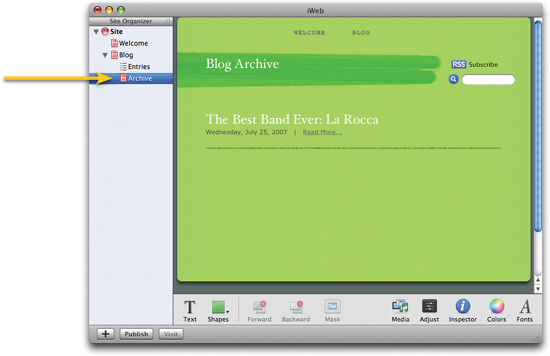
The “Blog” page you added is actually a collection of three pages, as you can see in the Site Organizer below: Blog, Entries, and Archive. Each of these pages has a very important and separate purpose, explained on the following pages.

The “Blog” Set of Pages
When you add a Blog, iWeb actually adds a set of three pages, as you can see in the Site Organizer. Each of these pages has a very important function. Click the link in the Site Organizer to show the page.
The “Blog” page
This is the page your visitors will see on your site once it’s posted to the web. You can edit everything on this page except the blog itself, the piece you see circled in the graphic below. You can’t edit this because iWeb automatically generates this from your blog entry, as shown on the next page. You can resize this text block or move it, but don’t delete it.

To publish your site so you can check it out along the way, just click the “Publish” button at the bottom-left of the iWeb window and it will publish to your .Mac account. For details, see Chapter 8.
The “Entries” page
This is where you will update your blog.
Whenever you feel so inclined, come to the Entries page, add a new entry, edit the text and graphics, and publish.
• Make a new entry: Click the button “Add Entry,” then replace the existing text and graphics.
• Delete an entry: Select an entry name in the top list of entries, then click the “Delete Entry” button.
• Change the date: You can pre- or post-date your entries by double-clicking on the date in the upper-right column. Change the date, then click anywhere on the iWeb page.

The “Archive” page
iWeb updates this page whenever you add a new blog entry. You can’t do anything to this page except change the title and rearrange items. iWeb automatically generates this page and the text, based on your blogs.
When visitors to your blog click the “Go to Archive” button on your blog page, it takes them to this Archive page where iWeb has created linked excerpts of each blog. (You control how much of the excerpt is visible on the Archives page using the Blog Inspector; see page 29.)
Allow comments on your blog
Many bloggers like to allow visitors to add their own comments. iWeb allows you to add this feature to your blogs, and also gives you the ability to delete visitor comments, if necessary. You can also allow visitors to post attachments, such as photos or files, for other people to access on your blog.
To allow comments and attached files on your blog page:
1. In iWeb, go to the Site Organizer and click on the main blog page titled “Blog.”
2. If the Inspector isn’t showing, click the “Inspector” icon in the bottom-right of the iWeb window to make it appear.

3. In the Inspector, single-click on the “Blog & Podcast” icon, as shown below, then make sure the “Blog” tab is selected.

4. Check the box to “Allow comments.”
If you want to allow visitors to upload attachments, check that box as well.
5. Save and publish your site (click the “Publish” button at the bottom-left of the iWeb window; see Chapter 8 for details).
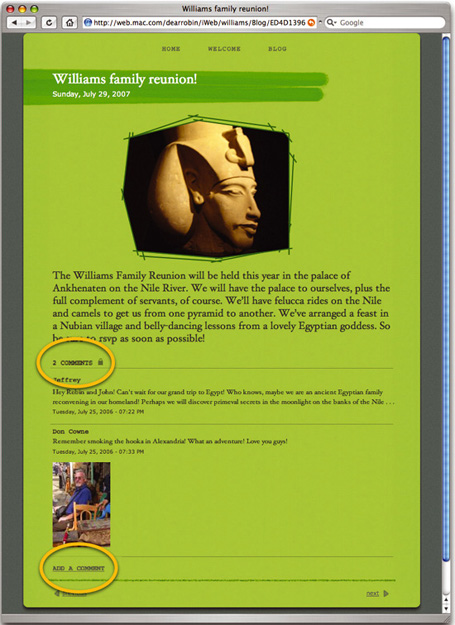
Visitors will now see a link to “ADD A COMMENT,” as shown below.
Add a comment
When visitors go to your page and click the link to add a comment, they will get a window like the one shown on the opposite page. They’ll type their comment and sign a name in the “Comment as” field. If they add a URL (web address), their name becomes a link that goes to that web address. If they add an email address, their name becomes an email link.
Every commenter must enter the characters shown in the blue image to prevent automated spam from showing up on your blog.
If you have allowed attachments, the commenter can click the blue link to “Add Attachment.” The “Choose File” button appears, as shown below-right. The commenter clicks the button, finds the file they want to upload, and off it goes. You can see on the opposite page an example of a photo that someone uploaded (attached) to the blog page.

You’ve got comments!
When someone posts a comment, iWeb tells you in two ways—if iWeb is open on your Mac. The icon in the Dock displays a number, like the Mail application, telling you how many new comments have been posted. And the Site Organizer in iWeb displays a blue dot next to the Blog page that has new comments.

Delete a comment
On the opposite page, you can see a lock icon next to the number of comments. Click that lock icon, enter your .Mac account name and password, and you can choose to delete any comment.

All Done?
Once you’ve written your blog and designed the site pages, you’re ready to publish your iWeb site and begin your blogging empire. A typical, ready-to-publish site is shown below. Your site will look different, of course, depending on the template you chose and the content you created.
You can click the “Publish” button at the bottom-left of the iWeb window to publish the site to your .Mac account, or see Chapter 8 if you want more details first.

To Update your Blog
Add a new entry, then click the Publish button!