
CHAPTER FIVE
Sallenelles to Merville Battery
Distance between stops by vehicle: 4.25 miles (6.84km)
Total walking distance at stops: Approx 1.5miles (2.41km)
Recommended time allowed for tour: 3 to 4 hours
If your arrival in France is by ferry at Ouistreham then head for Pegasus Bridge. This can be found by taking the D514 to Bénouville. Alternatively, if you are approaching from Caen, take the D515 (signposted for Ouistreham car ferry) until you see the sign for Bénouville on the D514. Take this road, go straight on at the roundabout and you will see the new Pegasus Bridge in front of you over the Caen Canal. Continue across Pegasus Bridge and across Horsa Bridge and at the next roundabout take the third exit, continuing along the D514 for approximately 2.3 miles (3.7km) until you reach the village of Sallenelles.
This tour begins in the village of Sallenelles. Drive into the village and turn right at the crossroads onto the D37b and drive for approximately 520 yards (475m) up to the top of the hill.
A. Sallenelles
On the left-hand side of the road, on a marble plinth and between two flag poles, is a bronze:
1) Memorial Plaque to No. 4 Special Service Bde. This memorial is dedicated to the men of 4 SS Bde HQ, 41,46,47 & 48 RM Cdo who gave their lives in the fighting, from June to August 1944, while holding positions in this area.
Drive back down into Sallenelles and turn right at the crossroads back onto the D514. Approximately 130 yards (119m) on the left-hand side of the road on the boundary wall between houses No. 13 and No. 15, and beneath a lamppost, there is a:
2) Memorial Plaque to Edouard Gérard. This memorial is in memory of the first Belgian soldier of the 1 Belgian Piron Bde to be killed in Normandy on 16 August 1944. Only twenty years old he was also the youngest member of the regiment to be killed in Normandy.
Continue to drive along the D514 for about 175 yards (160m) and on the left there is a stone:
3) 1 Belgian Bde and Colonel Jean Piron Memorial. This memorial is dedicated to the Belgian and Luxembourg soldiers of 1 Brigade Belge and their commander Colonel Jean Piron. Otherwise known as the Brigade Piron, or 1 Belgian Piron Bde, they were No. 4 Troop of the multinational 10 (IA) Cdo.
Total area covered in four car tours
For simplicity the following four tours are shown as one continuous route. However, with the use of the area titles the tour can easily be picked up at any point. Individual memorials and places of interest can be easily found using the list in Appendix D. This also gives individual satellite navigation coordinates to help with location.


One of the gliderborne troopers of A Coy 9 Para with German prisoner on the road to Sallenelles (D514). Note the skull and crossbones on the front of his smock. This was painted wth luminescent paint to help distinguish A Coy from German troops after their planned glider landing within the Merville Battery.

Sallenelles was the scene of heavy fighting for the Piron Bde between 14 August and 17 August. It was during this time they took their first casualties. On the stone memorial there is also a plaque dedicated, in 2004, by the people of Sallenelles to those from Brigade Piron who lost their lives for the liberation of Sallenelles. Those named are: Réne de Queker, Henri Duchesnes, Edouard Gérard, Petrus J. L. Harboort, Julius Leysen and Raymond Vanremoortele (see Ch. 5, B5, D21 & Battleground Europe book Pegasus Bridge & Horsa Bridge Ch. 7, B1, B8 & B18).
Continue along the D514 for 0.5 miles (0.8km) and on your left you will see some German bunkers that were originally part of a:
4) German Naval Radar Station. These bunkers have now been turned into a nightclub called The Bunker. In 1944 it was one of the objectives assigned to Lieutenant Colonel Otway and the men of 9 Para. However, after the attack on the Merville Battery Otway decided that his remaining force would be put to better use in taking the more important secondary objective of the high ground near Amfréville.
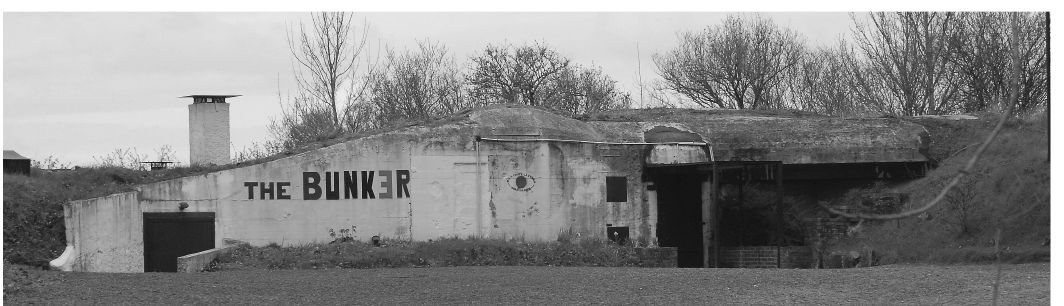
German naval radar station now a nightclub called The Bunker.
B. Merville-Franceville-Plage
Continue along the D514 and at approximately 800 yards (732m) take the next left turning, immediately after the pumping station and signposted Base Nautique de Franceville. Follow the road down to the car park, by the beach, in the Estuaire de L’Orne. Warning! Do not leave any valuables in your car in this area. From the northernmost point of the car park there is, approximately 130 yards (119m) due north, a large German bunker (type H612), one of many in this area. Continue past this, turn right and follow the first stretch of open sand that runs between the brushwood-covered sand dunes heading due north-east for a further 200 yards (183m) this will bring you to a reinforced concrete shelter observation post. It is this position that it is most widely believed to have been used as:

1) The Merville Battery Observation Post. From this bunker, in 1944, the Orne Canal locks, Ouistreham, SWORD Beach and, later, the massive Allied naval fleet could be clearly seen. Firing orders would have been passed to the Merville Battery via underground armoured covered telephone cable. On 6 June 1944 Oberleutnant Raimund Steiner, commander of the Merville Battery, was in his observation bunker and was awoken by a telephone call in the early hours with news that the battery was under attack (see Ch. 5, D28). This area of beach, east of the Orne Estuary, was not a designated landing beach on D-Day for the Allies. Although the Allies made swift progress on SWORD Beach, the start of which can be seen if you look west to the other side of the Orne Estuary, the bunkers on this side of the Orne Estuary were not abandoned by the Germans until mid-August 1944.
There are many bunkers in this immediate area as it was one of the many large fortified areas that formed part of Hitler’s Festung Europa. This particular strongpoint had been identified as Wiederstandnest (WN), aka Stützpunkt (Stp), 05. Its position here provided defence for the eastern flank of the Orne Estuary and Ouistreham. Amongst the many reinforced concrete structures are a variety of gun casemates, personnel shelters, tobruk pits and observation bunkers. The fire protection would come from the two type H506 casemates and the one type H612. The latter was positioned to provide enfilade fire across the Orne Estuary. The observation bunker for the Merville Battery was within this fortified complex.
The sand dunes, dense scrub and undergrowth can make access up to some of these positions difficult though and the ever-changing terrain periodically covers and uncovers the many defence positions at different times of the year. All entrances to bunkers are blocked up and so no efforts should be made to try and enter any of them.
Within the area of the German strongpoint complex there is also an ancient coastal defence battery, today surrounded by high sand dunes. Although not an integral part of the German fortifications the Germans had mounted a tank turret on top of the fort and which can be clearly seen today if standing on the surrounding sand dune. It is most likely the Germans would have used the building for storing supplies as well. This impressive fortification is often credited as the work of Marshal Sebastien le Pestre de Vauban (1633-1707) and is sometimes referred to as the Vauban Redoubt de Merville. It was, however, actually built in the late eighteenth century (1779), many years after the death of the famous military architect, but built in part, to his original designs. Vauban does have another connection with twentieth century warfare as he is also credited with the invention of the bayonet in 1689.



Return to your vehicle and drive back onto the D515 turning left towards Merville-Franceville-Plage. Continue until you reach the roundabout and take the first exit on your right. Parking spaces are available on your left after the turning. On the opposite side of the road you will see a number of memorials between four flagpoles, including from left to right:
2) No. 45 Royal Marine Commando Memorial. This is dedicated to the thirty-five men of 45 RM Cdo who were killed in Merville-Franceville in between 6 and 8 June 1944. Next, to your right, is a:
3) Memorial to Allied Soldiers and Merville-Franceville Civilians. This was presented by the Comité du Débarquement, in memory of those civilians and Allied soldiers killed in this area between June and August 1944. To your right there is:
4) Merville-Franceville Village Memorial. This memorial is dedicated to the local inhabitants who lost their lives fighting in both the First and Second World Wars. It has also been placed here in memory of those civilians who lost their lives after being deported or in the fighting during the 1940s. Next on the right is:
5) Belgian Piron Brigade Memorial. Placed in memory of the two Belgian NCOs, Sergent Zenon Boon and Sergent Francois Raquet, and the two privates, Soldat Guy Poncelet and Soldat Raymond de Ridder, of 1 Belgian Piron Bde. All were killed in Merville-Franceville on 18 August 1944 during the fighting for its liberation.
Return to your car and continue to drive through the village and along the Avenue Alexandre de Lavergne and follow the signs for Musée de la Batterie de Merville. On entering the small village of Merville follow the road around to your left and 50 yards (46m) on your left is:
C. Merville Churchyard
On the right hand gatepost leading into Merville churchyard there is a:

Merville Church.
1) Commonwealth War Graves Commission Plaque. This green plaque with white writing has been placed here by the CWGC to signify that within the churchyard grounds there are buried members of the Commonwealth forces. In this particular churchyard there is an:
2) Unknown First World War Soldier’s Headstone. This casualty, with the distinctive white Portland stone headstone, is an unknown soldier of The Great War from the Royal Army Medical Corps. There was no fighting in this area of France during the First World War, and CWGC documents record that this drowned body was found on the 3 August 1917. There is also one other CWGC headstone in this churchyard:
3) Sergeant A.K. Eley and RAF Aircrew Headstone. The only confirmed identified casualty in this burial plot is RAF Lancaster air gunner, Sergeant Alban Kenneth Eley. He is recorded as having died on 18 April 1943. The remaining five unidentified casualties are recorded as having died on 19 April 1943. RAF aircrew records detail all the crew as killed on 18 April 1943.
These six men were part of the seven-man crew of Lancaster Mk I GT-W4849 from No. 156 Sqn RAF. This squadron was part of Pathfinder Force No. 8 Group. At 2121hrs on 18 April 1943 this Lancaster crew, piloted by Sergeant Godfrey S. Cooper, took off from RAF Warboys in Cambridgeshire along with twelve other aircraft. Their objective was la Spezia in the Liguria region on the west coast of northern Italy. During their mission Sergeant Cooper and his crew were reported missing off the French Coast. They had joined No. 156 Sqn less than four weeks previous on 23 March. The remaining twelve aircraft and crew all returned safely from their mission.
Only six of the seven bodies were recovered from Sergeant Cooper’s crashed Lancaster, and only one body, Sergeant Eley, was identified. The remaining crew are now commemorated on the RAF Runnymede Memorial in Surrey, UK: Sergeant G.S. Cooper and twenty-one year old Sergeant K. Coulson on Panel 146; twenty-two year old Sgt D.R. Edwards on Panel 148; twenty year old Sergeant R. Harrison on Panel 152, twenty year old Sergeant J.J. Vaulkhard on Panel 168 and twenty-one year old Sergeant N.O. Robinson (RCAF) on Panel 185.
Before D-Day 156 Sqn had lost 132 aircraft and by the end of the war a total of 153 Halifax, Lancaster and Mosquito aircraft had been lost along with a total of 891 aircrew killed.
The Runnymede Memorial is dedicated to the 20,331 airmen who were lost in Second World War operations and who have no known grave.
Although not officially identified as being buried here in Merville Churvh Yard, there is also at the base of Sergeant Eley and his comrades headstone a:
4) Memorial Plaque to Sergeant J.J. Vaulkhard. In the churchyard there are a number of graves to locals who were killed during the war. Among them is:
5) Andre Alexandre’s Headstone. Andre was a young nine year old boy who was killed during an Allied bombardment on the 20 April 1944. There is also another grave marked by:
6) Jacques Auradou’s Headstone. Master Pilot Auradou served with the French Navy and was killed on 2 May 1945. You will notice in this churchyard a number of identical plaques that have been placed on the graves of certain individuals. These are:
7) Les Anciens Combattants Prisonniers de Guerre Plaques. These memorial plaques have a piece of barbed wire laid over the tricolore along the top and are presented by a French organisation of old comrades that were once prisoners of war. They are now placed on the graves of their fellow comrades who have died since the war. On another grave there is:
8) Les Rescapes Du Marquis Des Glières Plaque. This memorial plaque, dedicated to Monsieur Serge Aubert, is placed here in memory of him having survived his involvement with the Maquis des Glières, a Free French resistance group, during February and March 1944.
From the churchyard continue driving along for approximately 200 yards (183m) and take the next right turn along Avenue de la Batterie de Merville. After another 200 yards (183m) this leads to a circular driveway around which you may park. At the far end of the driveway there is:
D. The Merville Battery Museum
For a detailed explanation of the battle, and alternative tour of the battlefield, see Ch. 3 & 4.
Before you enter the museum, via the wooden building, there are a number of memorials in the gardens and on the grassed area. In addition, in the centre of the circular drive there is:
1) 9 Para Memorial. This memorial commemorates 9 Para and the supporting arms of the Royal Navy, Army and Royal Air Force who attacked the Merville Battery at 0500hrs on 6 June, thus preventing them from firing on the assault beaches. Back towards the entrance and to the left of the wooden building there is:

9 Para Memorial.
2) OVERLORD l’Assault Marker No 1. This is one of many markers of a route called OVERLORD l’Assault (OVERLORD, The Assault). On each marker there is a brief explanation in both French and English of what happened in this particular area. This forms just one of eight such self-guided trails, provided by the Comité Departemental Du Tourisme Du Calvados (CDT Calvados), CDT Manche and CDT Orne, that covers the whole area of Normandy that is associated with the Normandy Campaign. A free information booklet/map called The D-Day Landings And The Battle For Normandy can be picked up at most museums and tourist information outlets in Normandy. This particular trail finishes at the Musée Mémorial de la Bataille de Normandie (Memorial for The Battle of Normandy Museum), in Bayeaux.
To the right of the gateway that leads into the Merville Battery, there are some information boards that detail various aspects of the battery. To the right of these are a number of memorials. The first, under an oak tree, is:
3) Major Charles Strafford Memorial Plaque. This oak tree was planted, and memorial plaque unveiled, on 5 June 1999 in memory of Major Charles Strafford (see Battleground Europe Book Pegasus Bridge & Horsa Bridge Ch. 7, B15 & B19). Next along is a small conifer tree in front of which is:
4) Sergeant Roy William Wright Memorial Plaque (1). Sergeant Wright, 9 Para, passed away in 2008. This tree was planted in his memory and the memorial plaque erected. Sergeant Wright had been wounded in Normandy during the fighting around the Château d’Amfréville and le Plain. Next along, beneath another tree there is:
5) Lieutenant Barney Ross Memorial Plaque. This plaque is dedicated to Lieutenant Ross who was a Company Sergeant Major in 9 Para during the attack on the Merville Battery and who led the attack on No. 3 casemate. He passed away in 2005. Next along, beneath another oak tree is:
6) Lieutenant Colonel Terence Otway Memorial Plaque. The oak tree was planted on 6 June 2007 in memory of the CO of 9 Para. Lieutenant Colonel Otway passed away on 23 July 2006, aged ninety-two years. To your right beneath the next tree is:

Sergeant Sidney Frank Capon.
7) Major William ‘Bill’ Mills Memorial Plaque (1). This tree was planted on 5 June 2006 in memory of Major ‘Bill’ Mills who passed away in 2005. As a captain in Normandy he was engaged in the heavy fighting around the Bois des Monts (see Ch. 6, D5) while defending the ridge there. Beneath the next tree to your right there is:
8) Sergeant Sidney Frank Capon Memorial Plaque. This tree was planted on 6 June 2007 in memory of Sergeant Sid Capon, 9 Para, who passed away on 9 September 2006, aged eighty-two years. Sergeant Capon was in the party that attacked No. 1 casemate on D-Day. He was later seriously wounded by shrapnel in July 1944 (see Ch. 6, D7). Behind where you now stand are two wooden benches. On the first there is, on the backrest, a second:
9) Major William ‘Bill’ Mills Memorial Plaque (2). This wooden bench was donated by his wife. Behind this bench is another bench and on the backrest is a second:
10) Sergeant Roy Wright Memorial Plaque (2). This wooden bench was donated by his wife and family. Now make your way through the wooden building and into the small gift shop. A small admission charge is payable at the desk. As you walk through the building follow the footpath that leads to:
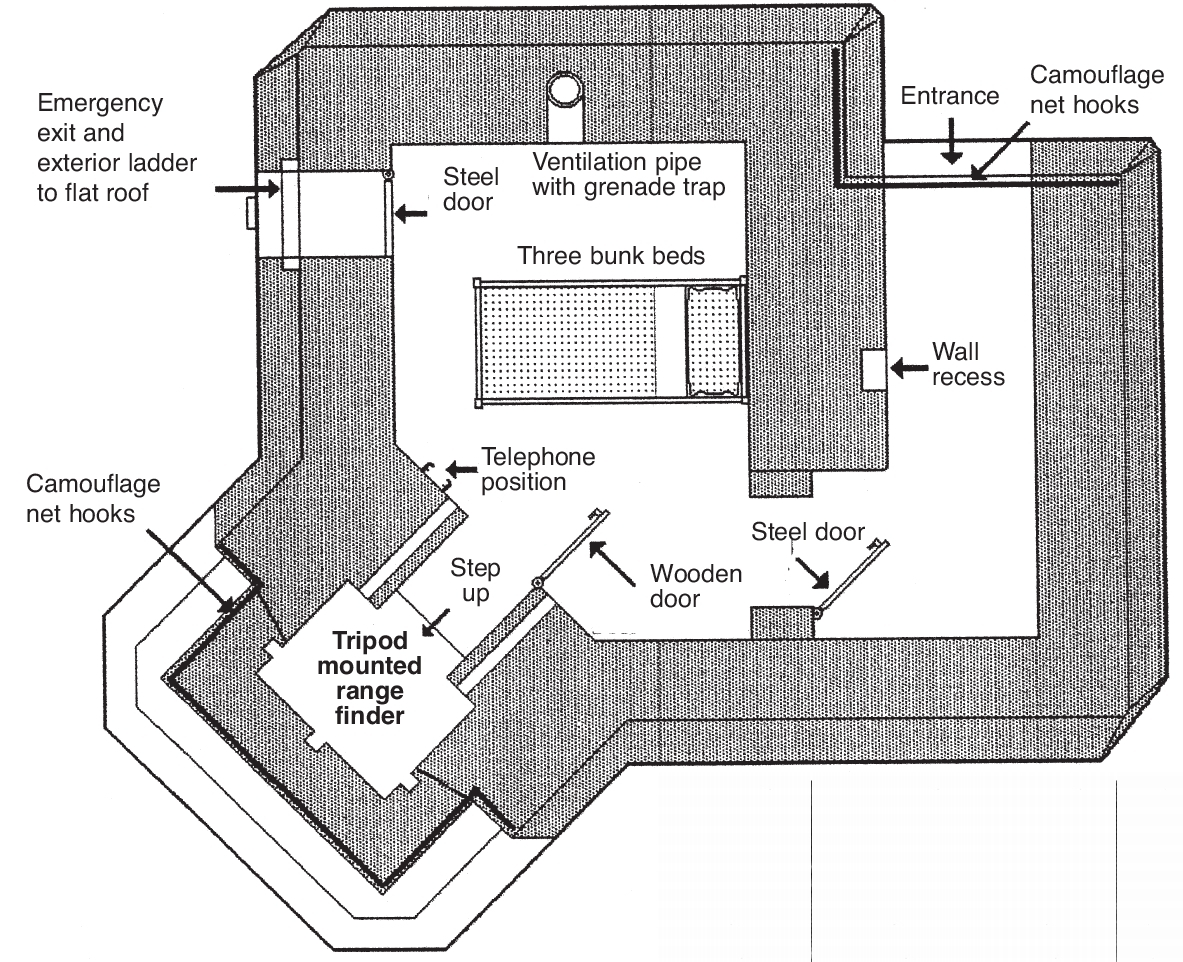
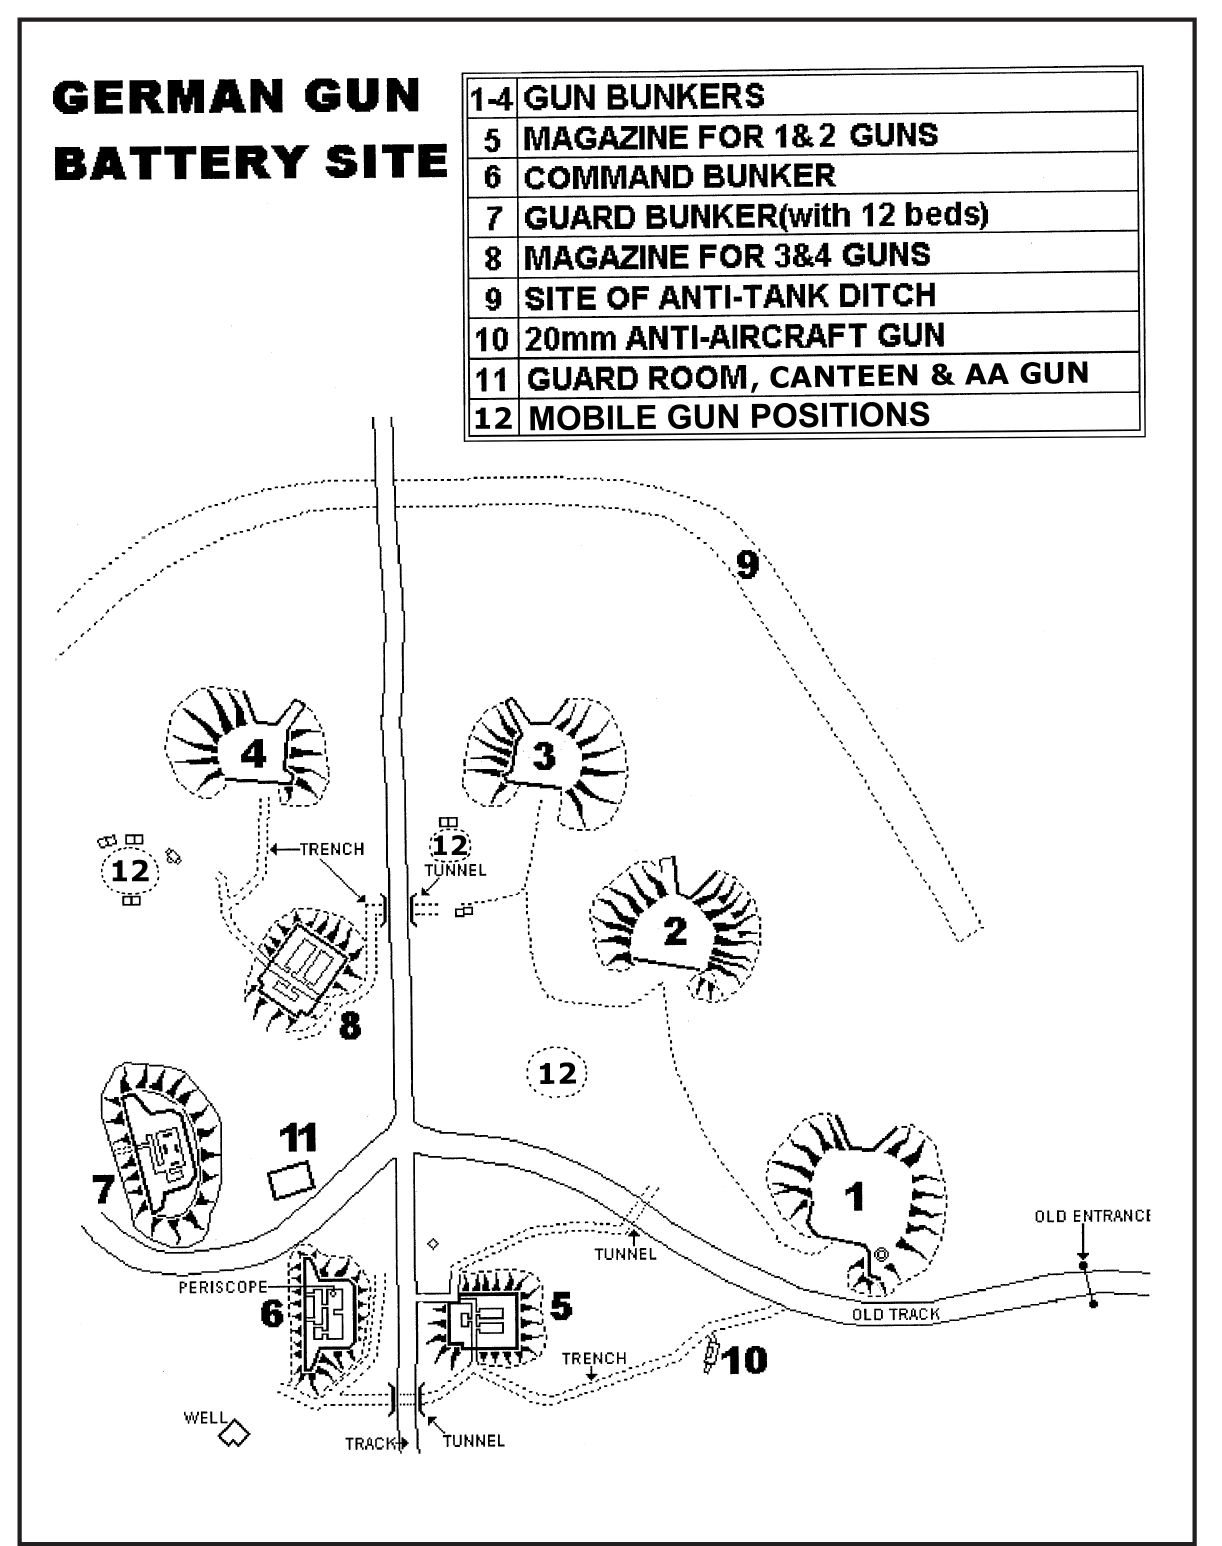
11) No. 1 Casemate. This is a type H611 casemate which is the largest of the four casemates on this site. Unusually this battery has three different types of casemates housing its four guns – further information can be found at www.atlanticwall.org. The site itself has been identified as WN01 of Normandy’s section of Festung Europa. It was occupied by No. 1 Battery of Artillerie Regiment 1716 of 716 Infanterie Division. The battery was started in 1941 and although designed for medium calibre guns of approximately 150mm (5.91in), at the time of the attack on the Merville Battery, it housed 100mm (3.94in) guns.
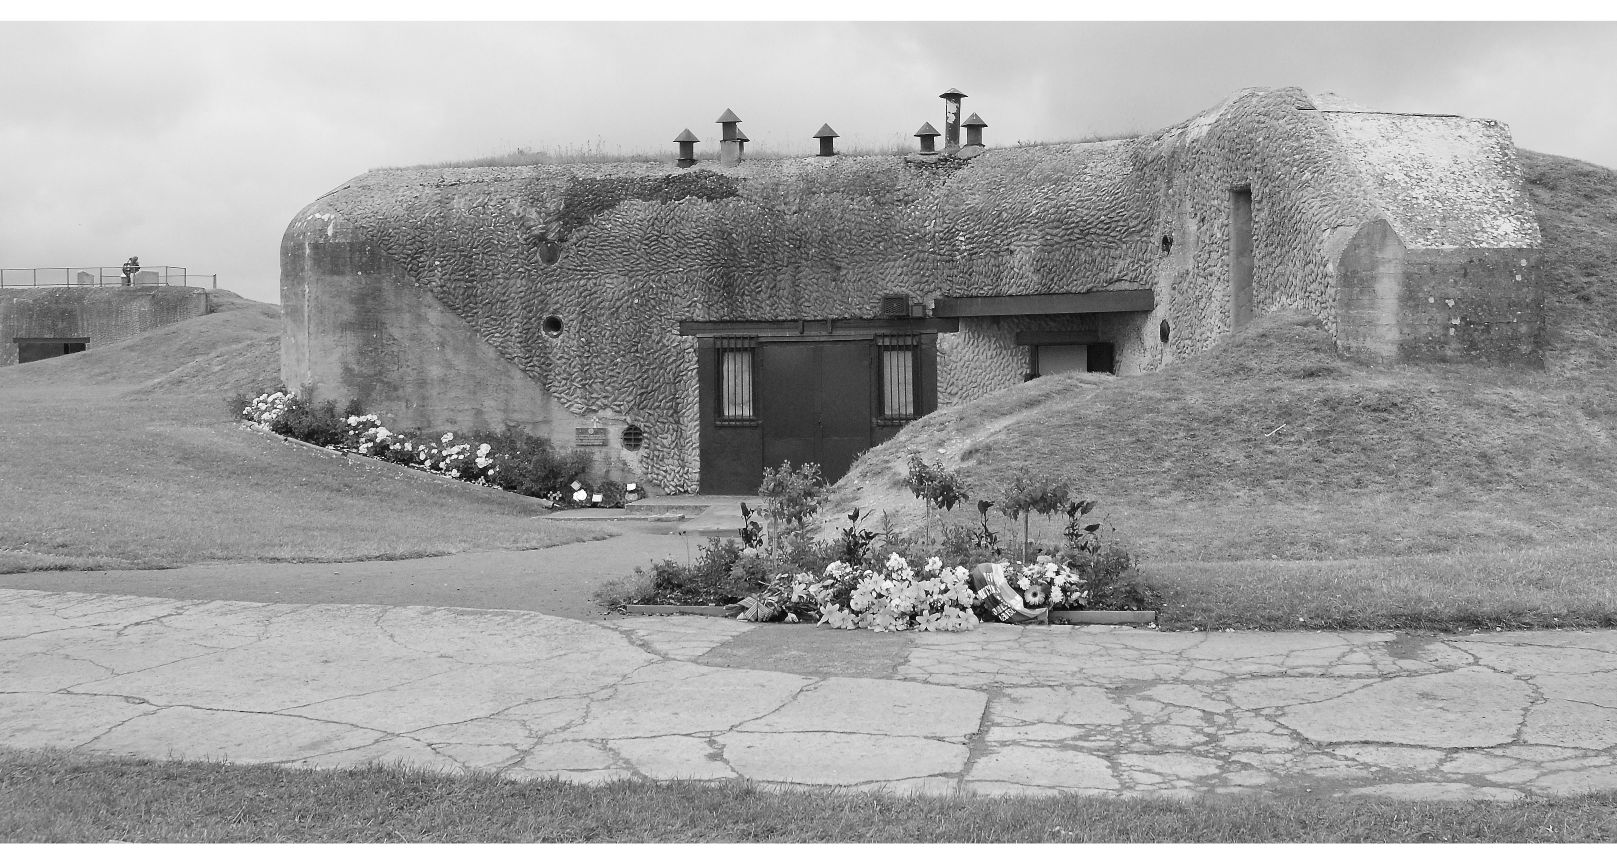
No. 1 casemate.

One of the Czech Skoda 100mm L FH 14/19 (t) field guns inside the Merville Battery.
Inside No. 1 casemate you can experience, at twenty minute intervals, a sound and light show that recreates the attack on the Merville Battery. In between these shows you may have a look around this part of the museum and see the many artefacts and memorabilia, now on display, that have been donated by veterans or excavated from the site during its restoration.
At the far end of the casemate there is a Czechoslovakian Skoda 100mm (3.94in) L FH (Leichte Feldhaubitze) 14/19 (t) field gun. After consultation with German veterans, and with evidence from archive documents and ammunition found in the area, it has now been established that this was representative of the type of artillery piece that was in place at the battery during the raid on 6 June 1944. It had previously been believed, and therefore documented in some publications, that they were French 75mm (2.95in) M 1897 field guns. The Skoda Field Gun in the museum is now positioned as it would have been when ready for firing onto SWORD Beach. These guns had a range of 10,717 yards (9,800m), some 6 miles (9.8km). A well trained crew could fire eight 35lbs (16kg) rounds per minute onto a target.
Because of the size of the concrete casemates, British intelligence had led the paratroopers to believe that they would house guns of approximately 150mm (5.91in). Nevertheless, the Czech 100mm (3.94in) guns had sufficient range to wreak havoc among the troops who landed on SWORD Beach, which is only 4 miles (6.44km) to the north-west of this battery.

Display of Belgian equipment.
Inside No. 1 casemate there would be a crew of nine men to man the gun. Operating on shifts, those off duty would reside in the requisitioned properties of Château Haras de Retz (see Ch. 6, A2) and Château de Merville. The officers had taken up off duty residence in the Mairie in Merville.
On the outside of the casemate, to the left of the entrance, there is a marble:
12) No. 3 Commando Memorial Plaque. This plaque commemorates the men of 3 Cdo who fought on this site on 7 June 1944 (see Ch. 4 & Ch. 5, D 18). At the top of the footpath leading down into No. 1 casemate there is the:
13) Combatants of all Nationalities Memorial. This memorial is dedicated to all those who fought and died on the site of the Merville Battery. This was dedicated on 5 June 2007.
Nearby there is an information stand one of many along the footpath around the battery, these will provide you with further information about this particular casemate and other points of interest around the battery. Continue along the footpath until you reach the second information stand. This gives details of:
14) No. 2 360° Open Gun Platform. The concrete platform provided a base for an open gun that was adapted to suit the type of gun that was sited there. With the gun mounted on the raised concrete centre block, the sunken pit of the gun platform was designed to collect spent shell cases so they would not interfere with the movement of the gun. Continue along the footpath until you come to the third information stand for:

No. 2, 360°, open gun platform. The author’s daughter, Hannah, gives a sense of scale. Beyond left, is the area 9 Para launched their attack.
15) No. 2 Casemate. This is type H612. The information stand provides you with details about the construction of the casemate and the various forms of camouflage used to disguise German bunkers. Today you can still see how the concrete on the exposed part of the bunker was formed to deflect light, in addition camouflage netting, earth banks and grass would cover most of the structure to make it less detectable from the air.
Time should be taken to go inside No. 2 casemate as the interior has now been transformed into a permanent memorial to the men of 9 Para. An audio and visual documentary is shown on two TVs and includes an interview with Lieutenant Colonel Otway as well as information about the daring attack on the battery. In the far centre of the casemate, beneath the distinctive paratrooper’s badge, there is a display case with the red beret and medals of Lieutenant Colonel Otway, DSO, Chevalier de la Légion d’honneur. These were kindly donated to the museum after he had passed away in 2006. Seat benches provide a quiet place to sit and reflect upon the heroic actions of 9 Para and after the brief documentary a roll of honour is played showing photographs of many of those who took part in the attack on the Merville Battery. It is, without doubt, one of the most respectfully presented and moving memorials one can experience in Normandy.
Outside, on the top of No. 2 casemate accessed by some steps, are a number of orientation tables that provide additional information about the battery and surrounding area. Return and continue along the footpath until you come to a bench seat, just after where the footpath turns right, on the backrest there is a brass:
16) John Gooday Memorial Plaque. This was donated by his wife in memory of her late husband who was in 9 Para. Next along the footpath there is a fourth information stand for:
17) No. 3 Casemate. The second H612 type casemate, this information stand details the stores system and the extraction and ventilation systems for the casemate. Inside there is a cockpit of a Horsa glider along with a flight simulator and documentary film. It was presented to the Merville Battery on 6 June 2008 by the Glider Pilot Association, in tribute to the glider pilots that took part in the airborne assault on D-Day. Among the other exhibits there is a framed:
18) Memorial to No. 3 Commando. This details the action of 3 Cdo on 7 June 1944. After some shellfire was received on SWORD Beach later in the day on 6 June, it was believed that this fire may have come from the Merville Battery. Major James Pooley, 2ic of 3 Cdo, led the attack on the battery and was killed just outside No. 1 casemate. There is now a photograph of him and of some of his troops in this framed memorial. As you walk back towards the main footpath, on your right there is:
19) No. 3 360° Open Gun Platform. This platform was linked to No. 3 casemate and around the edge of the circular platform you can still see the concrete ammunition storage shelters. Return to the footpath and walk along and through the tunnel underpass towards the next casemate. Left of the footpath there is a bench:
20) Private Ronald Sydney Jepp Memorial Plaque. Private Jepp served in the Machine-Gun Platoon, 9 Para. He was killed in action on the 12 June aged just twenty years. He is now buried in Ranville Commonwealth War Cemetery (IA, G, 15). His older brother, Private Terry Jepp, was a medic in 9 Para. Twenty-four year old Private Terry Jepp was wounded and taken prisoner, but he later escaped his captors and eventually rejoined 9 Para after the Normandy campaign. Continue along the footpath until you come to a fifth information stand for:
21) No. 4 Casemate. Again information is provided about the construction of the casemates. This is a type H669 casemate, but very similar in design to No. 2 and No. 3 casemates. The inside of the casemate is dedicated to Brigade Piron. There are many interesting exhibits including one of German mines and Allied mine-clearing equipment. Amongst the many photographs of Belgian troops there is one of the first Belgian soldier to be killed, Edouard Gérard (see Ch. 5, A2, A3, B5 and Battleground Europe book Pegasus Bridge & Horsa Bridge Ch. 7, B1, B8 & B18). Return to the footpath and continue until you come to the sixth information stand that is for:
22) No. 4 360° Open Gun Platform. This platform was linked to No. 4 casemate. The information board shows how underground tunnels linked the platform to No. 4 casemate and additional information about the artillery. If you walk over to the platform you will see, in the concrete on the centre circular stand, some original German artwork. The large ‘V’ centred above the laurel leaves represents Fatherland as in the German Vaterland. The inscriptions either side of the Third Reich symbol, an eagle holding a Swastika, reads: Deutschland mub‚ Leben on the left and Wenn auch wir Sterben, on the right. Translated it reads Germany must live, even if we die. It is a line, with slight paraphrase, from a popular German poem called Soldatenabschied (Soldier’s Goodbye) written by worker poet Lersch Heinrich (1889-1936). He penned the poem in 1914 after joining the German Army on the Western Front. A Roman Catholic he became an anti-Marxist and in the 1930s supported the Nazi Party. He was also the composer of a number of poems/songs that were published, in a compilation called German Songs For The People And The Fatherland, in 1918. Continue walking along the footpath, on the left there is a bench on the backrest is a brass:

German Graffiti on the centre stand of No. 4, 360°, Open Gun Platform.
23) Louis of 224 Para Fd Amb Memorial Plaque, donated by his wife. Farther along the footpath there is the seventh information stand for:
24) No. 3 and No. 4 Casemate Ammunition Magazine. This bunker had separate areas for storing and for preparing charges and was linked by the battery trench system. Ammunition was transported on sledges. The same sledges were used by 9 Para, after their attack, to evacuate the wounded. Continue along the footpath until you come to the eighth information stand for the:
25) Guard Bunker. Providing accommodation for the men on duty at the battery, this bunker also allowed sheltered movement via the battery trench system between emplacements. It was also protected by a machine-gun Tobruk pit that provided covering fire around this side of the battery. Continue along the footpath until you come, on your right, to a bench. On the backrest there is a brass:
26) 6th Airborne Division Memorial Plaque. This was donated by Tom Laurd to all those of the 6th Airborne Division who lost their lives in Normandy. Opposite the bench is the ninth information stand for the:
27) Canteen, Guard Room and Anti-Aircraft Gun Position. While the building provided the battery personnel with a kitchen and guard room, situated on top was a 20mm (0.79in) flak light anti-aircraft gun. This was the standard dual-purpose light anti-aircraft and anti-tank gun for the German army. It could fire 120-240 rounds per minute at a velocity of 2950 ft/sec (899m/sec). The flak gun would have a vertical range of approximately 4,155 yards (3,799m), some 2.3 miles (3.7km), but an effective target range of 2,400 yards (2,195m).
The twenty round box magazine, required a crew of seven men to keep the gun firing at maximum rate of fire. The flak gun was temporarily, sited on top of the canteen, after its own base was destroyed by an Allied bombing raid in May 1944, before it was moved to the top of the concrete roof of the battery well. Continue along the footpath until you reach the tenth information post for the:
28) Command Post. The nerve centre of the battery, this position contained the telephone exchange that linked the Merville Battery with its forward observation post on the beach near Merville-Franceville (see Ch. 5, B1) and each of the casemates so that their fire could be accurately directed. At the time of the attack on the battery by 9 Para, Stabsfeldwebel Johannes ‘Hans’ Buskotte was inside the bunker and used the periscope inside to observe the attack. He then telephoned through to Oberleutnant Raimund Steiner, who was in the OP on the beach to inform him the battery was under attack. Oberleutnant Steiner, in turn, telephoned through to other batteries in the area to request help by them laying down fire on the perimeter of the Merville Battery. On the opposite side of the footpath there is a reinforced concrete structure that covers the well that supplied the battery with all its fresh water. It was on this structure that the anti-aircraft gun was situated at the time of the attack on the battery. Continue along the footpath and through the tunnel. As you exit the tunnel, on your left, you will see a:
29) 5.5in (139.7mm) Medium Gun. Used by most of the medium regiments of the Royal Artillery in the Second World War, the 5.5in (139.7mm) calibre gun could fire two to five rounds per minute. Rounds were made up of either 80lb (36kg) or 100lb (45kg) charges. Maximum ranges were 18,100 yards (16,551m), some 10.28 miles (16.55km) for a super charged 80lb (36kg) shell, with a velocity of 1,950ft (594m) per sec. For the 100lbs (45kg) shell, maximum range was 16,200 yards (14,813m), some 9.2 miles (14.8km), with a velocity of 1,675ft (511m) per sec.
The gun’s weight in action was 13,646lbs (6,190kg), some 6.09 tons (6.19 tonnes) and was usually towed by a Matador vehicle that would also carry the ammunition and essential mechanical spares and tools. Manned by a crew of ten men, a well trained crew could have this gun firing on target within three minutes of taking up firing positions. The accuracy, at 9 miles (14.48km), was within 6ft (1.83m). When used as an anti-tank weapon the crew would often fire a 100lb (45kg) shell, minus the fuse, but with the transit steel plug still in place. This would, with accurate fire, lift the tank turret from its mount. By the end of the campaign in north-west Europe, between 6 June 1944 and 8 May 1945, 21 Army Group fired 2,610,747 rounds with their 5.5in (139.7mm) medium guns.
This weapon is sited on top of:
30) No. 1 and No. 2 Casemate Ammunition Magazine. The same construction and design as the magazine for No. 3 and No. 4 casemate. Next along the footpath, on the right, is a bench. On the backrest is a brass:
31) Private Frank Delsignore Memorial Plaque. This memorial was donated by his wife. Private Delsignore formed part of the small group of four men that actually made it to No. 1 casemate during the attack by 9 Para. With him were Sergeant Sid Capon, Sergeant Eric Bedford and Private Harold ‘Johnnie’ Walker. The officer leading them, Lieutenant Alan Jefferson, was wounded by machine-gun fire as they crossed the minefield. His batman, Private Morgan, was also wounded in both legs. Continue along the footpath until you reach the eleventh information post. On this post are a number of interesting quotes from people involved with the Merville Battery. Just behind the post are the remnants of:
32) Anti-Aircraft Position. Positioned here was a 20mm (0.78in) Flak light anti-aircraft gun. (see Ch. 5, D27 for weapon specification). The position was damaged during one of the many bombing raids on the battery. To the left of the anti-aircraft position and information post there is:
33) Bronze Bust of Lieutenant Colonel Terence Otway. This bust is the third sculptured by Vivien Mallock (see Battleground Europe Book Pegasus Bridge & Horsa Bridge Ch. 6, A24 & Ch. 7, B11). This one is dedicated to Lieutenant Colonel Otway and was unveiled here on 7 June 1997. To the left of the bronze bust is a bench. On the backrest is a brass:

Lt-Col Terrance Otway in 1998, next to the bronze bust of himself.
34) Lieutenant Colonel Terence Otway Memorial Plaque. This was donated by his wife in his memory. Farther over to the left there is another bench seat. On the backrest is a brass:
35) Frederick Scott Walker Memorial Plaque. Dedicated to the memory of Fred Walker, 9 Para. Before leaving the museum, via the wooden building, walk over to the far side of No. 1 casemate and to the:
36) Douglas C47 Transport Plane. This is the military version of the DC3 airliner built by Douglas. The most versatile aircraft used in the Second World War, this aircraft was widely used in the D-Day landing to tow gliders, drop paratroopers and parachute in supplies. It was also used throughout the Normandy campaign to evacuate wounded troops and bring in supplies to some of the many temporary airstrips that were built in Normandy during the conflict. It had a crew of three in the flight compartments: pilot, co-pilot/navigator and radio operator. The crew would also consist of one or two dispatchers depending upon what it was transporting. The C47 could transport one of the following: a load of 6,000lbs (2,722kg); approximately twenty-one fully laden paratroopers; or evacuate eighteen stretchered wounded along with a medical crew of three. Approximately 1,000 C47s took part in the British, Canadian and American airborne drops on D-Day.
Many heroic deeds were performed by the pilots and crew flying over Normandy on the night of 5/6 June. The pilots had to slow their aircraft from their cruising speed of 121 knots (139mph or 224kmh) down to approximately 95 knots (109mph or 176kmh), when dropping paratroopers. This was just above stall speed, but was necessary to give the paratroopers less buffeting when they exited the aircraft. They were also flying their aircraft as low as 500-700ft (152m-213m) when dropping the paratroopers so that their precious cargo would present less of a target for the German ground forces as they descended. This, however, came at the expense of their own aircraft becoming more vulnerable to enemy fire at such a slow speed and low altitude.

‘The SNAFU Special’ Douglas C-47 (Dakota) Transport Plane.
The C47 Dakota No. 42-15073, on display at the Merville Battery and called The SNAFU Special, actually saw service in all the major airborne operations in Europe during the Second World War. In Operation OVERLORD she was assigned to 440th Troop Carrier Wing (TCW), 95th Troop Carrier Squadron (TCS), United States Army Air Force (USAAF) and dropped the paratroopers of 501 Parachute Infantry Regiment (PIR) 101st Airborne Division, near the ancient market town of Ste-Mère-Église on the night of 5/6 June 1944. Later she saw service in Operations: DRAGOON in southern France; MARKET GARDEN in Holland; REPULSE over Bastogne; and VARSITY in the crossing of the River Rhine.
Its final days of action were in the former Yugoslavia. After being machine-gunned near Sarajevo in 1993 during the war in the Balkans, she was finally grounded. The association for the management for the Merville Battery found and raised funds for the aircraft to be purchased and restored. It was finally transported and unveiled here at the Merville Battery in 2008. Around the aircraft are positioned several information boards detailing the aircraft’s history. Alternatively visit www.the-snafu-special.com.

The Crossroads in Gonneville-en-Auge, now called a) Carrefour du 9ene Bataillon, from where Lt-Col Otway led his 150 strong assault force towards the Merville Battery. The memorial to 9 Para also marks the area.
To exit the museum return to the wooden building, inside there is a small gift and book shop.
Return to your car. Drive down the Avenue de la Batterie de Merville and turn right and drive to the next crossroads in Hameau de Descanneville. Turn right at the crossroads onto the D223. After 330 yards (302m) the area to your right, and for the next 200 yards (183m), is now an open field. In June 1944 it was a small wood and the area through which 9 Para launched their assault into the Merville Battery. Approximately 90 yards (82m) after the track on your right, there is a single track road on your left leading down to:
E. Gonneville-en-Auge
Continue down a single track road, to the crossroads in Gonneville-en-Auge. This crossroads is now called:
1) Carrefour du 9ème Bataillon, named in honour of 9 Para. To the right of the crossroads there is a:
2) Memorial to 9 Para, which marks the spot where Lieutenant Colonel Terence Otway, with only 150 men, met his reconnaissance party and then departed to launch their assault on the Merville Battery.
You can either finish your tour here, or continue, with the next tour, by following the directions in the next chapter.