5
THE LANDINGS ON SWORD BEACH started well, despite the swell caused by the recent storms, which meant that the tide was higher than expected. The “Locku” boys (Landing Craft Obstacle Clearance Units) had done a good job during the previous forty-eight hours, approaching the landing beaches in their midget submarines and clearing away some of the underwater obstacles. They had also marked the landing area well, insuring that the first waves came ashore at the right place.
The British 3rd Infantry Division, comprising of the 8th, 185th, and 9th Infantry Brigades, with No. 1 Special Service Brigade in support, made up the assault force for Sword Beach. Following a naval bombardment that began at 0650, the first troops of the 8th Infantry Brigade made the initial landings at La Brèche (now called La Brèche d’Hermanville) at 0725. The brigade was comprised of one battalion each from the South Lancashires, the East Yorks, and the Suffolks. Preceding the infantry were the DD tanks of the 13th/18th Hussars, which landed to provide covering fire for the AVRE tanks of the 5th Assault Regiment, Royal Engineers, who immediately began clearing the beach obstacles and beach exits for the infantry. Many of the engineers were killed as they disembarked from their landing craft. Among them was their commanding officer Lieutenant Colonel A. Cocks, who was killed when his landing craft received two direct hits just after unloading a Crab flail tank. The second explosion having detonated a supply of Bangalore torpedoes, which killed the officer and other engineers.
Despite this, each man had his job to do and selflessly continued with his work. Minutes later the infantry stormed the beaches, with the two assault companies of the South Lancashires landing to the west. The right hand company was tasked with clearing the beach of the German defenses and exploiting their position along the beach to the west. The left hand company meanwhile would clear its own area of beach, then launch an attack against the German strongpoint at La Brèche, codenamed Cod. The right hand company of the East Yorks would also help destroy the strongpoint while the left hand company made its way toward Riva Bella and Ouistreham. The Suffolks would land within the hour and reinforce the troops at La Brèche before moving inland toward the village of Colleville (now called Colleville-Montgomery). Once the village was liberated they would then attack the German fortifications known as “Hillman.”
EYEWITNESS
The boat crews had been ordered to go in at 4 knots and hit the beach hard. During the last hundred yards of the run-in everything seemed to happen at once. Out of the haze of smoke underwater obstacles loomed up . . . . We weaved in between iron rails and ramps and pickets with Tella-mines on top like gigantic mushrooms. We seemed to be groping through a grotesque petrified forest. The noise was so continuous that it seemed like a siren . . . . Mortar fire was coming down on the sands, an 88mm gun was firing along the line of the beach and there was continuous machine-gun and rifle fire. Immediately ahead of us a DD tank, its rear end enveloped in flames, unable to get off the beach, continued to fire its guns.
Major A. Rouse, 1st Battalion, the South Lancashire Regiment
Also landing at La Brèche, just before the Suffolks, were the commandos of Brigadier The Lord Lovat’s No. 1 Special Service Brigade. This unit was made up of Nos. 3, 4, and 6 Commando, No. 45 (Royal Marine) Commando, and elements of the Free-French commandos of 1 and 8 troop of No. 10 (Inter-Allied) Commando. No. 4 Commando was ordered to destroy any beach defenses that had not yet been silenced by the infantry or by the pre-assault naval and aerial bombardments. After that, with the French commandos leading the way, they would storm the German Battery known as “the Casino” at Riva Bella in Ouistreham. In the meantime, the rest of Lord Lovat’s commandos would follow, ready to make their way across the six-and-a-half miles of enemy held territory to form the link–up between the airborne and seaborne troops at Bénouville (Pegasus) Bridge.
Farther to the west, Brigadier B. “Jumbo” Leicester’s No. 4 Special Service (Royal Marine) Brigade would land on the right flank of the Sword invasion force near Lion-sur-Mer. Part of his force, No. 47 Commando landed separately from the Brigade, at Le Hamel (Gold Beach), since its objective was the coastal port of Port-en-Bessin (see Chapter 6). The rest of the commandos, however, were ordered to take the coastal villages of Lion-sur-Mer, Luc-sur-mer, and Langrune-sur-Mer.
No. 48 (Royal Marine) Commando, landing at St Aubin-sur-Mer (Juno Beach), captured a strongpoint at Langrune-sur-Mer (Juno Beach) while No. 46 (Royal Marine) Commando, under the cover of a naval bombardment, captured a strongpoint at Le Petit Enfer in Luc-sur-Mer. They then sent two troops inland to take the village of La Délivrande. Later these units would move farther inland and take the villages of Rots and Le Hamel near the main Bayeux to Caen Highway.
No. 41 (Royal Marine) Commando, meanwhile, landed at Lion-sur-Mer and captured the village before moving on to its next objective, the radar station at Douvres. This heavily fortified strongpoint managed to hold out for eleven days before being captured. Since it was on the demarcation line between the Canadian and British sector both British and Canadian divisions contributed to the capture of the radar station.
Back at La Brèche, leading the No. 1 Special Service Brigade landings, was No. 4 Commando led by Lieutenant Colonel Robert Dawson. Also under his command was Commandant Philippe Kieffer and the two French Commando troops. As the landing craft surged through the white surf, line abreast, in defiance of the German mortar and shell fire, Lieutenant Colonel Dawson ordered his landing craft skipper to slow down so that the two landing craft carrying the French Commandos could claim the honor of being the first commandos to step onto the French beaches on D-Day.
As the commandos ran through the breakwaters they found that many of the infantrymen were still pinned down at the water’s edge, crouching or lying in two of three feet of water, taking cover from the murderous German machine-gun fire and incessant
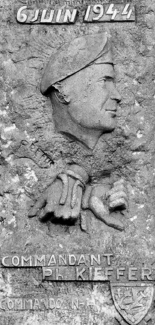
Memorial to Commandant Phillipe
Kieffer, next to the French
Commando memorial.
explosions of mortar rounds. Passing through the infantry, the commandos stormed a German strongpoint responsible for much of the fire. Cutting their way through the barbed wire defenses they crossed a minefield and paused long enough for the rest of the commandos to assemble. Within the first few minutes of battle the commandos had lost over forty men on the beach. Among them, Lieutenant Colonel Dawson was twice wounded, first in the leg, which he ignored, and then, more seriously, a head wound that forced him to relinquish command to his second in command, Major R. Menday.
Behind them Lord Lovat landed with the rest of No. 1 Special Service Brigade. Among them was Lovat’s piper Bill Millin (later to be known as the “Mad Piper of Normandy”) holding his bagpipes aloft as he waded ashore.

French Commando Memorial at Ouistreham. (See also page 133.)
EYEWITNESS
Once I could find my feet, I started to play “The Highland Laddie,” the regimental quick march of the Scots Guards, as I went ashore. The Brigadier had been involved with military training with the regiment, and it brought a smile to his face . . . . At one stage, a large figure looked me up and down, then bellowed in my ear in an angry voice: “You mad bastard. . . . ” It was a commando sergeant.
Piper Bill Millin, No. 1 Special Service Brigade
The leading commandos paused only long enough to allow their men to reassemble, then the French Commandos led the way along the road, which runs parallel to the beach, toward the German coastal battery at Riva Bella. With the help of a local gendarme who was a member of the French resistance, they were able to circle many of the German strongpoints and take up position for their assault on the battery. But despite a heavy naval bombardment to soften up the defenses, the solid walls of the concrete fortification were only partially damaged. The defenders inside were very much alive. The French Commandos only managed to overpower the shell-shocked Germans after a violent and vicious hand-to-hand battle that cost both sides many casualties. As soon as the battle was over the exhausted fighting troops witnessed one of the many, almost surreal, emotive scenes that face men in times of war: the sight of French, British, and German medical orderlies working together to tend the dead and dying who littered the battlefield.
By mid-morning the South Lancashires had liberated Hermanville, the Suffolks had taken Colleville, and the East Yorks and No. 1 Special Service Brigade were holding Ouistreham. With Ouistreham liberated, Lord Lovat was able to press on toward the bridges over the Caen Canal and River Dives to help reinforce the 6th Airborne Division. One obstacle, however, still represented a danger to any troops moving south from Ouistreham. This was Hillman, the German strongpoint mentioned earlier. Situated southeast of Colleville, together with a satellite strongpoint, Morris, to the north, the two German positions commanded a field of fire that stretched north to the landing beaches and east across St Aubin-d’Arquenay toward the Caen Canal.
The Suffolks pushed on past Colleville and managed to take strongpoint Morris by 1300. Hillman, however, was a much tougher target.

British 17-pounder anti-tank gun crew.
EYEWITNESS
The area covered was approximately 600 yards by 400 yards containing three steel cupolas, deep concrete shelters, infantry guns, machine guns, etc., very well dug in and camouflaged; it was the local Coastal Battalion HQ*, surrounded by wire, anti-tank mines and anti–personnel mines.
Captain Sperling, Regimental Signals Officer, 1st Battalion, the Suffolk Regiment
As the Suffolks prepared their attack on Hillman, 185th Brigade landed at La Brèche and began moving toward their objective – the high ground north of Caen from Beuville, Biéville, and Lébisey. If successful, they would attempt to take Caen itself. At the same time, the 9th Brigade would attempt to take Mathieu, Cambes-en-Plaine, and up to St Contest, the area that lay between the 185th Brigade and the 3rd Canadian Infantry Division.
The 1st Battalion, The Royal Norfolk Regiment, were given orders to bypass Hillman in order to reach their objective. Believing the village of St Aubin-sur-Mer to be still in enemy hands (in fact Lord Lovat’s No. 1 Special Service Brigade had already cleared the village) the battalion set off from Colleville, across the wheat fields between the village and the German strongpoint, to Beuville. The German sentries at Hillman spotted the advance and opened up with their machine guns at a range of half a mile. Within minutes the Norfolks had lost 150 men. The cries from the wounded were still echoing around the battlefield as the Suffolks launched their attack on the fortress. Sappers managed to breach the barbed wire perimeters with Bangalore torpedoes. PIATS (anti-tank weapons) were fired at the steel cupolas to no effect. The Norfolks managed to capture some of the outer trenches and take a few prisoners, but they were unable to penetrate the solid German defenses.

Panzer tank and crew of the 12th SS (Hitler Jugend) Panzer Division, await orders on June 6th, 1944.
In a second attack, the tanks of the 13th/18th Hussars were brought in, but even their seventeen-pounder armor-piercing shells were unable to penetrate the steel cupolas. However, with the cover provided by the tanks, the infantry were eventually able to overpower the German defenders and Hillman was cleared of enemy resistance at just after 2000.
The German units defending Sword Beach were from the 736th Grenadier Regiment of the 716th Coastal Defense Division. By midafternoon, however, reinforcements were on their way from Generalleutnant Feuchtinger’s 21st Panzer Division. Deployed around St. Pierre-sur-Dives, the 21st Panzer Division had been the closest armored division to the area of the invasion. Some of its units were actually on anti-invasion exercise during the night of June 5th/6th and were therefore immediately drawn into action, east of Caen, in an attempt to repulse the landings of the 6th Airborne Division.
Due to a complicated chain of command and commitments against the British airborne forces, Feuchtinger’s panzer tanks did not arrive in the Sword area until late afternoon. This was reported by a reconnaissance troop of the Staffordshire Yeomanry who had, along with the 1st Battalion, The King’s Own Scottish Borderers, passed through Hermanville and secured Beuville and Biéville. As the leading elements of the British 3rd Infantry Division neared their objective of Caen, Feuchtinger’s 21st Panzer Division was already preparing to launch its counterattack. Hastily digging in and holding the line from Lébisey to la Londe, the Germans held the high ground that dominated the approach to Caen. With less than three miles to go, the British advance was stopped in its tracks. Also approaching, on the German left flank, were the fanatical troops of the 12th SS (Hitler Jugend) Panzer Division, commanded by Oberstgruppenführer Witt.
On the evening of D-Day a gap remained between the British and Canadian bridgeheads, between Lion-sur-Mer and Luc-sur-Mer. In the early evening, the 21st Panzer Division set off to exploit this gap, pushing down from Caen toward Biéville and Mathieu, in the hope of reaching the coast and pushing the Allies back into the sea. Luckily, the British were prepared for such an attack and, with well-sited seventeen-pounder anti-tank guns on the high ground at Périers, they managed to stop the main German advance. Only one company of German infantry and a handful of tanks managed to get through and make their way toward the beach. The advance, however, coincided with the arrival of the largest airlift in military history. And there is little doubt that this sight took the heart out of the German’s resolve to put in a sustained and coordinated attack.
At 2100, less than an hour after the German strongpoint of Hillman had been captured, a massive air armada of gliders and planes brought in much-needed supplies at the two drop and landing zones on either side of the Caen Canal. German troops in the vicinity opened fire with everything they had, filling the sky with a peppering of flak and streaks of tracer fire. Protecting the 500-plus supply-carrying aircraft were fighter escorts of Spitfires and Mustangs. They swooped down and attacked the German ground positions while the gliders landed in fields that were being bombarded by German artillery and mortar fire. The much-needed supplies had arrived and so, too, had the reinforcements needed to hold the fragile airborne bridgehead east of the River Orne.
By the end of the first day, despite Caen not having fallen, and without a link-up to the Canadian troops from Juno Beach, the Sword beach landings were considered a success. The seaborne troops had managed to linkup and reinforce the 6th Airborne Division and, more importantly, they had also drawn Rommel’s panzer reserves in and around Caen. This took the pressures, at least temporarily, off the 50th Northumbrian Division landing on Sword Beach, and the American troops to the west at Omaha and on the Cherbourg Peninsular. For those American soldiers still fighting to gain a foothold on the shores of Omaha Beach, it would prove to be an especially important respite.
By June 10th, the British 3rd Infantry Division held a line that ran from Blainville-sur-Orne, on the banks of the Caen Canal, up to the Canadian boundary line just west of Cambes–en-Plaine. It became a static battle, reminiscent of World War One, with neither side willing to relinquish any ground and with a no-man’s land, stretching for less than 100 yards in some places, between the two armies. With the failure to take and hold Villers-Bocage and envelop Caen in Operation Perch (see Chapter 6), General Montgomery and Lieutenant General Miles Dempsey, commander of the British Second Army, decided to launch an attack across the Rivers Odon and Orne to the southwest of Caen. Codenamed Operation Epsom, the main attack would be made by the British VIII Corps in an attempt to reach the high ground between Bretteville-sur-Laize and Bourguébus. With this accomplished the 3rd Canadian and 3rd British Infantry Divisions could then close in on Caen and isolate the German forces in the city. Twenty-four hours before the main assault, XXX Corps launched their attack first, toward the high ground southeast of Tilly-sur-Seulles, to protect VIII Corps’ right flank.

A Bren gun carrier and “flail” tank of the 15th Scottish Division ready for Operation Epsom.
The 15th Scottish Division and 11th Armored Division led the attack for VIII Corps just before dawn on June 26th, making their way slowly through the villages of St Manvieu, Cheux, and a nearby hamlet. By the end of the day they had progressed four miles from their start line but were still one mile from the River Odon. The enemy troops in this area, from the 12th SS Panzer Division, fought with great tenacity and determination. Eventually the tanks of the 11th Armored Division made it across the River Odon and were fighting on the slopes of Hill 112. The Germans threw everything they had against the British and the battle raged around the hill.
Two days later, General Dollmann, commander of the German Seventh Army, ordered that Oberstgruppenführer Paul Hausser’s 2nd Panzer Corps should immediately attack the British VIII Corps with his 9th and 10th Panzer Divisions. This attack, toward the villages of Gavrus and Cheux, failed when the British troops defending the villages refused to move or retreat despite heavy losses.
On the morning of June 29th, the 11th Armored Division had taken possession of Hill 112. This gave the British a commanding view of the German positions. Accurate and sustained shellfire throughout the day and following night kept any German counter-offensive in check. Aerial reconnaissance photographs and reports revealed, however, a continued build–up of German armor. Lieutenant General Dempsey was fearful of overstretching his communication and supply lines and believed that his men were exhausted and too exposed to fight off another attack from Hausser’s fresh Panzer Divisions. He therefore decided to order the advance to stop, and he withdrew the 11th Armored Division back over the River Odon. The following day Hill 112 was re-taken by the Germans. Operation Epsom had failed in its main objective, and had cost VIII Corps over 4,000 casuialties, but it had not all been in vain. The German panzer divisions had received a severe mauling and General Dollmann had panicked about the growing Allied bridgehead. Fearing Hitler’s reprisals, he committed suicide on the morning of June 29th. On the same day Generalfeldmarschall von Rundstedt and Generalfeldmarschall Rommel were visiting Hitler at Berchtesgaden, thus leaving the German troops in Normandy without their three most senior commanders. Hausser, who would soon succeed Dollmann in command of the Seventh Army (becoming the first SS officer to command a German field army), followed Dollmann’s last orders, despite not having his panzer divisions at full strength. The swift rebuttal of his panzers by the British led Hausser to concede that it was time for the German forces to withdraw from Caen, and he relayed his report to Rommel’s HQ to that effect:
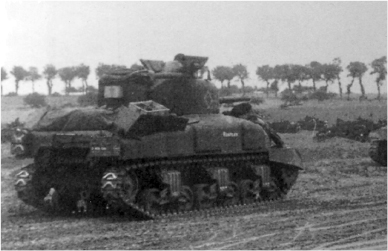
Sherman tanks of the 11th Armored Division on June 25th in Operation Epsom.
EYEWITNESS
The counter-offensive by the 1st and 2nd Panzer Corps has had to be temporarily suspended in the face of intensive enemy artillery fire and supporting fire unprecedented ferocity from naval units. . . the tenacious enemy resistance will prevent our counter-offensive from having any appreciable effect . . . [we should] husband the resources of the panzer divisions and create a defensive line commensurate with our infantry strength.
Oberstgruppenführer Paul Hausser, 2nd SS Panzer Corps
Von Rundstedt and Rommel shared Hausser’s view and suggested to Hitler that the Seventh Army should begin to fight a rearguard action back toward the River Seine. Hitler would hear nothing of it. He ordered that the Allied bridgehead must be contained and the Allies forced into a war of attrition; meanwhile, the Germans would build up their own supplies and force the Allies back into the sea. Hitler’s plans, however, could not match his resources and von Rundstedt knew this. In a telephone call on July 1st from Generalfeldmarschall von Kluge, von Rundstedt was asked what should be done now that they faced an ever increasing Allied force. Von Rundstedt had resigned himself to the futility of his command and made his reply direct and succinct, “Make peace, you fools. What else can you do?”
Von Rundstedt’s comments were passed on to Hitler who immediately relieved him of his position. Generalfeldmarschall von Kluge was named his successor.
The fighting around Hill 112 continued for over a month and included another offensive, Operation Jupiter, which was launched by the 43rd Wessex Division on July 10th. This, too, failed after a strong counterattack by SS panzer tanks. In the meantime, the Canadians had launched Operation Charnwood (see Chapter 7) in an attempt to dislodge the German defenders in Caen itself.
The next major offensive for the British armored divisions was Operation Goodwood, which was launched in conjunction with the Canadian Offensive of Operation Atlantic (see Chapter 7). It began on the morning of July 18th after a 1,000 bomber raid in which over 5,000 tons of fragmentation bombs were dropped on the German defenses. 700 tanks of VIII Corps then rolled forward, heading south, through the 6th Airborne Division’s area of operations east of the River Orne. It was hoped that the British armored advance would destroy all the German equipment and personnel on its way to the high ground around Bourguébus. Once this had been taken they could then push on and sweep across the open plains, south of Caen, toward Falaise. In the meantime the Canadians would attack the center of Caen and clear the city of German resistance.
EYEWITNESS
I knew all along that the German position in France was hopeless and that eventually the war would be lost. But if I had been given a free hand to conduct operations, I think I could have made the Allies pay a fearful price for their victory. I had planned to fight a slow retiring action exacting a heavy toll for each bit of ground that I gave up. I hoped that this might have brought about a political decision which would have saved Germany from complete and utter defeat. But I did not have my way. As commander in chief in the west my only authority was to change the guard in front of my gate.
Generalfeldmarschall von Rundstedt, Commander in Chief, West
Rommel, though, had anticipated such an attack and had prepared five lines of defenses that were up to ten miles deep between the British front line and their objective. With a fire power in excess of 1,500 guns, the Germans dug in and waited for the British armor to roll into its killing ground. Subsequently the German lines were not broken and the British attack was stopped after an advance of only seven miles. After two days’ bitter and costly fighting, the British had lost nearly 400 tanks and had sustained over 5,500 casualties. The Canadians, though, had managed to clear the southern suburbs of Caen and so Montgomery prepared another offensive, led by the Canadians, to secure the objectives originally planned for Goodwood. This was codenamed Operation Spring, and began in the early hours of July 25th (see Chapter 7).
By now the Germans were unable to resupply their front line as quickly as the British. They had also lost another of their commanders. While returning from a conference with Oberführer Kurt Meyer, commander of the 12th SS Panzer Division on July 17th, Rommel was severely wounded when his staff car was shot up by Spitfire pilots from the 602 Squadron and crashed into a tree. Ironically, in a twist of fate, the nearby village where Rommel was first treated was called St Foy-de-Montgomery.
Only the day before Rommel had reported to von Kluge that up to July 15th the German Seventh Army Group had lost over 97,000 men and over 250 tanks. Replacements, however, had amounted to only 6,000 personnel and 17 tanks. Ammunition, too, was running short. By comparison, the British, even after the debacle of Goodwood, were able to resupply their forward units within thirty-six hours. The Germans were slowly losing their battle of attrition.
CIRCUIT FIVE

Circuit five. Caen (Ouistreham) – Sword Beach – Douvres-La-Déliverande – Caen
SWORD BEACH STARTS AT OUISTREHAM and runs west to include Luc-sur-Mer. It is divided into four sections, east to west, codenamed: Roger, Queen, Peter, and Oboe. This tour starts in Ouistreham by taking the D-515 from Caen, onto the D-514, and then taking the third exit in the roundabout/rotary (in the center of which is one of the eleven stone monuments erected by the Comité du Débarquement in commemoration of the D-Day landings) and driving into the center of Ouistreham up to the church. Damaged during the fighting, the eleventh-century church had its stained glass windows replaced after the war. One window is dedicated to the Commandos of No. 1 Special Service Brigade, who liberated Ouistreham, and a second window is dedicated to the 51st Highland Division.
Continue from the church toward the sea front and park in the car park adjacent to the casino. This casino was built on the site of the German strongpoint attacked and captured by Commandant Philippe Kieffer and No. 10 (Inter-Allied) French Commandos. Before becoming a German strongpoint, another casino had stood on this site until it was destroyed by Allied bombers in 1942 (hence the reason the German position was referred to as the casino).
Approximately 250 meters west of the casino is a memorial to Commandant Kieffer and the French Commandos on the top of a sand dune. This aluminium sculpture is sited on top of a steel armored cupola and represents the bows of a ship hitting the German defenses. Leading up to the memorial, on either side, are eleven stones that bear the names of those French commandos killed during the liberation of Riva Bella; each of the seven steps you need to climb represents a commando who fell between this memorial and the casino.
Opposite the casino there is the Musée No. 4 Commando. This museum tells the story of the commando’s involvement in the D-Day landings and has a selection of documents, weapons, uniforms, and badges on display.
Walk eastward, toward the car ferry, and on your right you will see a fifty-two-foot concrete tower set back from the road, behind the houses. This is the five-level flak tower that was used by the Germans as the local headquarters and is Le Grand Bunker, Musée du Mur d’ Atlantique. The Atlantic Wall Museum has been restored to operational condition as it was in 1944. Inside all the rooms are set out with their equipment and there is also the opportunity to operate the range finder that the Germans used to scan the horizon for enemy activity. A selection of photographs and an audio-visual presentation explain the construction of the Atlantic Wall and also how the French resistance supplied the Allies with valuable intelligence about the German defenses.
Return to your car and drive west along the coast road. On entering Colleville-Montgomery-Plage take the next main road turning left and then take a right onto the D-514. On your left you will pass a memorial and statue to Field Marshal (General during the Normandy landings) Sir Bernard Law Montgomery. Continue along the D-514 into La Brèche d’Hermanville and, on your right, are the landing beaches where the first troops of the British 3rd Infantry Division came ashore. As mentioned in the Getting There (pp 14-17) section, it will be worth your while stopping, periodically, along the beaches to search for memorials and other interesting places connected with the D-Day landing. You will not be disappointed at how much there is to find.
Along the D-514 you will see one of “Hobart’s Funnies,” a Petard tank, which was one of the many names given to a host of weird and wonderful armored vehicles designed by and named after the commanding officer of the 79th Armored Division, Major General Sir Percy Hobart. Hobart’s Funnies were also referred to by their generic title as AVREs (Armored Vehicles Royal Engineers) and were divided into two main types: one was the DD or duplex drive tank, which was a Sherman tank fitted with twin propellers, a waterproofed underside, and a collapsible canvas screen that would allow the tank to float and be propelled in calm seas. Upon reaching the beach the drive would be switched to its tracks, the canvas screen dropped, and the tank would roll forward straight into battle.
The second type was given a whole range of names and tasks: the Crocodile was a flame-throwing Churchill tank (see Chapter 6). A Crab, or Flail, tank was a Sherman tank with rotating flails used to clear minefields. A Bobbin was a Churchill tank that carried 100 yards of coconut coir matting on a giant spool above the vehicle; the matting was laid out over soft ground to allow itself and other vehicles to pass over without becoming bogged down. An Armored Ramp Carrier (ARC) was fitted with a mobile ramp that could provide a quick and easy advance over beach walls, ditches, or steams. The Petard, mentioned above, was a Churchill tank with its standard gun replaced by a 290mm short-barrelled mortar. This fired an explosive charge, known as a “flying dustbin,” that was used to destroy enemy concrete fortifications.
Continue along the D-514 through Lion-sur-Mer, where No. 41 Commando landed, to Luc-sur-Mer. On the right is a memorial to one of the many small scale commando raids that took place in 1941 (see Chapter 4). Take the last turning left in Luc-sur-Mer, before the sign for Langrune-sur-Mer, onto the D-83 and drive through the village to Douvres-la-Délivrande. On the right as you near the end of the village is the Douvres Radar Station. After several attempts to capture the site by Canadian and British troops, No. 41 Commando, with support provided by the AVRE tanks of the 26th Assault Squadron, Royal Engineers, managed to overpower the German garrison on June 11th. Today the Musée Radar Douvres has exhibits showing in detail the construction of the bunkers and how the radar station was put to use by the Germans.
Return to Douvres-la-Délivrande on the D-83 and take a right onto the D-7, signposted Caen. About 600 meters on your left is la Délivrande War Cemetery (look for the green and white Commonwealth War Graves Commission sign). This cemetery has 1,123 burials, of which 927 are British, 180 German, 11 Canadian, 3 Australian, and 1 Polish. The first casualties buried here are from the Peter and Oboe sectors of Sword Beach and were killed on D-Day. A Royal Army Medical Corps operating theater was set up at the convent in la Délivrande during the Normandy campaign and the other bodies that rest here come from the fighting between the beaches and Caen. As with all the Commonwealth War Cemeteries, a register and plan of the cemetery can be found in one of the stone shelters in the cemetery grounds.
Head back toward the church in Douvres-la-Délivrande and take a right turn onto the D-35, heading for Hermanville-sur-Mer and Colleville-Montgomery. Turn left into Hermanville-sur-Mer, onto the D-60, and then take a right in the village just after the Mairie (Town Hall). 300 meters on your right is Hermanville War Cemetery. Of the 1,005 burials, 986 are British, 13 are Canadian, 3 are Australian, and 3 are French. Most of these were killed during the first few days of the landings.
Return to the D-35 and drive into Colleville-Montgomery. On the right is the site of the German fortification known as Hillman. A narrow road called “Rue du Suffolk Regiment” leads up to the bunkers and memorial. The memorial, placed on the side of the bunker, is dedicated to the 1st Battalion Suffolk Regiment. A plaque gives further details of the site and battle as well as a panoramic table that shows the extent of the Hillman defenses.
From Hillman continue along the narrow road until you reach Beuville. Turn right onto the D-141, through Beuville, and head for Mathieu. Turn left onto the D-220 and then left again onto the D-7. When you reach La Bijude, turn right, onto the D-79b, and then take the next right, onto the D-220a, heading for Anisy. After a few kilometers, Cambes-en-Plaine War Cemetery will be on your left. This cemetery contains 224 burials, all British, of which the majority are from the South Staffordshire and North Staffordshire Regiments, killed in the fighting for Caen between July 8th and 9th.
Return to the D-7 and turn right heading for Caen. Turn right onto the “périphérique” and follow the signs for the memorial. Built on the site of a German command post, this museum and memorial is divided into seven sections: 1) “Failure of peace;” 2) “The pre-war years and rise of Hitler;” 3) “France during the dark years;” 4) “The World War;” 5) “Landings of June 6th 1944;” 6) “The Battle of Normandy;” and 7) “Hope,” which tells of other major events since World War Two and the efforts of international organizations to promote peace around the world.
This modern museum also has a library, which is open to all visitors, a restaurant, a well-stocked shop, and even a free childcare service to keep the younger children occupied while their parents give their attention to the memorial’s exhibits. Please note that at least half a day is required to view the memorial.
From the memorial continue counter-clockwise around the “périphérique” and exit for Bretteville-sur-Odon. Take the N-175, heading for the center of Caen and then take a right onto the D-8. Follow the D-8 out toward Évrecy, and on your left there is Hill 112. Nearby there is a monument to 43rd Wessex Division and also a monument to the Dorset and Hampshire Regiments.
From here, the quickest way back to Caen is to return via the route you have just taken.
* [In fact it was found to be the Regimental HQ of the 736th Grenadier Regiment.]