
INTRODUCTION
I’m a framing contractor. I’ve spent most of my career as a lead framer, directing my framing crews and training workers to become framers. In my teaching, I found that much of the information I needed was not available in a good book, so I wrote one, Framing & Rough Carpentry. As I started spending more of my time training and working with lead framers, I again looked for a good, easy-to-understand reference. I didn’t find what I needed, so I wrote another book, Advanced Framing Methods, that provides all the information a framer needs to move up to the next level—becoming a lead framer. The Complete Book of Framing is the combination of those two books, updated with full-color illustrations and photographs, plus additional information—all presented in what I’ve come to think of as a “framer-friendly” format.
If you’re a novice with no framing experience, you’ll see the basics of framing shown in a simple, step-by-step style that makes it easy to learn. Where possible, I included both photographs and drawings for each step—for quick and complete learning. The advanced information will be more difficult for a novice to understand, but getting a good feel for the framing basics that come before it will help. The more advanced tasks are also explained with photos and clear drawings.
If you’re already an experienced framer, the book gives you some unique tools that you won’t find anywhere else. For example, after struggling with rafters and rake walls for years, I developed a diagonal percent system that makes it easier. I use this for finding rafter lengths and rake wall stud heights. The book also explains all the “classic” methods for doing these tasks, but once you try the diagonal percent system, I doubt you’ll go back to the old methods. Another example of the book’s unique style of presentation is the layout language, which I developed for my first book.
If you’re a lead framer, all the basic framing steps presented are important for reference and to help you teach and train crews. Most valuable, however, will be the guidance on managing a framing crew. Once you become a lead framer, your productivity is defined by the productivity of your crew. You’ll need to think about the information they need and how to teach and manage them most effectively. Chapter 14 of this book is like a mini framer management course.
The charts and graphs in the book present information that is needed to manage a framing crew, but is not readily available. For example, the International Building Code chart makes it easy to reference the latest information governing framing. The Standard Framing Dimensions chart gathers the information that you “sort-of” remember, but it helps to have it handy for quick reference.
This book covers all the major topics related to framing. Each is presented in the easiest learning method. Because the framing tasks are diverse and vary in complexity, the format also varies a little throughout the book. All of the topics are covered in a framer-friendly way.
Framing is very rewarding work, both physically and mentally. One of the biggest challenges, however, is getting accurate information every time so that you can be sure you’re framing a structure correctly. This book will assist you in that task.
Happy Framing,
Scot
Note: This book is intended to provide useful information for understanding residential framing, but it is not a substitute for professional construction, engineering, or repair evaluations, recommendations, or services. Readers should obtain assistance from appropriate experts, as needed.
Chapter One

Contents
· Framing Terms
· Framing Lumber
· Framing Sheathing
· Engineered Wood Products
· Lumber & Wood Structural Panel Grade Stamps
· Framing Nails
· Framing Tools
· Framing Tool Truck
· Cutting Lumber
· Protecting Lumber from Decay
· Preservative Treated Wood
The trade of wood framing comprises the rough carpentry skills needed to produce the “skeleton” of a building and its first layer of “skin.” The skeleton consists of the structural lumber forming the floors, walls, and roof. The skin consists of the lumber that encloses the skeleton and provides a surface for subsequent layers of protective and decorative finish materials.
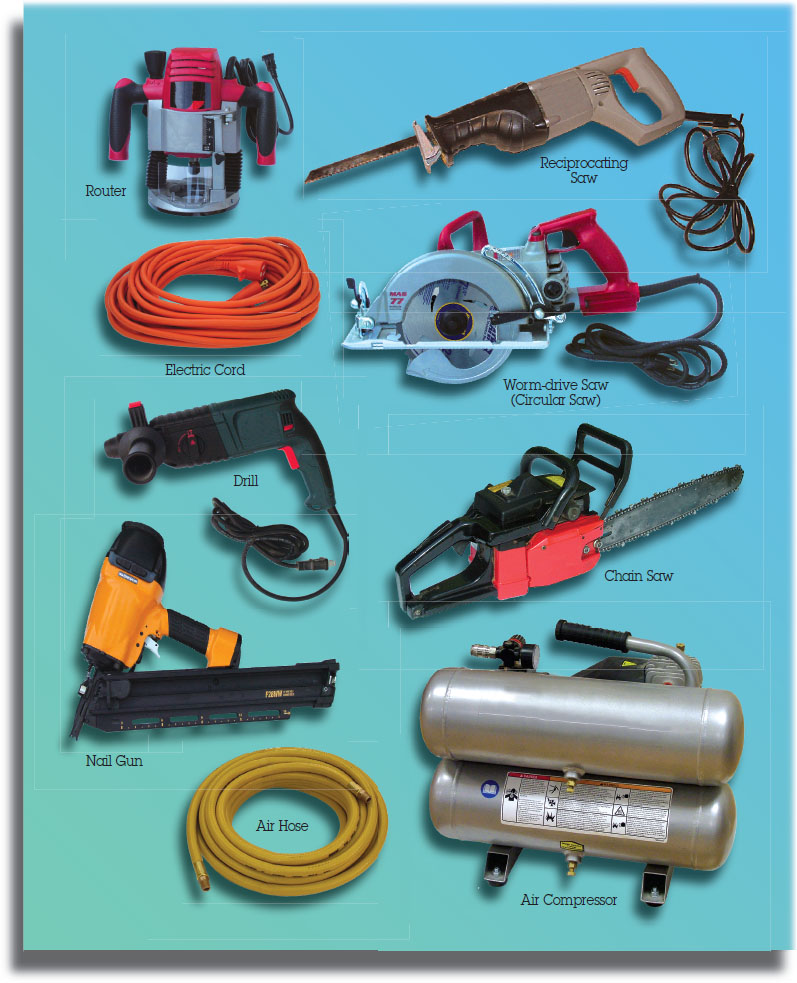
This chapter is an illustrated review of a framer’s most basic tools, materials, and terminology. This basic information is often not even taught on the job site, so if you don’t know it when you arrive for work, you will have to play a guessing game or ask a lot of questions.
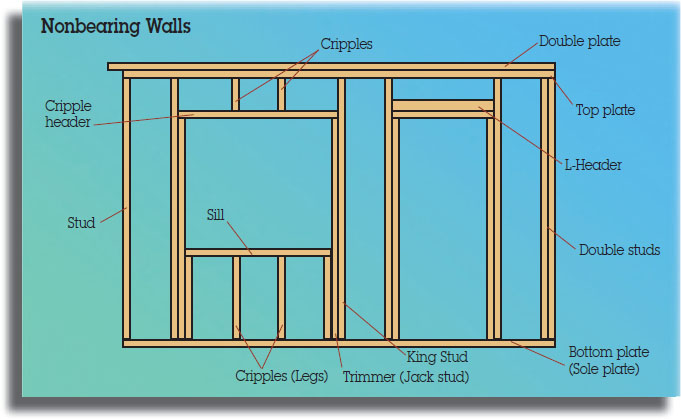
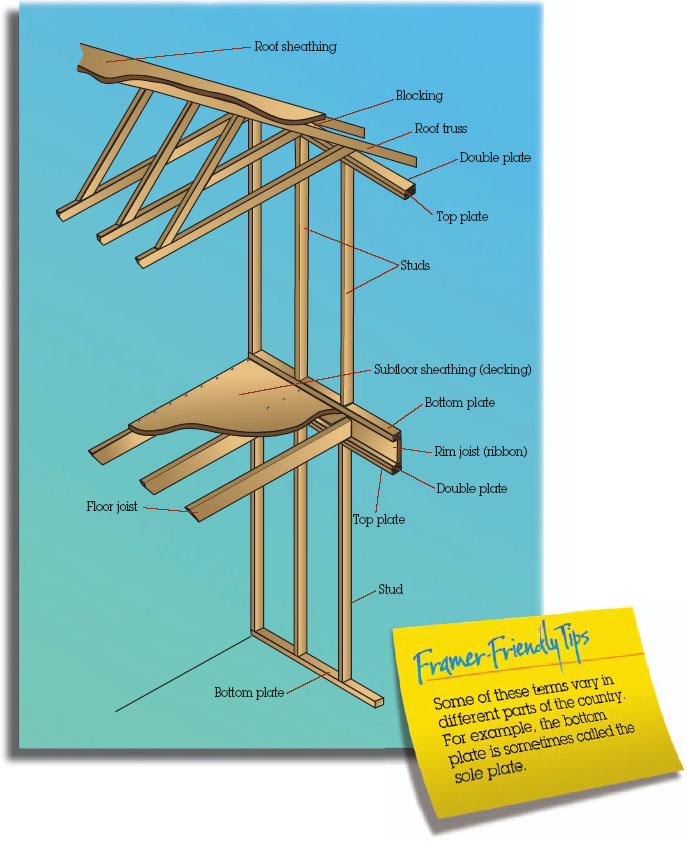
The detailed illustrations serve as a handy reference and help to reduce confusion when different words are used for the same item. Confusion can arise when framers move from job site to job site and work with different people. For example, bottom plates are often known as sole plates, backers as partitions, and trimmers as jack studs. But it doesn’t matter what they are called as long as you know what they are. There is also a more detailed list of framing terms with definitions at the back of the book.
The suggested organization for a framing tool truck presented in this chapter is just an example of how a truck might be set up for tool storage. Its purpose is, once again, to reduce confusion and make the job easier. It is amazing how much time can be spent looking for tools and nails if they aren’t put where you expect them to be.
Framing Terms
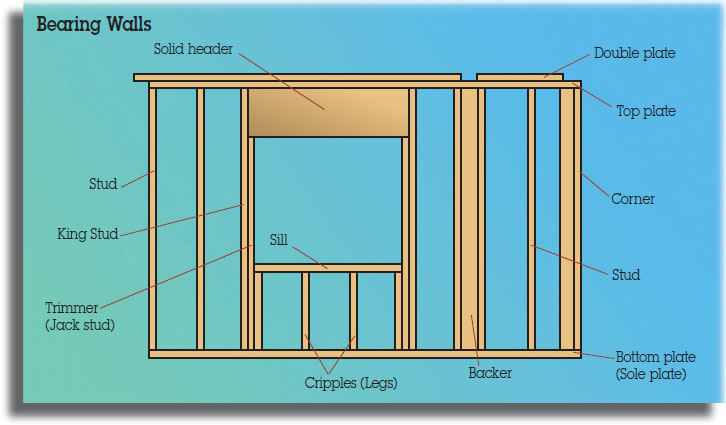
Bearing walls support the main weight of an upper portion of a building, such as a ceiling, floor, or roof. Nonbearing walls provide little or no support to those upper portions. Remove nonbearing walls, and the upper portions will stand; remove bearing walls, and the upper portions will fall.
Framing Lumber
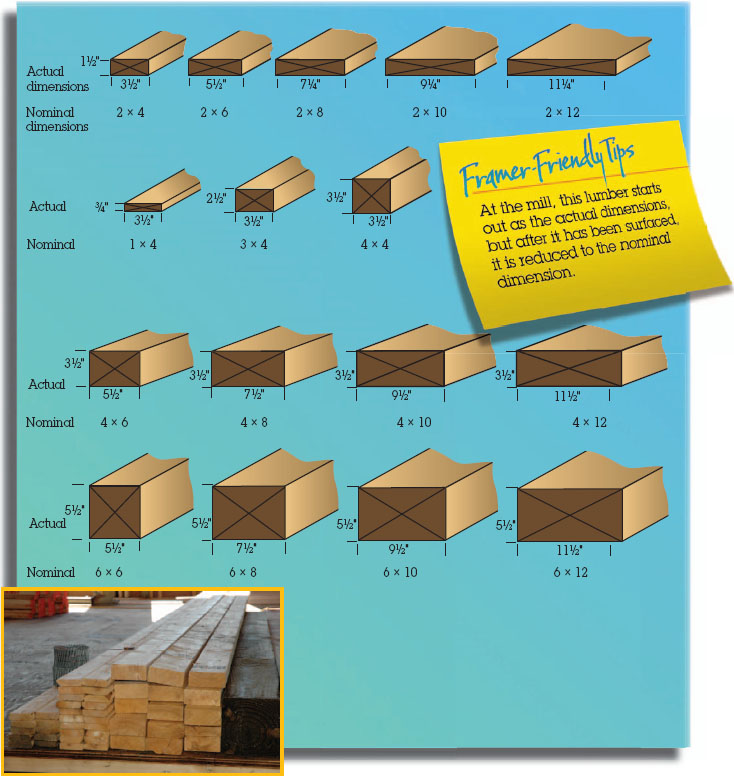
Lumber is sized in “nominal,” as opposed to “actual,” dimensions. A nominal dimension rounds off the actual dimension to the next highest whole number. For example, a piece of lumber that actually measures 1½"× 3½″ is rounded off to the nominal 2″ × 4″.
Framing Sheathing
Engineered Panel Products
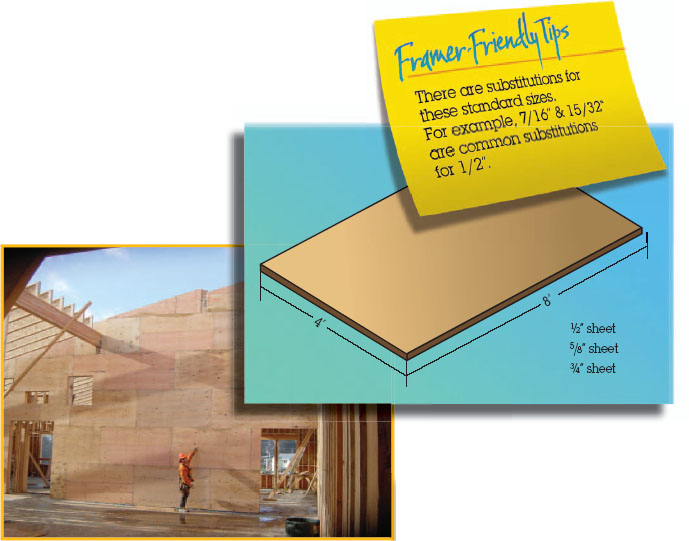
Sheathing comes in 4′ × 8″ sheets. The thicknesses most commonly used in framing are ½", 5/8″, and ¾".
The engineered panel products on this wall provide the strength needed for the high ceiling of this elementary school.
Although not as common in house framing, gypsum wallboard can be used on exterior walls, such as for apartments and condos, and commercial buildings for fire protection.
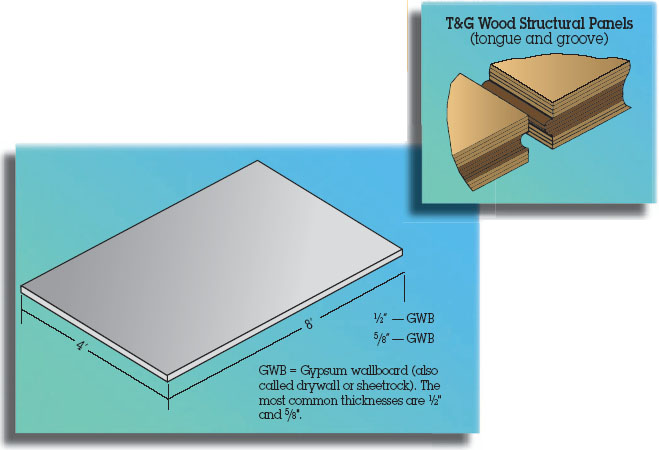
Dens Glass® gypsum sheathing is a brand that has fiberglass mat, which provides mold and moisture resistance and is gold in color.
Engineered Wood Products
Engineered wood products are becoming more and more a part of our everyday framing. The strengths of these different products vary. Whenever you use engineered wood, it is important that you understand the qualities of the specific product you are planning to use, as well as structural considerations and any restrictions on cutting and installation.
Engineered wood products can be divided into two categories: engineered panel products and engineered lumber products. Engineered panel products include plywood, oriented strand board (OSB), waferboard, composite, and structural particleboard. Engineered lumber products include I-joists, glu-lam beams, LVLs (laminated veneer lumber), PSLs (parallel strand lumber), and LSLs (laminated strand lumber).
I-joists are engineered panel products that provide consistency and fewer floor squeaks.

Engineered wood products have structural qualities different than those of traditional wood, so they must be used within the specification set by the manufacturer. When these products are specified on the plans, the architect or engineer who specified them will have checked with the structural engineer to ensure proper use.
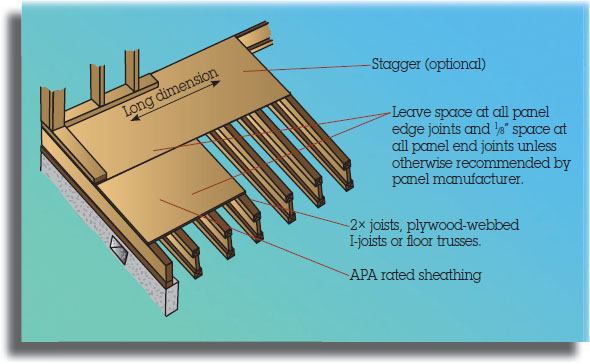
Engineered panel products have been around for years and are treated in a manner similar to engineered wood products. The 4’ × 8’ typical sheets are strongest in the direction of the grain. For floors and roofs, these sheets should be laid perpendicular to the direction of the supporting members. The strength of the panels comes from the panel cantilevering over the supports—so each piece should be at least as long as two support members.
Glu-lam beams, LVLs, PSLs, and LSLs can be cut to length, but should not be drilled or notched without checking with manufacturers’ specifications.
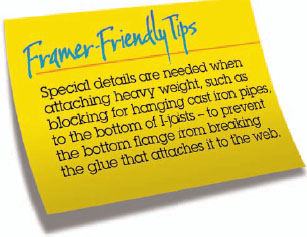
I-joists are becoming more widely used. Although the Engineered Wood Association has a standard for I-joists, not all I-joists manufacturers subscribe to that standard. Consequently, it is important to follow the manufacturer’s instructions whenever using I-joists. Installation instructions are usually delivered with the load for each job. The illustration shows some of the typical instructions.
Certain features are common among all I-joists. Rim and blocking may be of I-joist or solid rim board. Typical widths are 9½", 117/8 ", 14″, 16″, and 20″. Web stiffeners are used to add to the strength at bearing points. If the bearing point is at the bottom flange, then the web stiffener, which is the thickness of the flange on one side of the web, is held tight to the bottom. There should be at least a 1/8″ space between the top flange and the web stiffener. If the bearing point is at the top flange, then the web stiffener is held tight to the top with at least 1/8″ between the bottom flange and the web stiffener.
Common construction details for engineered lumber joists.
Section view of I-joist. Please note the components of the joist (darker colors) and the web stiffener (lighter color). Fasteners are shown in black.


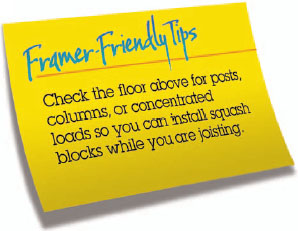
Squash blocks are pieces of lumber installed alongside TJI’s at points of heavy loading. They prevent the weight from crushing the TJI. They are typically dimensional lumber like 2 × 4s or 2 × 6s. They should be cut 1/16″ longer than the I-joist to take the load off the I-joists.
I-joist hardware, such as hangers, is usually delivered with the I-joist package. However, standard I-joist hardware can be purchased separately.
Squash blocks should be 1/16″ greater than the I-joist height.
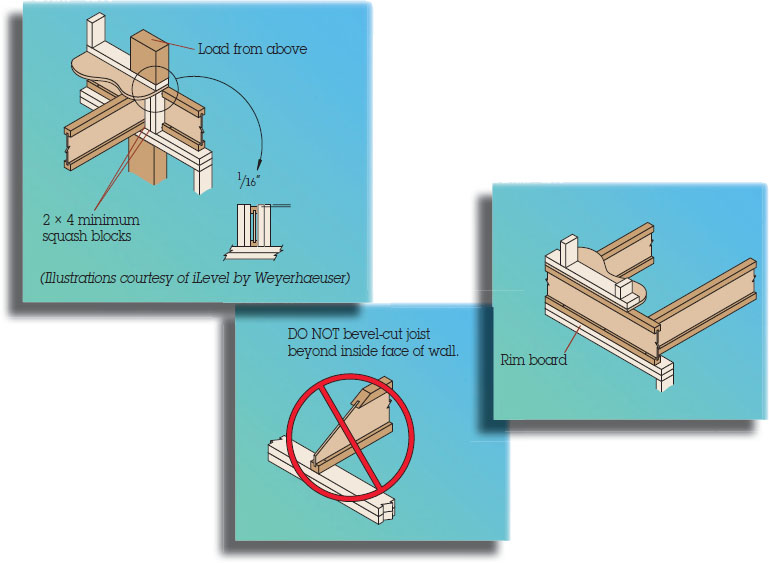
I-joists typically require a 1¾″ bearing. You can cut the end of an I-joist as long as it is not cut beyond a line straight up from the end of the bearing. However, no cuts should extend beyond a vertical line drawn from the end of the bearing point.
Lumber & Wood Structural Panel Grade Stamps
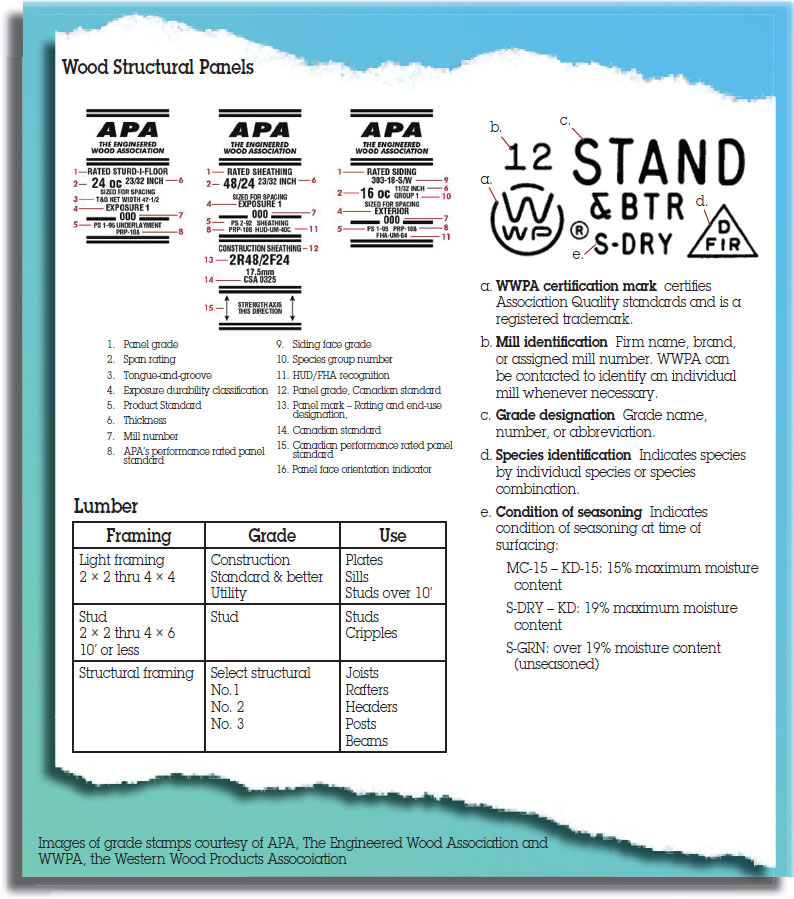
Lumber and wood structural panels are graded for strength and different uses. Each piece of lumber is stamped for identification before it is shipped. Architects specify grades of lumber and wood structural panels for various purposes, and framers need to make sure the right wood is used.
Framing Nails
Framing Tools

Framing Tool Truck
Typical Layout for a 14’ Step Van
If you’re a professional framer, organizing your tools helps keep them in good condition and helps you find them when you need them—saving valuable time on the job.

Cutting Lumber

Accuracy in measuring, marking, and cutting lumber is a very important framing skill to master. Periodic checks should be made of the condition of tape measures and the squareness of saw tables and blades.
A typical saw blade removes a channel of wood approximately 1/8″ wide, called a kerf. This must be taken into consideration when you make a cut.
Suppose you want to cut a board 25″ long. Measure and make a mark at 25″, then square a line through the mark with a square. The work piece—the 25″ piece you want to use—will be to the left of the line; the waste piece will be to the right. Guide your saw along the right edge of the line so the kerf is made in the waste piece. If your cut is perfectly made, the work piece will be left showing exactly half the width of your pencil line, and will measure exactly 25″. Thus, the old carpenter’s saying: “Leave the line.”

Protecting Lumber from Decay
Moisture and warmth will promote decay of most woods. To prevent decay, naturally durable woods or preservative-treated wood must be used when the wood is exposed to moisture.
Decay-resistant woods include redwood, cedar, black locust, and black walnut. Preservative-treated wood is treated according to certain industrial specifications. Preservative-treated wood is most commonly used because of its availability.
Preservative-treated or naturally durable woods should be used in the following locations:
1. On concrete foundation walls that are less than 8″ from exposed earth.
2. On concrete or masonry slabs that are in direct contact with earth.
3. Where wood is attached directly to the interior of exterior masonry or concrete walls below grade.
4. For floor joists if they are closer than 18″ to the exposed ground.
5. For floor girders if they are closer than 12″ to the exposed ground.


Preservative Treated Wood
The treating of wood in recent years has gone through some major changes. The most important thing to know is that there are different types of preservative treatment and that some of the treatments require specially coated fasteners to prevent corrosion.
A little history will help in understanding. For years the predominate chemical for preserving dimension lumber had been chromated copper arsenate (CCA). However, health concerns arose because of the arsenic content in CCA, and in 2004 the Environmental Protection Agency (EPA) required labels on CCA, which had the effect of disallowing the use of CCA-treated wood for most residential uses.
The first commonly used substitutes were copper azole (CA) and alkaline copper quaternary (ACQ). These eliminated the arsenic but created a different problem because they were corrosive to steel fasteners. To solve this problem, hardware manufacturers began making their common fasteners with a galvanized coating. For example, if you see a Simpson Strong-Tie hardware labeled Z-max you know it has been coated so that it can be used with CA and ACQ. Steel nails also had to be coated when used with lumber treated with CA or ACQ. Typically they are galvanized. Stainless steel is a better substitute for hardware and nails because it is less corrosive, but it is expensive.
Sodium Borate (SBX) preservative treatment is another substitute for CCA that does not have the problem of causing corrosion of steel fasteners, however it will wash out of the lumber with liquid exposure. It is specified for use above ground and continuously protected from liquid water.
New products are continually being developed. Carbon based compounds are among these and could prove to be less corrosive and natural in color.
The 2009 IBC & IRC code states that preservative treated wood should be in accordance with AWPA U1 (American Wood Protection Association Use Category System) for the species, product, preservative, and end use. The lumber tag attached to the treated wood will give the use category to assist you in making sure you are using the correctly treated wood.
All the different labels and chemicals can be confusing. Most importantly, make sure that you are using the right treatment for the task at hand and that you are using corrosive resistant fasteners where necessary. To check the correct use of treated lumber, read the tag attached to the lumber or ask the lumber supplier. For CA or ACQ treatment, you will need corrosion-resistant fasteners; for SBX or other borate treatments, you will not need corrosion-resistant fasteners. Beyond that, check on the fastener boxes for specifications or ask the lumber or fastener supplier.
