Chapter Fourteen

Contents
· Managing Your Team
· The Role of Lead Framers
· Quality Control
· Organizing Tools & Materials
· Teaching Framers
· Framing Tips for Every Task
· Planning & Scheduling
· Recordkeeping
· Productivity
This chapter is intended for advanced framers who are becoming “lead framers,” or starting to manage a framing crew. Keep in mind that the lead framer’s productivity is defined by the productivity of the crew. If you’re taking on the job of lead framer, you’ll need to think about the information your crew needs and how to teach and manage them most effectively. Earlier chapters in this book will help you train your crew in the specific steps of various framing tasks. But there are other aspects to managing a crew. It’s the lead framer’s job to get the building framed on time and within budget. The lead framer must also be sure that the expected quality standards are met, and that the building is structurally sound, visually aligned, and ready for inspectors and for other trades—all of this while maintaining a safe and congenial workplace. To meet all of these goals is an impressive accomplishment. The purpose of this chapter is to help you get there.
Management techniques have been developed over the years by studying and applying methods that work. The trend has been away from the dominating “command” approach and toward the cooperative “team” approach. This chapter deals with some organizational tasks, as well as with relationships and motivation. Developing good working relationships and instilling motivation is probably the most important and the most difficult task of a leader. A construction project manned by crews of skilled craftsmen who take pride in their work and get along with each other is bound to be successful. Assembling and directing such crews can only be accomplished by a leader who has developed good management skills.
Managing a framing team is a task like no other. The job changes every day and is always full of new surprises. The lead framer should be good at multi-tasking. A typical day might include trying to make sense of plans that don’t provide enough information, dealing with an owner or general contractor who is focused more on cost and schedule than the details of framing, and organizing a group of framers who have different levels of knowledge and experience into an effective team.
The most valuable tools you can have in managing a crew are common sense, framing knowledge, the ability to evaluate a situation objectively, and an understanding of your crew’s abilities and personalities. You probably already have a preferred management style, based on what you have learned in your experience in the field. This chapter will help you better understand that management style and improve upon it.
Managing Your Team
Construction is a unique industry. It is always changing. Each new job or building has its own individual plan, timetable, and workers to do the job. The economy, local governments, codes, tools, and materials are also constantly changing, creating different work environments. The crew structure has to change, as necessary, to accommodate the particular requirements of a job. To be efficient, the lead framer must be aware of all factors that affect the job, and must be able to work successfully within them.
The management structure of a framing crew can differ from company to company. In some cases, the lead framer is the owner/builder. In larger construction companies, the lead framer may run only the framing crew. Either way, the lead framer leads the framing on the job.
This book is not intended to cover the functions of the framing contractor or builder that include office management, bids, payroll, or business organization. It is written for someone who already has experience, knowledge, and skills in basic framing, and who wants to move up to the next level or become a better lead framer.
As a lead framer, you need to have a different perspective from a crew member. When you are working on your own, the amount of work completed depends on you. When you are leading a crew, the amount of work finished depends on the whole crew. On your own, you have complete control over what can be done, whereas you have limited control over how much work your crew gets done. Nevertheless, you only need a little control and increased knowledge to make a big difference in how much work the crew finishes. This chapter is intended to give you that increase in knowledge—which can make your jobs run better.
The lead framer

The Role of Lead Framers
A Lead Framer Must Possess:
1. Knowledge to frame any building
2. Ability to impart knowledge to other framers
3. Ability to motivate other framers
Knowledge to Frame Any Building
As a lead framer, you must thoroughly understand the basic concepts involved in framing any style building. The framing crew takes their direction from you; you, in turn, take your direction, depending on the situation, from any of the following:
a. Framing contractor
b. Site superintendent
c. Architect or engineer (plans)
d. Owner
There are a number of framing requirements that are easy to overlook. Compile checklists such as the ones shown and refer to them during each phase of the job.
Framing Checklist
Walls:
 Studs for tubs, medicine cabinets, etc.
Special shear nailing
Hold-downs
Alignment of windows and doors
Size of studs
Joists:
Heading-off for toilets
Double under bearing walls
Cantilevering overhangs
Roof:
Fascia overhang 6″ for gutters
Skylights or roof hatch
Ventilation
Attic access
Crawl space:
Vents in rim joists
Crawl space access
Responsibilities of Lead Framer
Check location and quality of power supply.
Check location and date of lumber drop.
Check window delivery schedule.
Check truss delivery schedule when appropriate.
Arrange to have the builder complete as much site preparation as possible before starting, including leveling the area around the building where framers will be working.
Highlight items on plans that are easy to miss or hard to find.
Make a list of potential problem areas and items that are easy to forget.
Ability to Impart Knowledge to Other Framers
· When teaching someone, start with the basics. Assume nothing. Explain in clear and simple language exactly what the job is, and how it is to be done.
· The easiest way to lead may be to give orders, make demands, and threaten. However, it creates an unsettling atmosphere that is not conducive to a cooperative, self-motivated crew. Request that framers do tasks; do not order them.
· Assume that no framer intentionally does something wrong. Help your crew correct errors and show them how to avoid making them again.
· Treat each framer with respect. His time may be less valuable to the company, but his worth as an individual is equal to yours.
· The words “please” and “thank you” can make a framer feel much better about working for you. It is an easy way to let him know that what he does is important and appreciated.
· Do not give the hard, unpleasant jobs to the same framer time after time. The entire crew should share such tasks.
· When a framer asks you a question, give him the answer, but then explain how you got the answer so the next time he can figure it out himself.
Ability to Motivate Other Framers
To produce good work efficiently, a framer must be motivated. To be motivated, a framer must:
· Feel good about himself
· Feel what he is doing is important
· Be respected by his lead framer
· Feel he is being treated equally
Feel good about himself
You are a lead framer, not a therapist, but your attitude toward your crew should have a positive effect on his motivation. A crew whose members take pride in their individual and collective skills will invariably produce quality work and take pleasure in doing it.
Feel what he is doing is important
Every task, no matter how small, is necessary to complete the job and, therefore, important.
Be respected by his lead framer
Take time to listen and teach. If, as lead framer, you are called upon to solve a framing problem, it is better to let the framer explain his solution first and, if it is an acceptable solution, let him do it his way. There are often several ways to solve a framing problem. If you have a way that is much faster or easier than the framer’s way, explain it to him and tell him how you came to your conclusion.
Directions should be given in terms of the job, not the individual. For example: Negative—“I told you five minutes ago to build that wall.” Positive—“We need that wall built right away so we can finish this unit.”
Framers like to feel that the person supervising is concerned about what they think and how they feel. Convey this through your words and actions.
Feel he is being treated equally
Don’t show favoritism when assigning tasks. Make every effort to treat all framers fairly. Deal with any complaints impartially.
Different Types of Management
There are many ways to manage framers. It is important to know the different management styles and the effects that they have on employees, so that you can create the most productive framing crew. There are three main styles of management: autocratic, bureaucratic, and democratic.
Autocratic: The lead framer has the decision-making power and does not delegate authority. Discussion and suggestions are generally not permitted. This style sometimes motivates framers to please the lead framer instead of to improve productivity. It also discourages framers from finding creative solutions.
Bureaucratic: The lead framer enforces established rules, regulations, policies, and procedures to run the crew. This style does not allow for creative solutions.
Democratic: Framers help determine the goals of the company. The lead framer organizes and directs the framers as part of his job as a crew member. If a problem comes up between the lead framer and a framer, they work together to find a solution they can both accept. This style usually creates a congenial work atmosphere.
Most lead framers use a combination of the three styles. This lets them have authority when they need it, while getting the help from their framers in developing the most productive methods for accomplishing their work.
Managing a framing crew can be compared to playing quarterback on a football team. Your team has to have confidence in your ability to direct them. The team expects you to tell them when they make mistakes, but they also expect you to tell them what they need to know to do a good job and to be considerate of them. In effect, you have to develop a working relationship with each framer.
The autocratic lead framer

The democratic lead framer

Different Types of Framing Crews
There are different types of framing crews, which require some adjustment in style. They are:
1. Hourly employees
2. Piece workers
3. A combination of the two
Hourly workers are paid by the hour. Their goal is to keep their employer happy with their work. They typically are more concerned with quality of work than with speed. Piece workers are paid by the amount of work they finish. Their main goal is to get as much work as possible done within a certain time frame. A combination of the two allows for the employee to be paid for each hour he or she works, then to receive a bonus for completing extra work within a defined time frame. A combination system can provide the motivation to maintain speed, while still allowing you a great degree of control over the job.
More on Motivation
Motivation is the intangible factor that can make or break a crew, and probably the single most important factor that affects framers, yet it is not something you can demand of your crew. As a lead framer, you want to support individual framers and maintain a high level of motivation in the crew.
Ideas for Building Relationships and Motivation
1. Honesty is a basic. A framer will observe not only what you say and how you treat him or her, but what you say to others and how you treat them. Keep your framers well-informed. If there is a slow-down coming up, and some framers might be laid off, let them know. You risk the chance of them quitting before the job is finished, but if you want them to be on your side, you have to be on theirs.
2. The first day on a job is the most important time for setting a new framer’s attitude toward his or her job. Take time to introduce him to the whole crew and show him where he can find tools, the first aid kit, and portable toilets. Allow time for him to acclimate to the job.
3. Developing relationships takes time and a conscious effort. While your time is valuable, and you have to balance it, try to listen to what your framers have to say, and show patience. If you want them to support your interests, you have to be concerned about theirs. Make yourself available and easy to talk to. Encourage open and free resolution of problems, and make every effort to use your framers’ suggestions, or explain why if you decide not to. This gives the framers positive feedback and gets them thinking about better and faster ways to accomplish tasks. If you constantly reject their suggestions, you reduce their motivation.
4. Use power discreetly. The more you have to display authority, the less valuable it becomes. Persuasion and guidance can be more effective than a show of authority.
5. Assign more responsibility and train framers to take on new tasks whenever the job allows. This will motivate framers to take on more duties.
6. Teach framers how to solve problems.
7. Praise framers for good work. This helps create a positive attitude, especially when it is done publicly. Compliments are a good relationship-builder, especially when framers first start working with you. Go out of your way to find something they have done well. Hopefully you can get a couple of positive compliments in before you have to start pointing out any mistakes.
8. Expect some mistakes and use them as learning opportunities. Making mistakes and learning on the job are everyday occurrences and should not create fear in a framer. Your framers need to know that you are there to teach and direct them, and that you will be fair and reasonable.
9. Make criticism into a learning experience and give it in private. When a framer makes mistakes or is sloppy, don’t assume it’s intentional. Calmly explain what he did wrong. Direct the criticism at the action, not the person. Be specific. For example, “your nails are not sunk deep enough,” instead of, “you are a horrible nailer.” If the framer does not improve or change, then you may have to tell him that he is not suited for the work and should look for work elsewhere.
10. Pitch in and be a good example, especially if the job is one that nobody wants to do. You should not feel that any task is beneath you.
11. Be courteous. Everybody likes to hear “please” and “thank you.” Saying “thank you” is a good way to finish up without giving the workers the sense that they are dismissed.
Respecting your framers will help keep them motivated, and help get the job done right.
Competition as a Motivator
It is sometimes possible to create competition that will provide enjoyment for your framers and increase productivity. Here is an example:
A while ago, I had a couple of hammers left over from tools I had purchased for a training class. On the job, we were framing a two-story hotel with two long walls on either side. I woke up one morning asking myself, “How can I make these walls go quicker?” I decided to create a competition by splitting the four framers into two teams, with one team on each side of the hotel. The winning team—the one that got their wall up first—would get the hammers. With the competition, the framers enjoyed the day and got a lot more wall framed than normal. Healthy competitions can help provide motivation.
Goals
One of the best management tools is goal-setting. It develops motivation by creating a reason to work productively, gives you a tool for judging the productivity of a framer, and provides a benchmark for discussing each framer’s daily tasks. Goals should be set for different time periods, ranging from the entire length of the job, to daily or task goals. Goals can be written down, or you can go over them in a conversation with your framers.
Goals for the job are usually defined in the beginning by your schedule and manpower.
It helps to break down your overall project goals into goals for each part of the job, like the first-floor walls, the joists, and the rafters. Once you know the goals for the major parts of the job, you can begin to set your daily goals.
Set daily goals the first thing in the morning. You might want to think about them and who you will assign to each task on your way to work. After assigning the tasks, ask each individual to set their own goals for the day, which you can review with them.
Framers sometimes think they can get more work done in a day than they actually can. In this case, all you have to do is agree with their goals, and encourage your framers to achieve them. If, on the other hand, they set their goals at a lower rate of productivity than you expect, review their goals with them, and see if you can teach them faster ways to achieve them. You might do a little of their work for them so they can see how fast it is supposed to be done.
If you can’t agree on a goal with a framer, give him another task, and assign his original task to someone else. At the end of the day you can compare how much work the other person accomplished with what you and the first framer expected, then determine which one of you was more on-target. This takes time and effort on your part, but sometimes that’s what’s needed to create motivation—which will save time in the long run.
It’s important to review goals when your framers are done with their tasks—either at the end of the day or the next morning before you set new goals. This will show framers that goals are important. It also lets you determine when and if improvement is necessary. Set goals that are realistic and obtainable, but still challenging.
When setting goals, consider the learning curve. Studies have found that when you double the amount of similar work that someone does, their productivity increases by 20%. Even experienced framers have a learning curve.
The more experience you have, the clearer your goals will be. The more you set goals, the better you will become at it.
Company Goals
Job site goals need to be directed by overall company goals, which will vary depending on the owner’s desires. Here are some examples:
Sample Company Goals:
1. To provide income for framers and the company
2. To provide a safe and enjoyable work environment
3. To coordinate with the general contractor’s schedule and needs
4. To produce high-quality framed buildings
5. To grow the company
6. To develop framing skills
Communication
Communication is to a lead framer what a hammer is to a framer—one of your most important tools. Before you were a lead framer, you had to communicate with only one person—most likely the lead contractor or superintendent. As a lead framer, you will be communicating with these same people, but also possibly with the architect, engineer, owner, and the crew.
Each one of these people comes from a different environment, has different knowledge and experience, and different goals related to the job you are framing. Good communication is based on honesty, trustworthiness, openness, and effective listening skills. Keep in mind that bad communication creates problems, while good communication solves problems.
Communicating with Framers
Each framer who works for you will have his or her own unique characteristics, personality, background, and place of origin. It’s probably impossible to know all the sides of all framers, but the more you get to know them, the easier it will be to communicate with and teach them.
Communicating with the Framing Contractor, Superintendent, Architect, Engineer, or Owner
We all know how to talk—some better than others. What we don’t always know is what to say and who to say it to. That will vary depending on the size of the job and the organizational structure of the companies doing the building. If you say the right thing to the wrong person, or the wrong thing to the right person, you might end up causing yourself delays and/or additional work.
The nature of the construction industry lends itself to communication errors. With each new building, you might be working with a completely new group. In many cases, an owner will select the team that will design and build the building. The architect may have a great sense of how the finished building will look and feel, but probably won’t be familiar with framing slang and concepts. The architect may hire an engineer to design the structural members of the building. Once the plans are complete, the owner will hire a builder who subcontracts the framing to your employer. You’ll then have to frame the building based on plans that may have been passed around, worked on, and changed by a group of people who may not have worked together before, and who may have varying degrees of experience or knowledge of what you have to do to frame the building.
Solving Problems on the Plans
Chances are, there will be some mistakes, omissions, and/or details on the plans that just don’t work. The parties involved in the design of the plans are capable of making mistakes in the same way you and your crew can make mistakes. Be ready to deal with these problems as they arise.
Good communication is probably your biggest strength when it comes to resolving mistakes or processing changes. The smaller the building, the easier it will be to navigate mistakes, and thereby reduce extra cost and time delays. Sometimes all it takes is a quick conversation with the superintendent. On bigger jobs, however, it may be necessary to get input from all members of the building management team, all the way back to the owner. In these cases, be sure to present the information in an organized way to prevent delays. The following five steps organize the process of solving problems with the plans:
1. Identify the problem: The information may be missing from the plans, or the design may just not work. It could also be that the information you need is in another part of the plans, not where it is usually located.
2. Have another framer review the situation: When you find a mistake, make sure it really is a mistake. One way to do this is to have one of your crew look at it. Even if he doesn’t have the knowledge to fully analyze the situation, just explaining it to him helps you review it in your own mind.
3. Develop a solution: It is usually worth your time and energy to develop an easy solution and write it down. Very often your suggestion will be accepted. This saves the person who made the mistake from having to work out a solution—which could take days or even weeks and could be more difficult to frame than need be. Along with your proposed solution, you should note any extra costs that would result.
4. Identify and seek out the person responsible: Typically, if the mistake is in the architectural plans, it will be an architectural mistake. If it’s in the structural plans, it’s probably an engineering mistake. Quite often, however, it’s a coordination mistake between the architect and the engineer. If you’re lucky enough to have direct availability to the parties involved, a quick phone call might provide an easy solution. Remember that framing contractors, general contractors, architects, engineers, and owners all have relationships. Go to the source whenever possible, but be careful to go through proper channels for communication. Get permission, if necessary, to directly contact the appropriate party.
5. Clarify the solution: Each job has its own chain of authority. Sometimes the general contractor takes responsibility for solving problems; sometimes it’s the owner or architect. Direct your suggested solution to whoever accepts the authority. Whether they agree with your solution or propose their own, be sure it is written down and dated, along with the name of the person who proposed the solution. Write it on the plans for easy reference. Do this while the person is still there to make sure you understand their interpretation of the solution. This way, you’ll be protecting yourself in case of any future confusion.
Delayed Communications
Organizing your communication is another important task of a lead framer. For example, you might realize that you need more material or hardware, but the person who orders it is not on the site. By the time you see that person, however, you are onto another task and may forget to let them know what you need.
The easiest way to avoid this problem is to carry a small notebook in your pocket, and write down what you need, whether it’s information or materials. Get used to checking your notebook whenever you talk to the people who supply your material or process your change orders, or when you are making phone calls. The notebook acts as a memory aid when communications are delayed.
Assigning Framers Tasks
As lead framer, your most important job is to assign framers to tasks. If they are unfamiliar with the tasks, it’s part of your job to teach them how to do the work. It may be tempting to just grab the right tool and take care of the problem yourself, but if you don’t teach your crew, they won’t be able to work independently, and neither will you.
Organizing your crew and assigning tasks can be the easiest part of your job, or it can be the most difficult. A lot of it has to do with the framers you have working for you, and the way you manage them. For example, one individual with a bad attitude can disrupt a whole crew, or a crew without proper direction can work all day and get little done.
When you first start leading, you’ll quickly realize that it takes a lot of preparation to keep the whole crew busy all the time. As each framer finishes a task, you must have another task ready. If a task isn’t ready, the framer(s) will have to wait around while you get it ready for them.
Dealing with Difficult Personalities
Chances are you will have to work with a difficult framer at some time. Common sense and creative thinking are good tools in these situations. Here are some difficult personality types:
· The Complainer: Looks for problems, not solutions. Suggestion: Tell him complaints are not helpful, he should look for a solution, and if he gets stumped, you’re there to help.
· The Back-Stabber: Disrespectful and might wish to be lead framer. Suggestion: Confront disrespect or underhanded behavior openly. Explain to him how his actions affect the whole team. If you can’t resolve the issues, speak to the framing or general contractor.
· The Talker: Probably a nice person, but as long as he keeps you talking, he isn’t working. Suggestion: Be considerate, but after a short while, excuse yourself to get some work done.
· The Perfectionist: Wants every task done according to his standards and lets everyone know if something is less than perfect. Suggestion: Use this person’s keen eye to uncover potential problems. Let him be a sounding board for new tasks.
In some cases, “difficult” framers may just have personalities that require relating to them a little differently. Try to use the individual strengths of each framer for the betterment of the team.
If you are working on a task and one of your crew needs something to do (and you don’t have anything else for him to do), show him what you are doing so that he can help you or take over. Or have him get started on the next phase of the job. The point here is that if anyone is going to be standing around scratching his head, it should be you, because you can always use the time to plan for the next step.
Analysis of Crew Performance
For your framers to become better framers, they should have an understanding of how well (or not) they are performing their jobs. Crew analysis is the process of answering this question. It is important to know the capabilities of each framer, so you can assign him to the kind of task where he’ll be most productive and know how much supervision or instruction he needs. Discuss these things with your framers. Their feedback will help you understand and evaluate them.
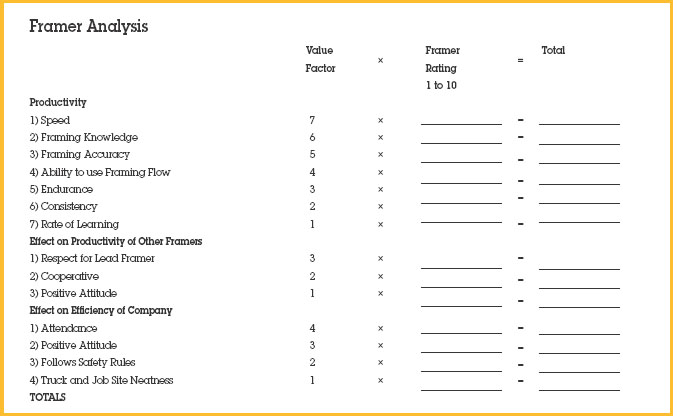
The “Framer Analysis” form can be used to evaluate your crew and to show your framers what aspects of their work are important to you. This is also a good format for deciding wage increases based on performance. The framer who consistently gets high ratings may get more money if he reaches a certain skill level.
To use the form, give the framer a rating from 1 to 10 for all the items listed. The “Value Factor” column in this form is an estimate of the comparative value of the productivity items. You can change these values to your own preferences. Enter your rating in the column titled “Framing Rating 1 to 10.” Multiply the rating by the various value factors and put the results in the column labeled “Total.” Add the total ratings. This will give you a value you can use to compare your framers’ performance. You can use the Framer Analysis form for your own planning purposes or to show framers where they need to make improvements.
Quality Control
In framing, the question of speed versus quality always comes up. You want to get the job done as fast as possible—but you must have a quality building, and quality takes time. The most important thing to consider is the structural integrity of the building. Once that requirement is satisfied, the faster the job can be done, the better.
It is a lot easier to talk about the importance of quality than it is to define it for a framer. Quality to one framer can be the product of a “wood butcher” to another framer. Framers learn under different lead framers who have different goals and objectives, and different standards of what quality workmanship is. You need to establish your own definition of quality of workmanship for the framers working for you.
The best way to do this is by observing or auditing their completed work, then giving them feedback on what you saw and what you would like to see. To audit the work, check a portion of what has been done. If that sample is done well, most likely the rest is done right. If you find a mistake, find out why it was made, correct any similar errors, and make sure the framer knows why this happened.
Audit Checklist
A checklist is helpful when you audit individual tasks. It will help you remember all the parts that need checking. For example, the following list could be used for shear walls.

Audit Guidelines
The following guidelines can be used to control the quality of experienced and new framers’ work, and the work at the end of the job.
For an experienced framer you have worked with before:
1. Casually observe as part of routine.
2. Audit work after completion, or at regular intervals.
For new-to-the-task framers:
1. Review framing tips (at the end of this chapter).
2. When possible, demonstrate work.
3. Watch as the new framer gets started.
4. Ask the new framer to come and get you for review after the first piece is finished.
5. After a half hour to an hour, review the work.
6. End of day: review the work.
7. End of task: audit the work.
End of job:
1. Audit 10% of each individual task.
2. If mistakes are found, review all task work.
3. Correct all mistakes.
4. Check for omissions.
Shear Walls Checklist
Nailing pattern for sheathing
Blocking, if required
Distance between sheathing nails and the edge (3/8″ minimum)
Nails are not driven too deep
Lumber grade, if specified
Hold-down sizes and location
Hold-down bolt sizes
Tightness of bolts
Sample Pick-Up Checklist
Studs under beams
Drywall backing
Fireblocking
Nailing sheathing
Headers furred out
Thresholds cut
Crawl space access
Attic access
Dimensions of rough openings on doors and windows
Check door openings for plumb
Drop ceilings and soffits framed
Stair handrail backing
All temporary braces removed
Joist hangers and timber connectors
Pick-Up Lists
Pick-up lists are important to keep things organized at the end of the job. The superintendent typically creates this list of tasks that have to be done before you are finished with the job. When the list is first given to you, review it to make sure everything is clear to you. It is sometimes easiest to ask the superintendent to accompany you around the site to make sure you understand exactly what he is trying to communicate.
You may have to consult the plans to get all the information you need in order to understand the work that needs to be done. If the superintendent does not have a written list, make your own list as you walk around the site discussing each task.
Remember that quality control is not just for the owner’s benefit in the finished product. Quality control also makes your work go more smoothly. When your framers’ cuts are square and true to length, the framing fits together a lot more easily. If the building is square, when you cut joists and rafters, you can cut them all at once, the same length, instead of having to measure each one. When you get to the roof, the trusses will fit.
Organizing Tools & Materials
In addition to organizing and teaching the crew, you will have to organize your tools and materials. Each crew and job will require a different type of organization. To give you an idea of how to go about this, we will discuss three aspects: tool organization, material storage, and material protection.
Tool Organization
Following is an example of how the crew’s tools might be organized using a job site tool truck.
Clear descriptions are important on pickup lists. If you don’t have a detailed pickup list, you can count on returning to the job to fix at least one task.

General
Put tools away, in their designated place, after using them.
· Hang safety harnesses and lines on hooks.
· Stand sledge hammers and metal bars in corner.
· Place saws on saw table.
· Place nail guns in safety box.
· Place electrical tools in wood box.
· Hang up screwdrivers.
· Place metal wrenches and sockets in metal box.
· Place nails out of weather.
· Place trash in designated container.
Roll-up
Roll up largest, bulkiest items first.
· Four-way electric extension cords
· Air hoses
· Electric cords
Take equipment to truck in following order:
· Miscellaneous hand electrical tools
· Air hoses and electric cords
· Circular saws and old saw blades
· Air compressors (Drain every Friday.)
· Ladders
The person responsible for the truck:
· As soon as roll-up begins, start picking up and taking tools to the truck.
· Take tools from framers and put them in their place in the tool truck.
· Clean/organize truck when not busy putting tools away.
o Put similar nails together.
o Hang up rain gear.
o Put tools in proper place.
o Check and account for number of tools.
o Put all loose garbage in bucket.
Nails
· Use up partial boxes of nails first.
· Follow established storage procedures. For example, starting at the right-hand side of back of truck
o 1st: 16d sinkers 4th: joist hanger nails
o 2nd: 8d sinkers 5th: concrete nails
o 3rd: roofing nails 6th: fascia nails
· On right-hand side under seat, 10d gun nails.
· On left-hand side under seat, 8d gun nails.
Roll-out
· Check oil in air compressors every morning.
· Oil nail guns every morning.
· Check oil in circular saws the first of every month.
· Check staging and ladders.
· Check safety devices in all tools.
This list should be discussed at the first crew meeting on the job, then the list should be posted on the tool truck.
Material Storage
1. If your lumber is being dropped by a truck, check to make sure the lumber is loaded so that the items being used first are on top. You might need to contact (or have the superintendent contact) the lumber company to make sure they think about the loading order. Sometimes it helps to make up a quick list to help them out. For example:
· Treated mudsill plate
· Floor joists
· Floor sheathing
· Wall plates
· Studs
· Headers
· Wall sheathing
· Rafters
· Roof sheathing
The lumber company may not be able to load the material exactly the way you want, but a little concern for the loading order can make a big difference in the amount of lumber you have to move.
2. When using a forklift, store like items together so that you do not have to move other material to get at what you need.
3. When storing items, always think about where you are going to use them. If you don’t have a forklift, store them as close to where you are going to use them as possible.
4. If you have to store items in front of each other, make sure the items needed first are available first.
5. Consider using carts or other mobile devices for moving lumber in the building.
Pallet jack and drywall cart for moving lumber

Material Protection
Material protection also requires you to consider accessibility and time. You can spend a lot of needless time moving and protecting material. You can also end up reducing the quality of your building by not taking care of your material. Consider the following:
1. If the specifications indicate a certain procedure for protecting your material (usually the case on larger jobs), then you need to follow them.
2. Use scrap lumber to keep your material out of the dirt.
3. If lumber is left in direct sun, the exposed sides will dry out more than the unexposed sides, and cause it to warp. The warp will make framing difficult, and walls curved.
4. Moisture loss or absorption from lumber causes shrinkage or swelling. If the shrinkage or swelling is uneven or happens too quickly, the wood fibers can break and cause the lumber to warp.
5. Fungal growth occurs when moisture content reaches 20%, and the air temperature is between 40 and 100 degrees. Fungal growth causes decay and stain.
6. The moisture content of green lumber is little affected by rainfall. But if it is not used right away, green lumber is more susceptible to fungal decay and stain.
7. Posts, beams, and timbers are always green. Seasoning checks will occur, but will not affect the structural performance. The more this lumber is protected, the less it will check, and the easier the installation will be.
8. Always cover lumber if you are expecting snow or other bad weather. It is easy to lift the cover to remove the snow when you need to use the lumber. On the other hand, if the lumber is being used up quickly and is not adversely affected by the environment, covering it may be a waste of time.
9. If lumber is delivered with covers already on, leave them in place as long as possible. If you are using only small quantities at a time, consider pulling the lumber out at the ends to leave the cover on. With engineered wood products such as glu-lam beams, you may be able to just uncover the ends for bearing.
10. If moisture absorption is expected on full bundles of sheathing, cut the banding to prevent edge damage due to expansion of the sheathing.
11. When lumber is covered, allow ventilation so that the sun does not create a greenhouse effect that will promote mold growth.
Teaching Framers
You have to take training seriously if you want your framers to take learning seriously. You are a teacher whether you want to be or not. The only question is whether you are a good teacher.
Good teachers have confidence in their knowledge and an understanding of those working for them. Remember:
· A picture is worth 10,000 words.
· A demonstration is worth 100 pictures.
· Tell your framers what you are going to tell them, tell them, then tell them what you told them. Repetition makes learning easier.
· It is important that framers understand the structural significance of their work.
Some of your teaching will apply to all of your crew. For example, special nailing may be specified for double wall plate joints for the whole building. A crew meeting is a good time to inform the whole crew all at once.
Hold a crew meeting before you start a job, then once a week after that. Monday morning meetings can help ease everyone back from the weekend. You can have these meetings right before or after your safety meetings, while you already have everyone together. It’s nice if the crew meeting can be a relaxed time, while still covering important points such as:
· Task assignments
· Crew procedures (crew organization)
· Tool organization (tool truck)
· Job-specific items
Teaching While Assigning Tasks
Most of your teaching will occur when you are assigning tasks to framers. You won’t have to say anything to your experienced framers, but new or apprentice framers benefit from seeing you follow a certain procedure to make sure you don’t forget anything.
When assigning a task:
· Always assume your framers are seeing the task for the first time.
· Explain everything you know about the operation.
· As you’re explaining the operation, tell your framers why it’s done this way.
· Ask them if they understand. (Have them explain it to you.)
· If they ask you a question and you don’t have the answer, tell them you’ll find out and get back to them.
Check on them:
· After five to ten minutes.
· Repeatedly until you’re confident that they know what they’re doing.
When you’re teaching a framer trainee, remember that they’re learning as a student, so expect that it may take a little while for them to catch on. Don’t expect all trainees to learn instantly, but always assume they want to learn.
The best way to communicate how to do a job is to actually do the job, and let the trainee watch. At the same time, explain as much of what you’re doing as possible.
If you are showing an apprentice how to nail off plywood, use the following sequence:
1. Tell them the nailing pattern.
2. Ask them if they know what “nailing pattern” means.
3. Tell them about keeping the nail 3/8″ away from the edge of the plywood.
4. Tell them to angle the nail slightly toward the edge of the plywood.
5. Tell them when they need to use a regulator or depth gage, and show them how.
6. Tell them how to avoid breaking the plywood surface.
7. Demonstrate use of a nail gun.
8. Watch them while they shoot a couple of nails in.
9. Ask them to come and get you to check their work after they have finished two sheets.
10. Check their work closely to make sure it’s done properly.
Using this type of checklist will help you remember all the items that should be covered. This list also helps with assigning framing tasks.
Framing Tips for Every Task
When the lead framer is assigning tasks, he has to decide what information he has to tell the framer before starting the task. If the crew member has never done the task, the lead framer needs to explain it. If the framer has done this task many times, little needs to be said. If the framer’s knowledge is not clear, it’s best to review the task with him.
There are certain “tips” that experienced framers have developed for each task. Use the ones provided in this section or keep your own list to help your crew members.
Use your legs to support studs while spreading

Building Wall Tips
Material Movement for Walls
1. Locate wall framing so that once the wall is built, it can be raised into position as close to where it finally goes as possible.
2. Spread the headers, trimmers, cripples, and sills as close to their final position as possible.
3. Eight is an average number of 2 × 4 studs to carry.
4. You can use your leg to stabilize the studs you are spreading. Stabilize them with one arm and one leg to free up your other arm so that you can spread them one at a time. This way you won’t have to set them down, then pick them back up to spread them. (See photo.)
5. Select a straight plate for the top and double plates, and position any crown in the double plate in the opposite direction of the top plate crown. This will help straighten out the wall.
Nailing Walls
1. Nail the headers to the studs first. Make sure that they are flush on top and on the ends of the headers.
2. Nail the trimmers to the studs. Make sure that they are up tight against the bottom of the header and flush with the sides of the stud.
3. Nail the studs and cripples to the plates. Nail sills to the cripples and the trimmers. Make sure that all the connections are tight and flush.
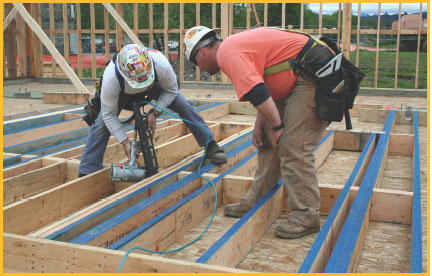
Teaching wall-building
Squaring Walls
1. Align the bottom plate so that when it is raised, it will be as close to the final position as possible.
2. Attach the bottom plate to the floor along the inside chalk line for the wall. Toenail through the bottom plate into the floor so that the sheathing won’t cover the nails. If the wall is in position, it can be nailed on the inside, and the nails can be pulled out after the wall is raised.
3. Use your tape measure to check the diagonal lengths of the wall.
4. Move the top part of the wall until the diagonal lengths are equal. Example: If the diagonal measurements are different by one inch, then move the long measure toward the short measure by one half inch diagonal measure. Make sure the measurements are exact.
5. Once the diagonals are the same, check by measuring the other diagonal.
6. Temporarily nail the top of the wall so that it will not move while you are sheathing it. Make sure you nail so that your nails won’t be covered by the sheathing.
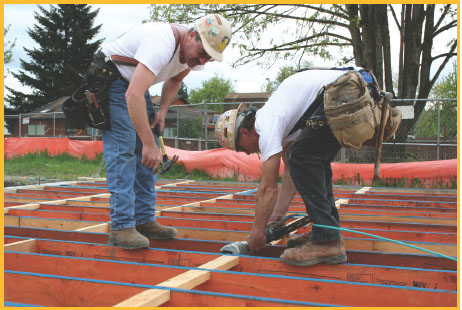
Teaching joisting
Joisting Tips
Material Movement for Joists
1. Material movement is a major part of installing joists.
2. Always carry the joists crown-up. This way, you can spread the joists in place, in the right direction, without having to look for the crown a second time. It’s easier to look for the crown on the lumber pile than when it is on the wall.
3. Check on the size of joists and positions needed. Try to spread the joists on the top of the pile first so you won’t have to restack them.
4. Check your carrying path for the joists. Sometimes you can reduce your overall time by making a simple ramp or laying a joist perpendicular to those already in place.
Cutting Joists to Length
1. Cut joists after spreading.
· Spread joists on layout, and tight to rim joists.
· Chalk cut line.
· Lift and cut each joist in sequence.
2. Cut joist on lumber stack.
· Measure joist lengths.
· Cut multiple joists on lumber pile.
Nailing Joists
1. Position joist on layout and plumb.
2. Nail through rim joist into joists, making sure joist is plumb.
3. Toenail through joist into double plate. Nail away from end of joist to prevent splitting.
Rafter Tips
Cutting Rafters
1. Figure cut lines for rafters, and check measurements before cutting.
2. Install common rafters first.
3. Cut three rafters.
4. Check two to see if they fit. If they fit, leave them in place and use the third as a pattern for remaining cuts. If they don’t fit, cut to fit or save for hip or valley jacks.
5. Cut balance of common rafters and install.
Installing Ridge Board
1. Figure height for ridge board.
2. Install temporary supports for the ridge board.
3. Install ridge board.
Nailing Rafters
1. Toenail common rafters on layout into double plate.
2. Nail on layout through ridge board into rafter.
3. Cut hip and valley rafters.
4. Cut jack rafters.
5. Set and nail hip or valley rafter.
6. String line centerline of hip or valley.
7. Layout hip or valley rafter.
8. Toenail jack rafter on layout through rafter into double plate.
9. Nail jack rafter to hip or valley rafter.
Sheathing Tips
Floor Sheathing
1. Make sure the first piece goes on square.
2. Chalk a line using a reference line and the longest part of the building possible.
3. Align the short edge of the plywood with interior joists, the long edge with the rim.
4. Pull the layout from secured interior joists.
5. Nail the plywood to align with the chalk line and layout marks.
Teaching rafters
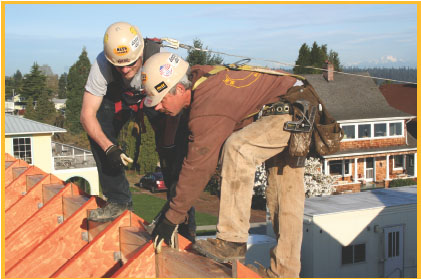
Wall Sheathing After Walls are Standing
1. Make sure the first piece goes up plumb. If you are installing more than three pieces in a row, use a level to set the first piece plumb.
2. It is easier to install the plywood if you are able to fit a 16d nail between the concrete foundation and the mudsill.
a. Place two nails under each piece near each end.
b. Remove the nails when you are finished.
3. The easiest and fastest way to handle an opening in the wall is to just sheath over it, then come back and use a panel pilot router bit to cut out the sheathing.
Roof Sheathing
1. Make sure the first piece goes on square.
2. Chalk a line from one end of the roof to the other.
· When measuring for the chalk line, make sure you consider how the plywood intersects with the fascia. The plywood may cover the fascia, or the fascia may hide it.
3. If the sheathing overhang is exposed, the sheathing could take a special finish.
· If the exposed sheathing is more expensive than the unexposed sheathing, then often the exposed sheathing is cut to fit only the exposed area. In this situation, cut the sheathing so that it breaks in the middle of the truss or rafter blocking.
4. 24″ is the minimum width of any row of sheathing. Check before you get to the last row in case you need to cut a row so the last row will be at least 24″.
Teaching sheathing

Nailing Sheathing
1. Read the information on the stamp on each piece of plywood. Make sure you are using the right grade. Sometimes the stamp will tell which side should be up.
2. There should be at least a 1/8″ gap between sheets for expansion.
3. The heads of the nails must be at least 3/8″ from the edge of the sheathing.
4. Make sure that the nail head does not go so deep that it breaks the top veneer of the sheathing. Control nail gun pressure with a pressure gage or depth gage.
5. Angle the nail slightly so that it won’t miss the joist, stud, or rafter.
6. Use the building code pattern for walls, floors, and roofs. Always check the plans for special nailing patterns. (Most shear walls have special patterns.)
Installing Hold-Downs (while walls are being built)
1. Locate wall hold-downs on plans and check details.
2. Locate holes to be drilled for hold-downs, anchor bolts, and through-bolts.
· Measure location for through-bolts.
· Center hold-downs on plates.
· Center hold-downs in post or align with anchor bolts.
3. Drill holes.
4. Nail post into wall.
5. Nail sheathing to wall.
6. After wall is standing, install hold-downs, bolts, washers, nuts, and through-bolts.
7. Tighten all bolts and nuts.
Teaching installing hold-downs after walls are built

Installing Hold-Downs (after walls are built)
1. Select a work area (large, close to material).
2. Check the plans for the location, quantity, and other details of hold-downs.
3. Collect all material and tools needed.
4. Spread hold-down posts for common drilling (Cut if necessary.)
5. Mark hold-down posts for drilling.
6. Drill for posts with holes 1/16″ larger than the bolts.
7. Loosely attach hold-downs, bolts, washers, and nuts to posts.
8. Spread hold-downs to installation location.
9. Drill holes for through-bolts if necessary.
10. Place hold-down in wall.
11. Place through-bolts into hold-downs where required.
12. Tighten all nuts.
13. Nail posts to plates.
14. Nail sheathing to posts.
Teaching installing hold-downs while walls are being built

Removing Temporary Braces
1. Remove temporary braces only after the walls have been secured so that they will not move.
2. A sledgehammer provides a fast and easy way to remove the braces.
3. Knock a number of the braces off at one time. Be careful that no one steps on the nails before you remove them.
4. Put the removed braces together.
5. Hit the point end of the nail to expose the nail head.
6. Use a crowbar to remove the nails.
7. If you do not have many braces, a hammer is an easy way to remove them.

Material Organization and Cutting
Material Organization, Mitre Saw
1. Set up your table in convenient locations for moving lumber in and out.
2. Place the incoming material as close as possible to the side of the saw where you will be positioning it to cut.
3. As it is cut, stack the lumber in a pile that is neat and easy to pick up and carry or lift with a forklift.
4. Put scrap wood that you will be cutting into stacks nearby, maybe under the saw table.
Cutting with a Mitre Saw
1. Set your length gage for multiple cuts.
2. Cut your first piece, then check the cut for square (both vertical and horizontal) and correct length.
3. Check the second and tenth piece for square and length.
4. Check every tenth piece after that for length.
5. Keep lumber tight against lumber guides, but don’t bang them so that they move.
6. Remove any sawdust near the guides.
7. Respect the saw! If you don’t, there is a good chance you will hurt yourself or your fellow framers.
Fractions
Many apprentice framers are not familiar with fractions, and some might be embarrassed to admit this. It doesn’t take long to teach fractions. Ask the framer to show you where 11/16″ is on the tape. If he can’t do it easily, draw a duplicate of a tape showing the different length lines. Mark the fractions on each line, and tell him to take it home and memorize it. Review as frequently as required to develop proficiency.
Reading a tape measure

Teaching mitre saw

Planning & Scheduling
While lead framers are not responsible for developing project costs or schedules, they are asked for input into the decisions of others who must estimate and schedule construction. The superintendent, for example, might need to know if he can meet a deadline with the crew that is in place; a lead carpenter might need to know if there is enough material available to complete the job; or the framing contractor might need to know if any labor can be spared to send to another job.
To answer these questions, the lead carpenter must understand and appreciate the importance of the construction schedule and budget. This means thinking ahead and looking at the project as a whole, while also focusing on the details. It means evaluating the crew’s ability to perform its job at a particular time under a given set of conditions.
Using the Crew Effectively
A crew includes both labor and equipment required to install materials. On any given day, the makeup of the crew can change. One person may not show up or may be sent to another job. At other times you may have to absorb extra manpower on short notice. Equipment you expected to have available may not be there or, with little notice, you may have the benefit of equipment. When faced with these situations, a seasoned lead framer draws on his or her experience and makes the necessary adjustments to either push the job or, at the very least, maintain the momentum.
Staying on Schedule
The lead framer should understand the labor hours required for each task, and be able to know in his or her mind if the schedule is realistic and can be maintained. Perhaps more important is recognizing potential problems before they become real problems. In a matter of hours, what seems to be a minor glitch can become devastating to the schedule. For example, if fuel has not been requested for a piece of equipment, production may be forced to stop while waiting for a fuel delivery.
Never underestimate the importance of realistically measuring the crew’s ability to perform the work. Keep in mind that most jobs, unless very short in duration, are scheduled well before the work begins, and job durations are usually based on optimistic job site conditions. During the course of construction, a monthly schedule is broken down to weekly schedules, and weekly schedules are broken down to daily schedules.
Before committing the lead framer to a schedule, the framing contractor normally has agreed to the means and methods that will be followed for the job. If the estimator has based the estimate on a crew that performs differently than an average crew, the schedule may or may not have allowed enough time for the work.

Planning for Materials
Avoiding Slow-Downs
Once a productive and effective crew has been assembled, nothing can slow that crew down faster than a shortage of material. Construction project estimators and schedulers often look at past project costs for material, labor, and equipment needs and costs. They may make adjustments to these figures based on input from the field, allowing for factors such as a more experienced work force, or new equipment that will make the work go faster. Nevertheless, material shortages can still occur. The lead framer needs to keep an eye on the rate at which materials are being used, and communicate material needs to the superintendent.
Taking Waste into Account
Project estimators perform quantity takeoffs that are really a best guess of how much material will be needed for the job. Waste is a concern in the quantity takeoff for any area of construction. There is some inevitable waste in framing lumber, depending on spans, wall heights, and the grade of lumber. A rule of thumb for lumber waste is 5%–10%, depending on material quality and the complexity of the framing.
Making Sure You Have the Correct Stock
The lead framer should be made aware of any material lists, structural framing drawings, shop drawings, engineered drawings, or cut lists that have been prepared for a framing project. This information is critical to ensure that the correct stock (lengths and widths) is used in the assembly of the frame. Read all notes on the drawings and find out whether the plans being used are the most recently amended or approved version.
Using the plans and shop drawings, the lead framer can determine which material to use for cripples, jacks, headers, blocking, and other miscellaneous members.
“Short” or “Will Call” Deliveries
Keep in mind that many initial stock deliveries are “short,” meaning that as the project nears completion, someone is responsible for ordering just enough materials to complete the frame. This is sometimes referred to as “will call.” The lead framer needs to know in advance if this strategy is being used.
On some projects where material storage and handling are restricted, a “just-in-time” delivery schedule may be necessary. This means that the lead framer must, in some cases, anticipate material and equipment needs on a daily basis.
In “will call” or “just-in-time” situations, the lead framer must be made aware of any problems in deliveries and must estimate and plan material use in order to maximize the productivity.
How Change Orders Affect the Schedule
A lead framer may be given instructions to perform change orders with little regard for how the change will affect time, cost, and crew productivity.
The time and cost of change order work varies according to how much of the installation has already been completed. Once workers have the project in their mind, even if they have not started, it can be difficult to re-focus. The lead framer may spend more time than usual understanding and explaining the change. Modifications to work in-place, such as trimming and refitting, usually take more time than was initially estimated. Post-installation changes generally involve some demolition. The change may come after finishes and trim are installed and may require protection of in-place work.
When faced with a change or a rework situation, the lead framer must break down the typical day into segments and estimate the impact on each segment. Say a change involves reframing an opening or creating a new opening in a wall that has been completed. The estimated time for the change should account for demolition, possible salvage of original materials to be reused, procurement of new materials required, and possibly a reluctance of the crew to perform the change. The time spent on the change will generally add time to work in progress. If the lead framer anticipated four openings per day and now has to reframe two, productivity for framing openings may drop to three per day until the change is complete. This will delay setting windows or installing exterior sheathing and other tasks. (See “Changes to the Plans” and “Extra Work” in the next section.)
Recordkeeping
Recordkeeping is quite possibly one of those tasks that you thought you were getting away from when you started framing. The reality is that recordkeeping is an important, but not necessarily major, task for the lead framer. There are three things you will want to keep records for: timekeeping, changes to the plans, and extra work.
Timekeeping
Timekeeping is easy, but you have to record it every day. If you don’t, it’s easy to forget and make a mistake that is not caught until the payroll checks come out. Most companies provide forms that can be filled out at the end of every day. You will need some type of an organizer to store your time cards and other records. For a small job, an aluminum forms folder, similar to what the UPS drivers use, works well. These folders are durable and keep the rain out. If you are working on a big job, you will probably need something like a builder’s attaché to keep all your papers organized. Your time cards can be kept in your organizer so you always know where they are.
Changes to the Plans
Changes to the plans should always be recorded when they occur. Changes may be conveyed in conversation or in writing. Because the time when you receive the changes is not always the time you will be doing the work, it is important to record the information so that you will not forget it. The best place to record changes is on your plans. Write it on the sheet where you will see it, then write the date and the name of the individual who gave you the change. If it was given to you on paper, keep that document in your organizer after you have written the change on the plans. You can also tape the change to the plans. If there is not enough room to record the changes on the appropriate sheet, tape the information on the back of the prior sheet so you will see it when you are reading the sheet involving the changes.
Keeping your papers organized

Extra Work
The third recordkeeping task is recording change orders. This is important because if work is done that wasn’t originally figured in the framing bid or contract, it must be documented in order to obtain payment. This can be a sensitive issue. Many times there is controversy over payment for tasks that are not clearly defined in the bid or contract. If at any time you are asked to perform work that you consider a change order, you should inform the person asking you to do the work right away that this extra work constitutes a change order, and that you expect to be paid for it. The person requesting the extra work can then decide whether they still want to make the change, knowing the extra cost it involves.
When you actually perform the change order work, make sure you record the work done and the cost to be billed. If you are to be paid on a time and material basis, you need to keep accurate time records showing the hour of the day, and the date the work was performed.
Plans with taped changes

Productivity
Your objective is most likely to frame a quality building for the least possible cost. Wages represent the greatest percentage of the total cost, and since wages are paid for time spent working, it follows that if you lessen the time it takes to complete a building, you thereby reduce the wages paid and, thus, lower the total cost.
There are various tasks involved in framing. Some of the tasks can be done as fast, or nearly as fast, by the least experienced framer as by the most experienced framer—for example, carrying and spreading studs. Suppose that a $10/hour person can do the same job as a $20/hour person, only 20% slower. You save $8/hour by having the less expensive person do the job.
Be careful, however, because if an inexperienced framer takes on a job beyond his capabilities, the chances for mistakes are great. This could result in wages paid for work incorrectly done, and higher wages paid for an experienced framer to find and correct the mistake.
It is ideal for you to have a balanced crew of experienced and inexperienced framers. This allows you the flexibility to fit the framer to the task. It takes planning to coordinate framing tasks so that they are done as inexpensively as possible, but it is time well spent for the money you will save.
The following are job titles and responsibilities for a typical large framing crew, divided into four categories: overall organization, walls, floors, and roofs.
Typical large framing contractor crew
Organizing
1) Lead framer
Coordinate work schedule with framing or general contractor.
Locate lumber drop.
Make sure tools and supplies are available.
Train framers.
Solve problems.
2) Cut and chalk framer
Cut stairs and rafters.
Chalk lines.
Assign framers to tasks.
3) Layout framer
Layout for walls, joists, rafters, and trusses.
Walls
1) Plumb and line framer
Plumb and line walls.
2) Wall spreader
Spread all parts of a wall (studs, trimmers, cripples, headers, etc.) so they are ready to be nailed together.
3) Wall nailer
Nail walls together
4) Makeup framer
Nail together a quantity of stud-trimmers, corners, backers, headers, etc., before they are carried to the walls
Floors
Joisting
1) Rim joister
Nail joists in position
Header out joists
2) Joist nailer
Nail joists in position
Nail on joist hangers
Nail blocking and drywall backing
3) Joist spreader
Carry joists into place
Sheathing
1) Sheathing setter
Place and set sheathing
2) Sheathing nailer
Glue joists ahead of setter and nail sheathing behind setter
3) Sheathing carrier
Carry sheathing to setter
Roofs
1) Spreaders
Spread and install trusses and rafters
Install fascia
2) Blockers
Install blocking and drywall backing
Set sheathing
3) Sheathing packers
Carry sheathing to setters
Multiple-Framer Tasks
Some tasks require more than one framer, for example, lifting large walls. Any time framers have to be called from other tasks to perform a common task, care must be taken not to waste time. The cost per minute of a 5-framer task is 5 times that of a single framer task. The person organizing the task needs to take responsibility for making sure the task is ready for all framers. If it is lifting a wall, the organizing framer should make sure the wall is completely ready so framers don’t stand around while one person makes last-minute adjustments.
Learning Curve
Studies have been done that show that as output is doubled, the time required decreases according to a constant ratio. The common ratio is about 4 to 5, or 20%. For example, the fourth set of stairs built will take 20% less time than the second.
Multiple Cutting Analysis
Multiple cutting becomes efficient when you have to cut a number of pieces of lumber the same size. Trimmers, cripples, and blocks are good examples.
To multiple cut, first spread all the lumber to be cut out on the floor or a table. Then measure each piece, mark each piece with your square, and finally cut each piece.
Analysis has shown it takes 36% less time to cut ten pieces of 2 × 4 when the tasks of spreading, then measuring, then marking, and then cutting are done for all the pieces at one time.
For very large numbers of cuts it may be worthwhile to make a template or a measuring/cutting jig.
Motion Analysis
Question: Can significant time (and money) be saved by moving faster?
Answer: Motion analysis studies have shown that something as simple as walking more quickly around the site can substantially raise productivity. For instance, if a framer spends 2 hours in an 8-hour day walking from point to point on a job site, a quick walk can save about 30 minutes per day over a relaxed walk.
Speed Versus Quality
Speed or quality: Which should it be? How good must the work be if it must be done as fast as possible? The two variables to consider when answering these questions are:
· Strength
· Attractiveness
First and most important is the structural integrity of the building. The second is creating a finished frame that will be pleasing to the eye. Once requirements for strength and attractiveness are satisfied, the faster the job can be done, the better.
Material Movement
Framing requires a lot of material movement. It is estimated that one-quarter to one-third of a framer’s time is spent moving material, so any time or energy saved is a cost reduction.
The following hints will help you save time, energy, motion and, in the last analysis, money.
· Whenever material is lifted or moved, it takes time and energy; therefore, move material as little as possible.
· When stacking lumber, consider the following:
o Where will it be used next?
o Will it be close to where it is going to be used?
o Will it be in the way of another operation?
o Will it obstruct a pathway?
· Always stack material neatly. This helps to keep the lumber straight and makes it easy for framers to pick up and carry it. Stack 2 × 4 studs in piles of eight for a convenient armful.
· Have second-floor lumber dumped close to the building so framers can stand on the lumber stack and throw it onto the second floor.
· When stacking lumber on a deck, place it where walls will not be built, so it will not have to be moved again.
· Use mechanical aids, such as levers, for lifting. Remember your physics—the longer the handle in relation to the lifting arm, the easier it will be to lift the load.
· Two trips to the lumber stack or tool truck cost twice as much as one trip. If you have to go to the tool truck for a tool, check to see if you need nails or anything else.

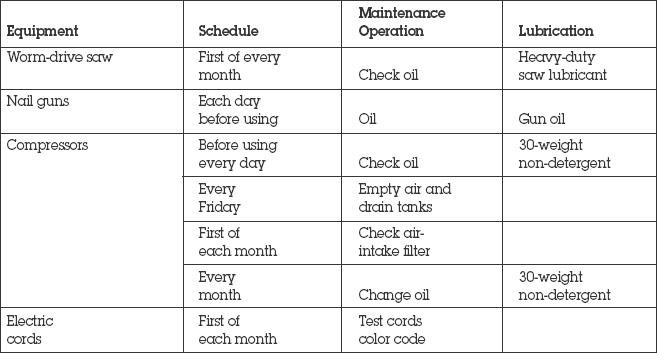
Tool Maintenance Schedule
Draw up a schedule such as the one shown in the following table for your specific equipment; post it, and assign a reliable crew member to take charge of it.
Conclusion
When you started reading this chapter, you were probably hoping for some nice clean answers on how to manage a crew—answers that you could put to use tomorrow. Now you are probably thinking that you have more questions than you did when you started reading—and that’s the way it should be. Managing a crew is a never-ending job that will challenge you every day. The information presented in this chapter should give you a base for the common-sense decisions you will have to continually make in response to the questions that come up as you manage your crew.