
Chapter Four

Contents
· Step 1–Spread Headers
· Step 2–Spread Makeup
· Steps 3–7–Assemble Wall
· Step 8–Square Wall
· Step 9–Sheathe Wall
· Step 10–Install Nail-Flange Windows
· Steps 11–15–Standing & Setting Wall
· Step 16–Plumb & Line
· Framing Rake Walls
There are many ways to frame walls, but it is always good to follow an organized sequence. This 16-step sequence has been developed over years of framing. Following these steps will help you and your crew work efficiently and eliminate errors. It will also ensure consistency from framer to framer. For example, if you have to leave a wall in the middle of framing it to go to another task, another framer can easily pick up where you left off and proceed without having to check every nail to see what you have done.
Keep in mind, walls must be square, plumb, and level. Measure accurately, cut straight, and nail tight.
Rake walls (sometimes referred to as gable end walls) typically start at the height of the standard wall and go up to the ridge of the roof. The challenge of building a rake wall is figuring the heights of the studs and making sure the wall is built square. Lifting the assembled rake wall into place can also be a challenge. This chapter will cover four ways to figure stud heights and build rake walls efficiently—using methods that will make your work easier.
Step 1–Spread Headers
Spread headers in location close to where they will be framed.
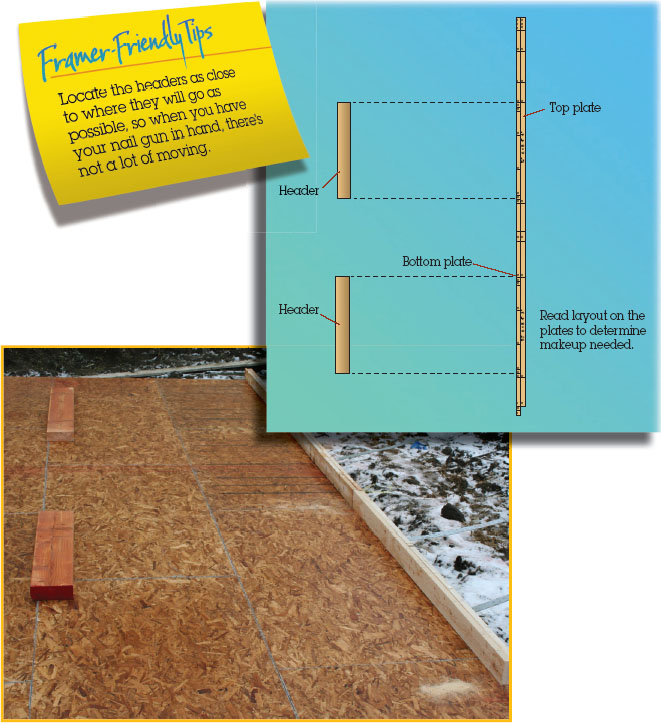
The steps outlined in the next pages follow the process of framing and sheathing the exterior walls in a horizontal position. The fully framed and sheathed wall is then lifted into position by using special lifting jacks or muscle power.
Step 2–Spread Makeup
Usually, one member of the framing crew does all the cutting. This promotes an efficient workflow and ensures consistent cuts. The person doing all the cutting must work fast enough to stay ahead of the remaining members of the crew.
Spread makeup: stud/trimmers, backers, corners, cripples, sills, beam pockets.

Steps 3–7–Assemble Wall
3: Spread studs
4: Nail headers to studs
5: Nail top plate to studs & headers
6: Nail bottom plate to studs
7: Nail double plate to studs
Following the nailing patterns discussed in Chapter 2, the wall frame components can now be assembled. Pneumatic nailers reduce the amount of time required to perform this task.
Spread remaining wall parts and nail.

Step 8–Square Wall
To square a wall, secure the bottom plate as shown, then move the top of the wall until the diagonal dimensions are equal. Once the wall is square, secure it with two nails through the double plate into the floor.
Nail on the inside of the bottom plate so the nails will hold the wall in position while it is being stood. The bottom plate should be nailed so that it’s in line with the wall chalk line. Then, when the wall is raised, it will be in the right position.
Exterior Wall


Step 9–Sheathe Wall
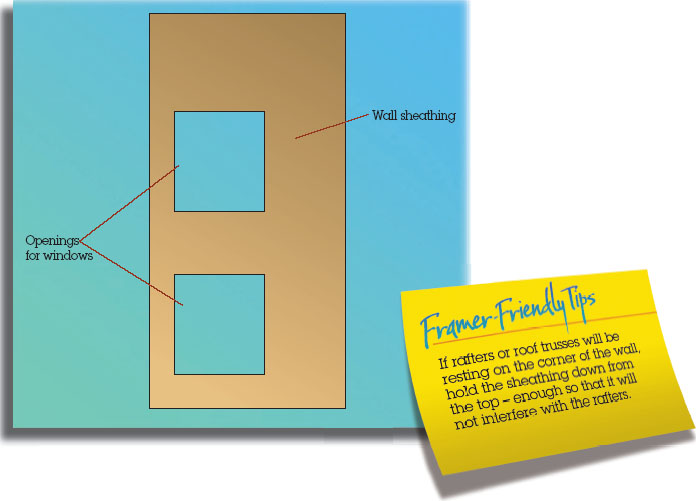
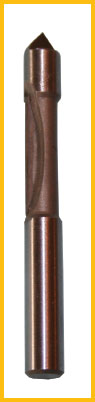
Cover the entire wall with sheathing, then rout window and door openings with a panel pilot router bit (see illustration). Save the leftover pieces of sheathing for small areas and filling in between floors.
If the first floor exterior walls can be reached from the ground, then the sheathing is not installed until after the walls are plumb and lined (straight and true; see Step 16–Plumb & Line). This eliminates the potential problem of a square wall sitting on a foundation that is not level.
Sheathing: place, cut openings, and nail.

Panel pilot router bit
Step 10–Install Nail-Flange Windows
Before Wall is Stood Up
a. Check plans for correct window.
b. Check window opening for protrusions (nails, wood splinters, etc.) that might hold window away from edge.
c. Install window flashing. (See “Window Flashing Installation,” Chapter 6.)
d. Set window in opening, making sure window is right side up.
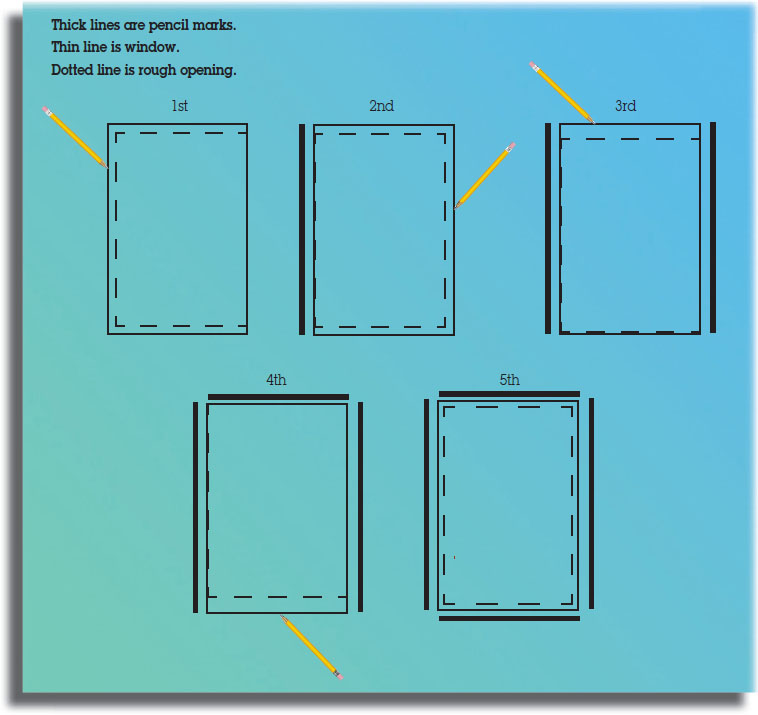
e. Slide window to each end of opening, and draw a line on the sheathing or flashing with a pencil along the edge of window. (Draw lines before caulking window.)
f. Center window in marks you have just drawn.
g. Nail window sides and bottoms, using appropriate nails.
h. Do not nail top of window.
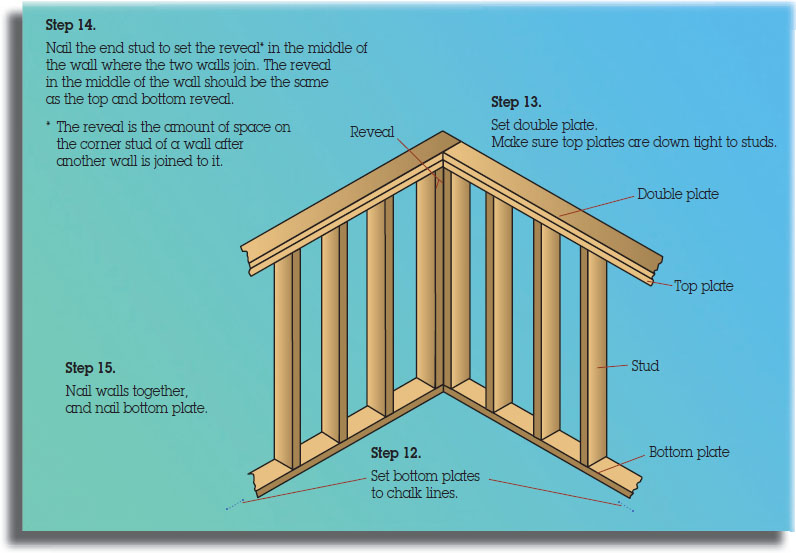
Steps 11–15–Standing & Setting Wall
11: Stand wall.
12: Set bottom plate.
13: Set double plate.
14: Set reveal.
15: Nail wall.
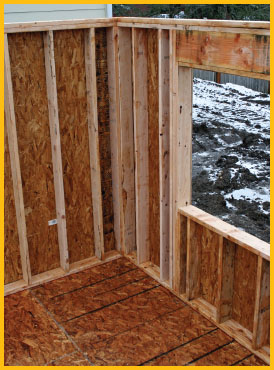
Corner securing two walls

Step 16–Plumb & Line
“Plumb and line” is the process of making the walls straight and true.
“Plumbing” is the use of a level to set the ends of the walls plumb or perfectly upright.
“Lining” is using a tight string attached to the top of a wall as a guide for straightening it.
Set nails at either end of wall as shown, and then string line tightly between them, adjusting the line so that it is about ½″ above the double plate. Wall should be moved in or out to align with string.
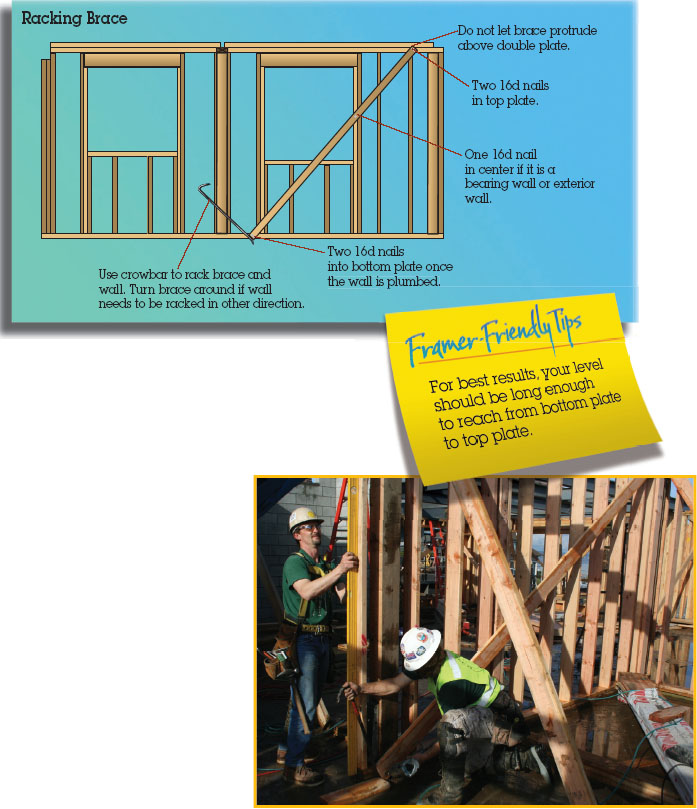
The walls are braced with 2 × 4 lumber to hold them and, if necessary, make them plumb and straight.
If a wall already is sheathed and in place, but not plumb, correct it if it is more than ¼″ out of plumb for standard height walls.


Racking a wall is moving the top of the wall with the bottom secure until the wall is plumb.
One framer racks the wall with a brace and crowbar, while the second framer checks for plumb.
Plumbing Tools
A level is the traditional tool for determining plumb. A laser can also be used. Whichever tool you use, you want to make sure you check it for true before you start. To check a level, hold it in position against a wall and read the bubble. Then turn it around and place it in the same position against the wall. If the bubble reads the same, then your level is accurate. To check a laser use a similar method. Set it in place, and mark the bottom dot and the top dot. Then turn it around and align the bottom dot. If the top dot hits the same spot on the top of the wall that you marked, your laser is reading accurately.
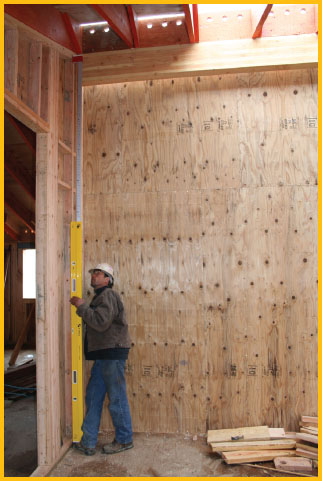
Levels are accurate when the level is long enough to reach from the bottom plate to the top plate. An 8’ level will work fine for most residential walls. A 12’ extension level works for walls up to 12’. If the level does not reach from plate to plate, you have to figure that there will be some variance for the studs’ irregularities.
Lasers are good for taller walls. Lasers are not dependent on perfect wood for determining plumb. Set the laser at the bottom, and read the distance you set at the bottom on your tap at the top of the wall. If you need to check plumb on a regular basis, the laser has the advantage of fitting in your pouch.
Plumbing tall wall with extending level.
Framing Rake Walls
There are four common ways to figure stud heights and build rake walls.
1.Chalk lines on the floor.
2.Figure lengths on paper.
3.Build and chalk lines.
4.Stick frame.
Each has its own advantages. With all these methods, you must use the pitch given in the plans to determine the wall height. The pitch is generally shown on the elevation sheet just above the roof slope.
Method 1: Chalk Lines on the Floor
The first method is to chalk out a duplicate on the floor, if you have the space. Then you can measure and cut the studs and plates right from your chalk lines.
The advantage to using this method is that it is quick, easy, accurate, and doesn’t require a lot of math. However, if you don’t have the space on the floor, if it’s raining and you can’t chalk lines, or you have a lot of rake walls in the building, it is probably best to use one of the other methods suggested.
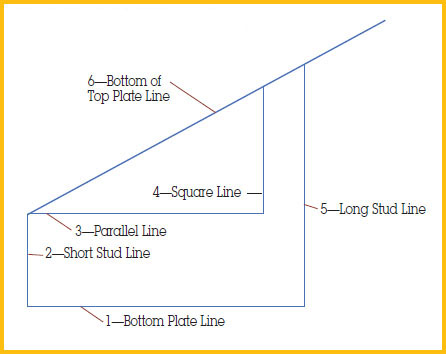
To chalk the lines, you need to know the heights of your low point and high point. You must also ensure that the wall is square. To find the height, you can use the “Chalk the Actual Dimensions” system. The pitch on the plans gives you the relationship of the rise to the run. For example, a 6:12 pitch means that for every 12 units of run, there are 6 units of rise. To find the high point on the wall, go out 12 units of run, then up square 6 units. Mark this reference point and chalk a line from the low point of the wall through this point, and extend it as far as necesary to reach the high point in the wall. The closer you make the reference point to the high point in the wall, the more accurate your line will be.
To find the rake wall stud heights using the “Chalk the Actual Dimensions” method, follow these steps:
1. Chalk a bottom plate line (1). Usually you can use the chalk line for your wall. (See “Chalk the Actual Dimensions” illustration.)
2. Chalk the short stud line (2). Make sure it’s square (perpendicular) with the bottom plate line (1). You can use the 3-4-5 triangle to square the line. (Explained in “To Square the Wall” and “3-4-5 Triangle” later in this chapter.)
3. Chalk a parallel line (3) with the bottom plate line (1) that aligns with the top of the short stud. Extend this line out toward the long stud (5).
4. Chalk a square line (4) to the parallel line that is close to the long stud line (5), but convenient for figuring its length. The length of the square line (4) will be in a relationship to the parallel line (3), depending on the pitch of the rake wall. If, for example, the pitch is 6/12 and the parallel line is 12, the square line will be 6.
5. Chalk a line square (4) with the bottom plate line (1) where the long stud line (5) should be.
6. Chalk a line from the short point of the short stud (2) through the top of the square line (4) and on past the long stud line (5). This will be your bottom of top plate line (6).
7. Once you have these lines, you will be able to fill in all the remaining studs.
An unsheathed rake wall

Chalk the Actual Dimensions
To Square the Wall:
· Draw a straight line where you want to place your bottom plate, then make a perpendicular line at the high point of your wall.
· Use a 3-4-5 triangle to double-check that the line is exactly perpendicular or square. (See “3-4-5 Triangle” illustration.)
A 3-4-5 triangle will help you establish that two lines are square or at right angles to each other. To establish square, just follow these steps:
1. Start with the line you want to square from; this will be the 4-unit line—also referred to as the run.
2. Measure a line perpendicular to the run line at 3 units in length, called the rise.
3. Measure the diagonal from the outside of the 4-unit line (run) and the 3-unit line (rise), and adjust the 3-unit line so that the diagonal (hypotenuse) is exactly 5 units.
The units can be anything as long as they are in the same ratio. For example, they could be 3’, 4’, and 5’, or they could be 15’, 20’, and 25’. The longer the units, the more accurate your measurement will be.
Method 2: Figure Lengths on Paper
With this method, you figure the stud heights, plate lengths, and layout anywhere you want—whether in the office, at home, or on the job site. All you need is a set of plans. Once you have the heights and lengths figured, you can build the wall anywhere, then move it into position.
Use the “Rake Wall Stud Heights” worksheet later in this chapter to figure the stud heights, the plate lengths, and the layout points. Give the completed worksheet with all needed information to whoever is framing the wall.
A construction calculator, such as Construction Master IV®, can be used to figure lengths accurately. With a construction calculator, you can work in feet and inches and use a memory function for repetitive calculations.
3-4-5 Triangle

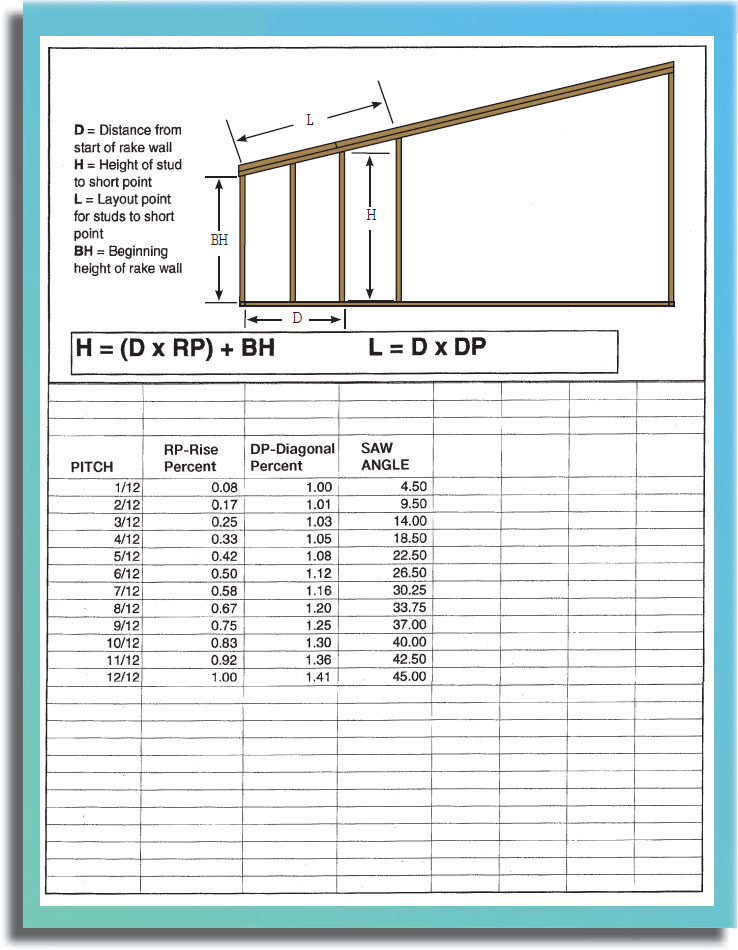
To use the Rake Wall Stud Heights Worksheet, just fill in the blanks and find the stud heights. The column “D” is where you write the distance on the bottom plate from the start of the rake wall to the short point on the stud. There is less confusion if you always use the short point on the studs. It is also easier to cut the short point than the long point when using a worm drive saw.
The stud height to the short point is found by using the formula (D × RP) + BH. RP is the rise percent, or the relationship between the rise and the run. The relationship gives you the height increase of the studs per increase in the distance of the plate. This relationship is illustrated in the filled-in version of the Rake Wall Stud Heights Worksheet. The formula for finding RP is also shown, in the “Rise & Diagonal Percent” illustration later in this chapter.
The “Rake Wall, RP, DP, Saw Angle” illustration provides the rise percent for common roof pitches. The “BH” from the formula is the beginning stud height. BH is a constant and is the height of the first stud at the lowest point. This height can vary depending on how the rafter or lookouts rest on the rake wall.
A typical beginning height would be slightly lower than the adjoining wall, as shown in the “Rake Wall Beginning Stud Height” drawing. In this example, the beginning stud height is only 3/8″ less than the adjoining wall stud height because the plates on the rake are thicker on a slope than they are when flat.
To find the layout points for the studs and the length of the plates, use the formula D × DP. DP is the diagonal percent, or the relationship between the Diagonal and the Run. This relationship tells you the length increase of the top plate or layout point per increase in the distance of the bottom plate. This relationship is shown in the “Rise & Diagonal Percent” illustration, which also provides the formula for finding DP. The drawing gives the Diagonal Percents for the common roof pitches and the saw angles—the different angles at which you can set your saw to cut the top of the studs and the ends of the top plate and double plate.

Rake Wall Stud Heights–Example

Method 3: Build and Chalk Lines
This method is possibly the quickest way to figure stud heights and build rake walls. Here is how it is done:
· First, lay out the bottom plate in the same way you would if you were going to frame an ordinary wall.
· Spread your studs, making sure that they are long enough to reach the top of the rake wall.
· Toenail the bottom plate from the inside of the plate so that when the wall is lifted, the nail will function as a pivot point on the layout line.
· Cut the length of the beginning stud to match the adjoining wall. Take into consideration the location of the rafters if the lookouts rest on the rake wall, and the thickness of the plates on the rake.
· Set the beginning stud square with the bottom plate.
· Use the rise percent to find the length of the longest stud. (See the “Rake Wall, RP, DP, Saw Angle” illustration.)
· Set that stud square with the bottom plate.
· Nail the rest of the studs to the bottom plate.
· Block the wall where required.
· Position all the studs so they are square.
· Chalk a line along the top of the studs.
· Cut each stud.
· Measure and cut the top plate and double plate.
· Nail the top plate to the studs, and the double plate to the top plate.
Method 4: Stick Frame
With this method, you are framing the wall in place.
· Find the beginning stud and the longest stud heights in the same way you would with the other methods.
· Nail the bottom plates to the floor, and brace the beginning stud and the longest studs in place.
· Make sure that the studs are plumb before continuing.
· Measure, cut, and nail the top plate onto the studs.
· Lay out the top plate using the “Figure Lengths on Paper” method, or plumb up from the bottom plate. Measure, cut, and nail the remaining studs in place.

Rake Wall Stud Heights Worksheet

Rake Wall RP, DP, Saw Angle
Please note that the beginning stud height on a rake wall is not the same as a typical stud.

Standing a rake wall
Rise & Diagonal Percent
