Chapter Six
Contents
· Door Framing Terms
· Installation of Exterior Doors
· Installation of Nail-Flange Window
· Installation of Window Flashing
· Installation of Sliding Glass Doors
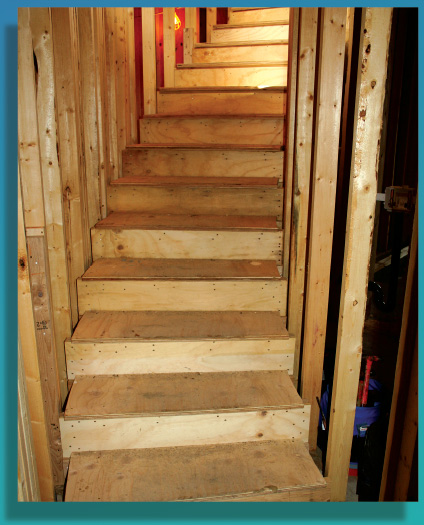
· Installation of Stairs
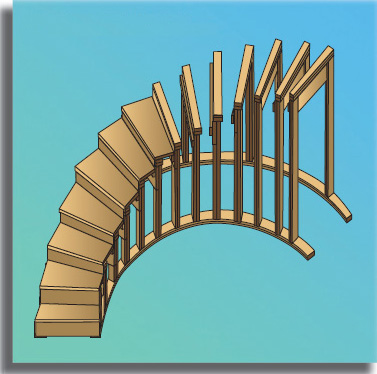
· Circular Stairs
Doors and windows are two of the few finish items that framers sometimes handle. It is important that time and care are taken to ensure they are installed in a proper, professional manner. Put your framing hammer in the toolbox and use, instead, a lighter, smoother-faced trim hammer and a nail set.
Exterior, pre-hung doors are the type covered in this chapter. They are the ones framers most commonly work with, and most of the skills involved in hanging them will carry over to the hanging of interior doors. The first door you hang on any job will give you the most difficulty. If you have more than one door to hang, do them one after the other; each door will go in a little easier than the one before.
Nail-flange windows and sliding glass doors will vary depending on the manufacturer. You will find here the basic principles of their installation. Use common sense and follow the directions provided, and you should have little trouble installing these units.
Stairs represent one of the more difficult challenges to a framer’s skill. As in roof framing, the geometry is a bit complicated, but taken step-by-step, the logic soon becomes clear, leading to successful execution of the plans. There are many different stair designs. The stair layouts described in this chapter are typical. Be aware that the dimensions given on the plans do not always allow for enough headroom. Always check headroom and other dimensions by taking accurate on-site measurements. This chapter also contains instructions for laying out and framing circular stairs.
The instructions for installation of pre-hung doors, windows, sliding glass doors, straight stairs, and circular stairs are all presented in steps for easier understanding. A calculator is handy—some might say necessary—for finding the rise and tread dimensions when not given on the plans. Always double- or triple-check your calculations. Remember: measure twice, cut once. The finish floors at the top and bottom of stairs are often different. When cutting stair stringers, don’t forget to check the plans for such differences and then check the height of your top and bottom risers to allow for them.
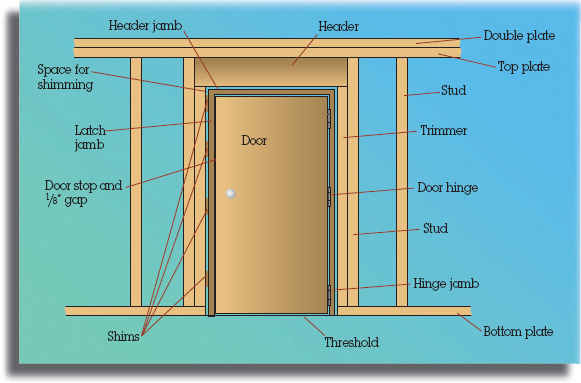
Door Framing Terms
Installation of Exterior Doors
Steps for Pre-Hung Doors
1. Read instructions that come with door.
2. Check plans for door swing.
3. Check threshold for level.
4. Nail hinge jamb.
5. Nail latch jamb using shims.
6. Check door for overall fit.
7. Nail door.
8. Set nails and break or cut shims.
9. Check again for overall fit.
View of door looking down from the top


Steps for Installation
1. READ INSTRUCTIONS
· Usually there are instructions that come with the door. Check the instructions over for anything you might need to know.
2. CHECK PLANS
· Check the building plans to find the direction of the door swing.
3. CHECK THE THRESHOLD
· Check the threshold for level. Shim under hinge jamb if necessary.
4. NAIL HINGE JAMB
· Nail hinge jamb tight to trimmer with one 16d galvanized casing nail at each hinge. Do not set nails. Plumb both directions. Shim behind jamb if necessary to obtain plumb or if door needs to be centered in opening.
5. NAIL LATCH JAMB Before nailing the latch jamb, make sure:
· There is a continuous gap between door and jamb of 1/8″.
· Door touches latch jamb equally at top and bottom.
· Lockset hole in the door and latch jamb line up.
6. CHECK DOOR FOR OVERALL FIT:
· Gap around door is even.
· Door and latch jamb align.
· Door closes smoothly, no binding.
· Lockset holes line up.
· Door closes tight, no rattle.
7. NAIL DOOR
· Six 16d galvanized casing nails in hinge jamb—two at each hinge.
· Four 16d galvanized casing nails in latch jamb—one each top and bottom and two near latch. This includes nails used in Steps 4 and 5.
8. SET NAILS AND TRIM SHIMS
9. FINAL CHECK
· Check again for overall fit. (See Step 6.)
View of door looking down from the top

Installation of Nail-Flange Window
1. Install window flashing. (See the following section.)
2. Set window in place.
3. Place temporary shims under bottom of window. Equalize space at top and bottom of window. Shims are usually 1/8″ to ¼". Level windowsill.
4. Make gaps the same between window frame and trimmer on each side.
5. Nail top corners from outside.
6. Nail one bottom corner. (Do not set all the way.)
7. Place window slider in and check to see if the gap between the window slider and window frame is the same from top to bottom.
8. If the gap is not equal, check both the rough opening and the window for square, and adjust accordingly.
9. Finish nailing. Make sure gap is equal top, bottom, and middle. (Do not nail top of the window.)

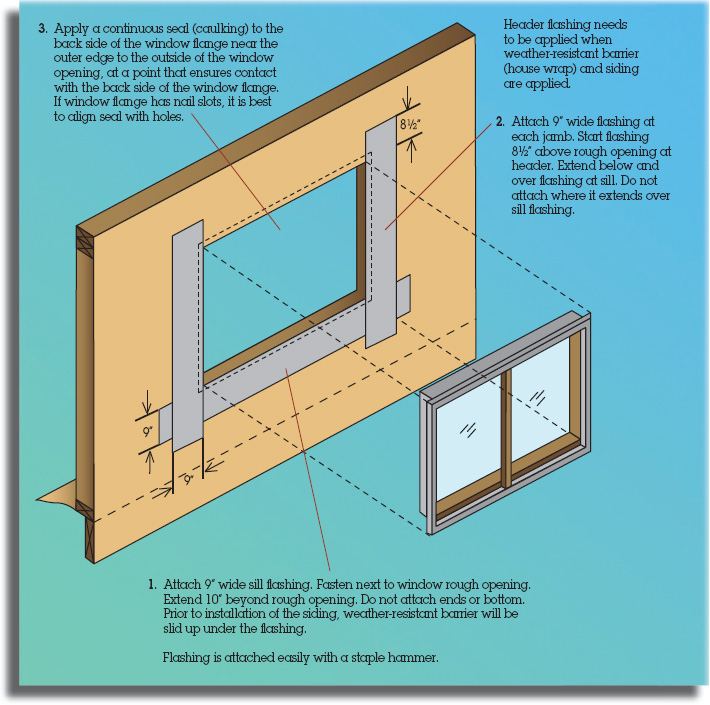
Installation of Window Flashing
Moisture penetration in buildings can cause rot in the structure. New and more extensive exterior rain protective systems have been developed and used to combat this problem. Some of these systems use a special type of water resistant barrier and self-adhesive flashing. Another system is the rainscreen. It provides a whole second layer of protection, typically by installing furring strips over the initial water-resistive barrier and then an outside siding material attached to the furring strips. These furring strips allow for ventilation and pressure equalization. These systems have not been standardized yet and so it is important to follow the specifications as outlined on the plans.
Installation of Sliding Glass Doors
1. READ INSTRUCTIONS. Read and follow carefully the instructions that come with the door. Never assume what you do not know.
2. SEAL THRESHOLD. Use neoprene or similar sealing compound to seal the threshold.
3. INSTALL FLASHING. The jamb flashing with sealer is installed using a method similar to the jamb flashing on windows.
4. PLACE DOOR. Place the door in position.
5. CENTER TOP. Center the top of the door in rough opening.
6. NAIL TOP CORNERS. Nail each corner of the top of the door through nail flange. (Do not set nails.)
7. ADJUST DOOR. Adjust the door frame so that the space between the door frame and wall trimmers is equal. Check for plumb with a level and adjust if necessary.
8. COMPLETE NAILING. Close the door and latch it. Then nail off the sides using four 8d nails on each side. Do not nail top of door.
9. ADJUST DOOR. Adjust the slider part of the door if necessary. Usually there is an adjustment screw at the bottom of the door. Tighten this screw to close a gap between the door and the jamb at the top of the door, or loosen to increase the gap.
10. TIGHTEN SCREWS. If screws come with the door, shim and tighten screws in the sides and bottom. Use pre-drilled holes.

Installation of Stairs
The three main dimensions in stair building are for risers, treads, and headroom. The riser height and the tread width are usually given on the plans. You can generally use the tread width given on the plans. The riser height, however, is often not accurate enough to use.
Stair Installation Steps
1. MEASURE HEIGHT. Measure the height of the stairwell from finish floor to finish floor.
2. FIND RISER HEIGHT. Divide the height of the stairwell by the number of risers shown on the plan to determine the riser height. Be careful to consider the finish floor heights, which may differ top and bottom.
3. FIND TREAD WIDTH. Check plans for tread width.
4. CHECK HEADROOM. Chalk a line from edge of nosing at top of stairs to edge of nosing at bottom of stairs. (See “Checking Stair Headroom” later in this chapter.) Check for minimum clearance of 6′-8″ to finish straight up from line to bottom of headroom.
5. MARK AND CUT STRINGERS. (See “Marking Stair Stringers” later in this chapter.”)
6. CUT. Cut stringer spacers, treads, and risers.
7. NAIL STRINGER SPACER. Nail stringer spacer to stringer. Spacer leaves clearance for applying wall finish.
8. SET STRINGERS.
a. At top deck, measure down riser height plus tread thickness and mark for top of stringer.
b. Set stringers to mark.
c. Check stringers for level by placing a tread on top and bottom and checking level, side to side, and front to back.
d. Adjust stringers for level.
e. Nail stringers.
9. NAIL RISERS.
10. GLUE AND NAIL TREADS.

Finding Riser & Tread Dimensions
If the riser and tread dimensions are not given on the plans, then you need to calculate them. To do this you should consider the following points:
· You want the steps to feel comfortable.
o When walking up steps, a person’s mind determines the height of the riser based on the first step. Make sure all risers and treads are equal, so the stairs will not cause people to fall.
o The lower the riser, the longer the tread needs to be to feel comfortable.
·Common dimensions for riser and tread are 7″ rise and 10½″ tread.
·Use the following three rules to check to see if your stair dimensions are in the comfortable range.
o Rule 1: Two risers and one tread added should equal 24″ to 25″.
o Rule 2: One riser and one tread added should equal 17″ to 18″.
o Rule 3: Multiply one riser by one tread and the result should equal 71″ to 75″.
Important Stair Code Regulations
The following guidelines for stairs are according to the 2006 International Residential Code (IRC) and 2006 International Building Code (IBC)
Width – 36″ minimum – with occupant load of 49 or less (measured in clear, to finish).
44″ minimum – with occupant load of 50 or more (measured in clear, to finish).
Rise – 4″ minimum.
7¾″ maximum for IRC – 7″ for IBC, with residential 7¾".
Tread – 10″ minimum for IRC – 11″ for IBC.
Riser height and tread length variance – 3/8″ maximum variation between the treads within any flight of stairs.
Headroom – 6′-8″ minimum, measured vertically from a line created by connecting the nosing of the stair treads to the soffit above.
Before Stairs Are Built...
Check for headroom by finding the distance vertically between two lines that represent the distance between the stair treads and any obstruction in the headroom. One line is a straight line that connects the nosing on the stairs. The second line is one that runs parallel with the first line but 6′-8″ in a vertical direction above the first line.
To create the stair noising line, first measure up the height of one riser and back from the riser the distance of the noising and make a mark. From that mark, measure parallel to the subfloor a distance equal to the combined width of the number of treads. Then measure perpendicular to the subfloor the combined height of the number of risers and make a second mark. Chalk a line between these two marks. From this line, make the second line that is parallel and yet a minimum of 6′-8″ vertically. This is your headroom and if anything protrudes into this space you do not have minimum headroom. Remember this distance is to the finish, and so if you are putting carpet or drywall on then you need to allow for their thickness.
Checking Stair Headroom

Marking Stair Stringers
1. Measure treads and risers using framing square.
2. Subtract thickness of riser from top.
3. Notch bottom for ledger or top plate. Notches differ. (See illustrations in this and following section.)
4. Care must be taken when marking the top and bottom steps. The thickness of the stair tread and the type of finish flooring on both the tread and the floor must be considered so that all the risers will be the same.
5. For the top tread, be sure to figure in the riser so that the treads and nosings are all equal.
Marking Stair Stringers

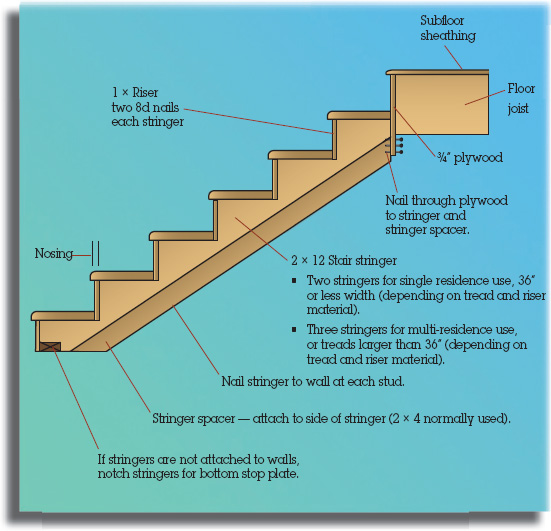
Standard Stair (to be carpeted)
Adapt these guidelines for use when plans do not give details.
2 × 12 Stair tread:
1. Router nosing with ½″ round router bit.
2. Glue and nail three 16d nails on each stringer for single residence use.
3. Glue and nail four 16d nails on each stringer for multi-residence use.
Recap of Key Stair Guidelines
The following are important items to go over to make sure you end up with a good set of stairs:
· Check the code maximum and minimum widths, depths, and heights.
· Remember to review the floor finish on the top, the bottom, and any midway decks for different thickness in the finish floor material. For example, if there is going to be lightweight concrete on the floor sheathing, or if a carpet stair ends on a concrete slab, then the last tread height would have to be adjusted. It is important to stay within the 3/8″ height variance (specified in the codes) between all the risers.
· If you have a midway deck in the stairs, make sure you check the height. Figure the height and measure from the top or bottom of the stairs, and then check by figuring the height and measuring from the opposite of top or bottom. If you figured right, your marks should align.
· It is not uncommon for a set of plans to be drawn up with the stair headroom less than the 6’–8″ that the code requires. To check the headroom before you frame the stairs, you need to find the point that is plumb, down from the lowest point above the stairs, and then measure to the line in a plane with the nosing of your stair treads.
· Since the stairs are not built yet, the hardest part is finding that nosing plane. You can either work off the plans, if framing has not started, or work with the framing if the frame is ready for the stairs. To find this plumb point on the nosing plane, start from the first nosing, count the number of risers, and multiply that number by the riser height; then add the partial riser.
· To get the partial riser height, you just multiply the partial tread length by the riser percent, which is the riser height, divided by the tread length. Once you have found this length, you can measure either up or down, depending on which direction you used, to see if you have enough headroom.
Circular Stairs
Circular stairs are not as difficult as they seem the first time you think about doing them. They do, however, take some planning and careful work. There is no one way that curved stairs need to be built, as long as they are strong enough to bear the traffic. The method that follows is commonly used.
First of all, unlike straight stairs, we will not use stringers. Instead, each tread will be supported independently, by either a wall or a header. The header method allows for space to be usable under the stairs. The system outlined here uses a header to create what are called tread walls.
8 Steps for Building Circular Stairs
1) Find Riser Height
To get started, you first need to find your riser height. Quite often it is given on the plans, in which case you want to check it to make sure it works with the actual floor heights. If the height is not given on the plans, consider the following points when figuring the riser height.
· As with straight stairs, you want the steps to feel comfortable, so remember:
o Make sure all risers are equal, so the stairs will not cause people to trip and fall.
o The lower the riser, the longer the tread needs to be to feel comfortable.
· Common dimensions for riser and tread on straight stairs are 7″ for the riser, and 10½″ for the tread.
· For circular stairs, the tread width varies, so it is more difficult to figure the riser and tread dimensions.
· The comfortable range for circular stairs is harder to determine than the range for straight stairs because of the varying tread width. The code for residential buildings requires a minimum of 6″ at the narrow end and 11″ at a point 12″ out from the narrow end. For other buildings, the code requires a minimum of 10″ at the narrow end and 11″ at a point 12″ out from the narrow end. Because most of the length of the tread is greater than 11″, the rise will typically feel more comfortable if it is less than it would be for a comparable straight stair.
2) Mark the Circumference Lines
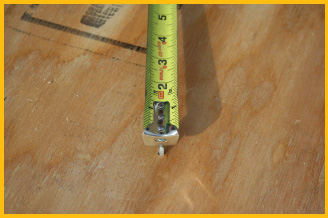
With the rise figured out and the number of treads known, you can start marking your circumference lines. The best way to start is by making the stair footprint on the floor in the position where the stairs are going to be built. If the plans show a radius dimension and location, then you can use the plans to locate the radius center point. To make your circumference lines (which represent your stairs and the walls on the sides of the stairs), set a nail part-way at the located radius center point. Then hook your tape to the nail and mark your circumference lines by swinging your tape around the nail and holding your pencil on the required dimension. (See photo.) Most tape measures have a slot in the hooking end for a nail head. (See illustration later in this section.)
If the radius or the radius center point is not given, you will need to find it. You can vary the radius length, but make sure you can maintain the following four requirements:
· 6″ minimum tread width at the narrow end of the tread (10″ in non-residential).
· 11″ tread width at a point 12″ in from the narrow end.
· A minimum stair width of 36″ in the clear to finish.
· In non-residential buildings, the smaller radius should not be less than twice the width of the stairway.
Drawing the circumference lines

End of tape hooked to a partially set nail
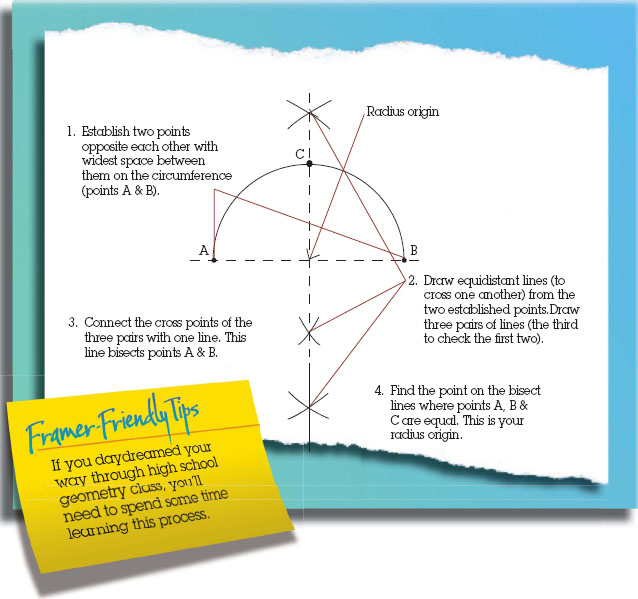
The first thing you need to do to find your radius is to establish two points on the circumference opposite each other. They can be any two points. Look on the plans for points that are already established. If there are no established points, then select points that fit with the location of the stairs. Once you have established two points, it is merely a matter of bisecting the line between these points, finding the radius origin, and drawing your circumference lines from the radius origin. (See the “Bisecting a Line to Establish the Radius Origin” illustration.)
3) Marking the Tread on the Footprint
Now that you have your circumference lines, you need your tread lines. Since you have figured your riser height, you know the number of treads that you will have. Knowing the number of treads, you can find the exact tread point along your stair circumference. To do this, divide the stair circumference in half, and then divide those halves in half again and again until you are down to single treads. (See “Divide Circumference for Treads” illustration.)
If your stair has an uneven number of treads, then you have to subtract one tread before you begin dividing into halves. To subtract one tread, you first have to know the width. The width will be equal to the total stair circumference length divided by the number of treads.
It is difficult to measure the stair circumference, and so your one tread will probably not be exact. Therefore, when you are done marking all the other treads, re-mark the tread you measured first.
Once you have all your division points for the treads, then chalk lines from the radius center point through the division points to the longest circumference line, and those lines will make your tread footprint. (See “Tread Footprint” illustration.)
4) Cut Bottom Plate
The bottom plate of the tread walls will not be parallel to the top plate, as it would be in a straight stair. The bottom plate will follow the circumference and serve as the bottom plate for all the tread walls. A good way to make the bottom plate is to use two pieces of ¾″ plywood. If the radius is not too small, you can cut the plywood with a circular saw. To mark on the plywood, set a nail anywhere and mark the plywood with a pencil and a tape measure. Use the dimensions from the stair footprint to get the radius length.
5) Nail Bottom Plate in Place
To build the stairs, start by nailing the bottom plates in place. (See “Bottom Plate Nailed in Place” illustration.)
6) Build the Tread Walls
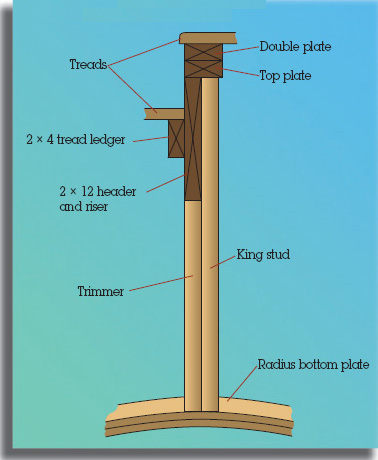
The walls supporting the treads will be built as header walls. Built this way, they will provide the riser and allow space for storage below the stairs. The wall will consist of a 2 × 12 single header that will serve as the riser, a top plate, a double plate, trimmers for under the 2 × 12 header, and king studs next to the trimmer. A ledger to support the tread below will be nailed onto the header. (See “Section of Tread Wall from End” illustration.)
Each tread wall should be higher than the one below it by the riser height. The height of the first step will have to be figured separately to equal one riser height, adjusted for any difference in floor covering. The top step might also have to be adjusted for a difference in floor height.
7)Install the Tread Walls
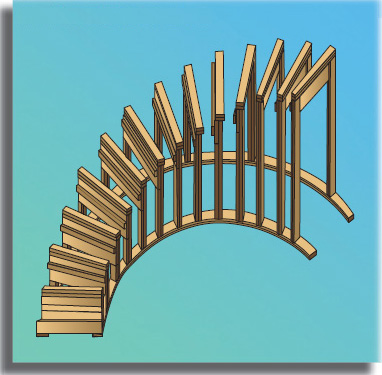
Nail the tread walls in place using the footprint lines. The bottom of the studs will be toenailed into the bottom plate already in place. (See “Tread Walls Nailed in Place” illustration.)
8)Cut and Nail Treads
The treads should all be the same. They will be nailed onto the top of the tread walls and the ledgers. An equal nosing should be maintained the full length of the tread. Make sure the walls stay plumb both ways. Glue each tread to prevent squeaks. (See “Treads Halfway Up Stairs” illustration.)
Bisecting a Line to Establish the Radius Origin
Divide Circumference for Treads

Tread Footprint
Cutting curved bottom plate

Bottom Plate Nailed in Place

Section of Tread Wall from End
Tread Walls Nailed in Place
Treads Halfway Up Stairs