
The benefits of stacking are renowned in astrophotography. However, every picture you take has noise ingrained in it. The stacking process is used to increase the resolution and sharpness of an image. The technique works by increasing the signal-to-noise ratio (SNR) and exploiting the randomness of the noise and the consistency of the actual signal. Every stacked image reinforces the target signal and averages out the effects of the noise. The process of stacking involves taking multiple pictures of the same object, followed by processing these images through a software algorithm which averages pixel differences of the frames to ‘stack’ and produce the final high-quality image. You can see how the target signal remains the same throughout the multiple pictures, but the noise randomly changes and can be averaged out, leaving the strong target signal to dominate.

Single Image.

Grainy appearance.
The benefits of stacking are apparent in the following examples. The sharpness and depth of the image are so much better on the stacked image; this becomes even more pronounced when you compare the grain in each of the pictures.
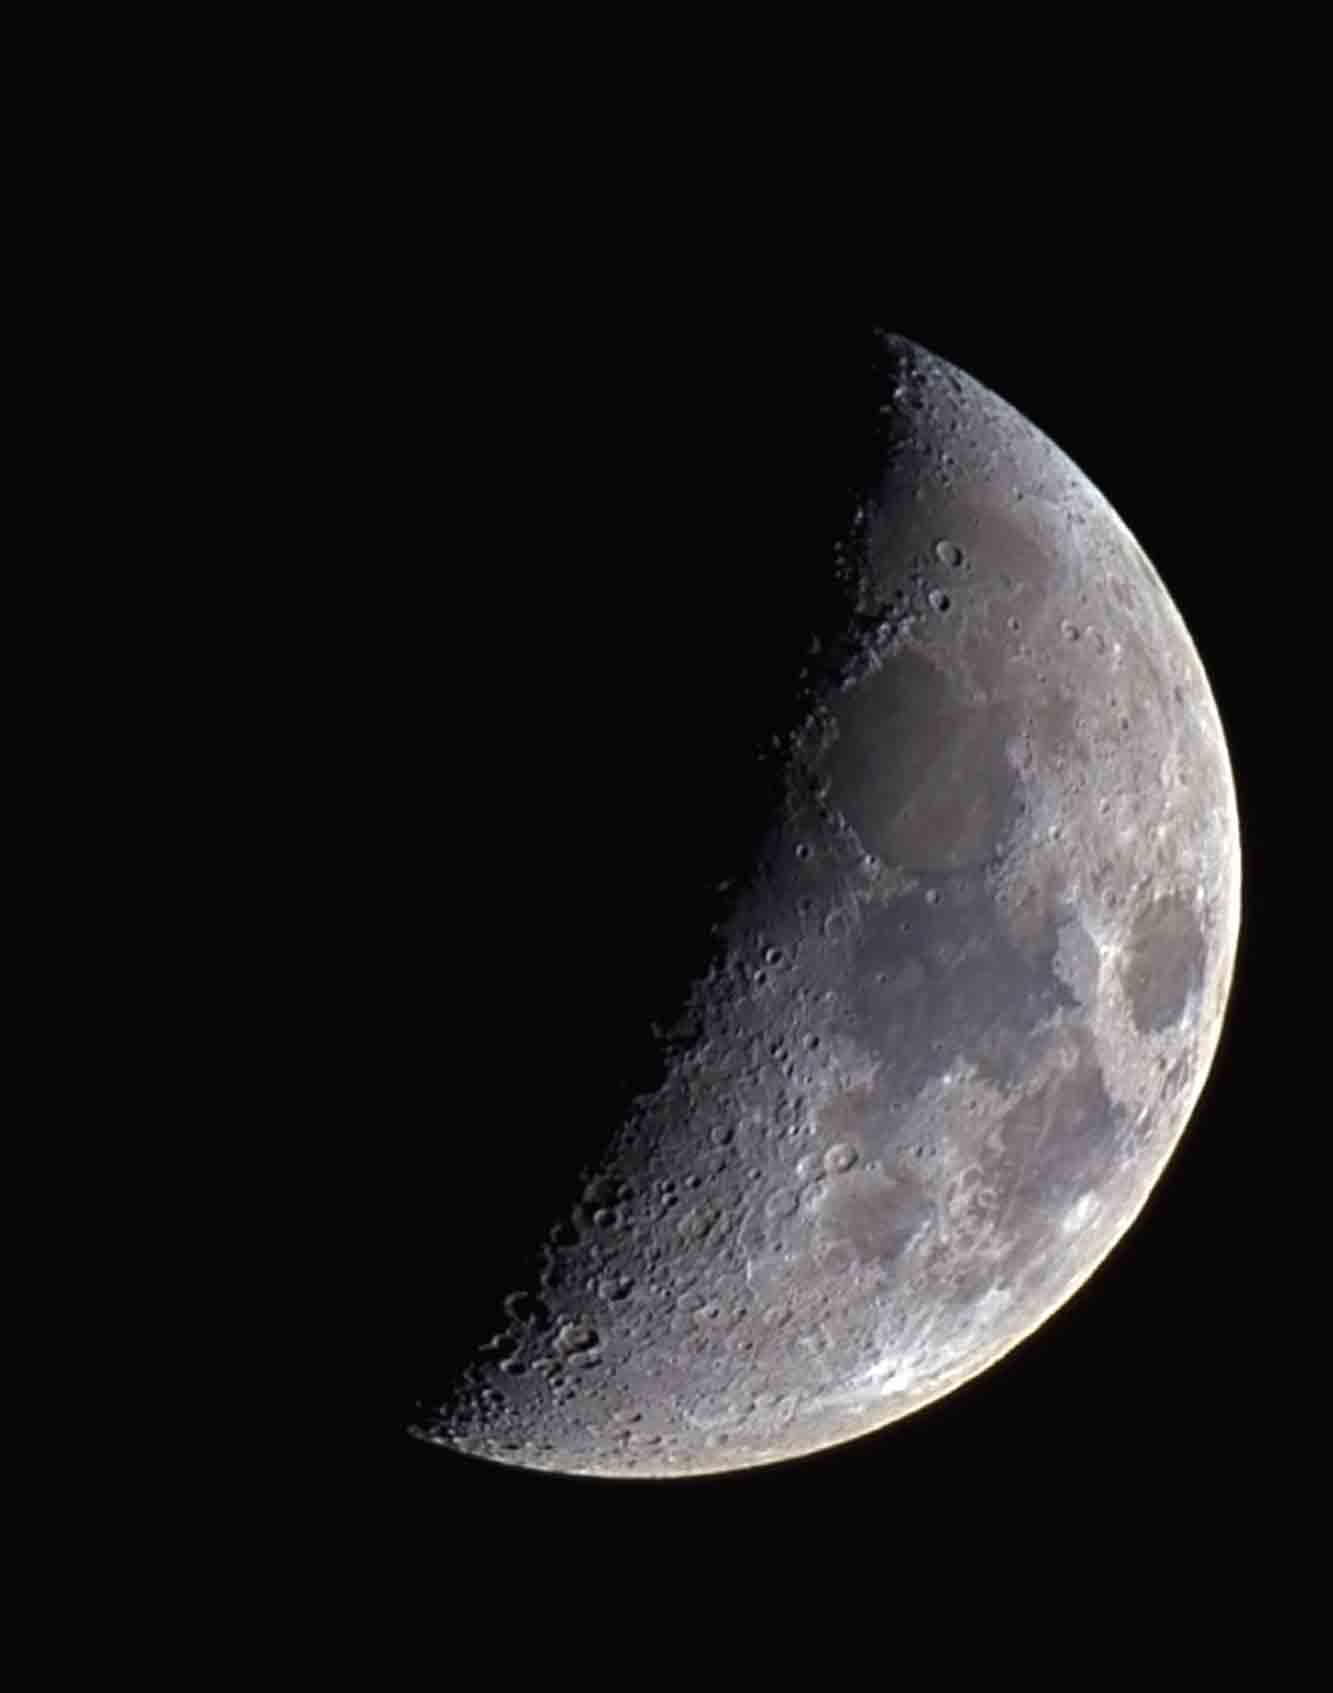
Stacked 18 images.

Noise reduced significantly.
The stacked lunar image above was a stack of eighteen single images taken with a Canon 6D DSLR with a lens at 600mm. The stacking was carried out using free software called Registax. There are numerous software packages available for stacking images, although not all of them are suitable for taking lunar pictures. Some of the available stacking software packages are only suitable for stacking deep sky targets and use stars in the image for alignment. This is the reason they are not suitable for lunar images.
The most widely used stacking software packages for lunar images are Registax and Autostakkert; they are both freeware and are available for download. Registax is better for stacking single photos and Autostakkert is better for stacking video. I will show examples of both software packages, as the process is different for each.
7.1 Stacking Multiple Images from a DSLR
When you have captured multiple images of the same target, you are ready to stack them. You do not need a set number of pictures for the stacking to be a success, but generally, the more pictures you have, the less noise will appear on the final image. The number you need to stack depends on the initial image quality and you will need fewer images to stack if the individual images are of high quality. The previous example shows the noise reduction achieved from stacking only eighteen images and you can see a significant improvement in the quality compared with the single image. The eighteen frames would be less effective on much noisier images like those from a video camera and would require you to stack more pictures for the same effect.
Before we start the stacking process, the image files need to be compatible with the stacking software, as not all stacking programs can process RAW files from the DSLR. Registax cannot work with RAW files. The first thing you will need to do is convert the RAW files from your camera into a format that Registax can process, such as a TIFF file. TIFF files are a non-loss data format and you should always use the highest quality non-loss image formats where possible, otherwise you will lose data during the process. There are many software options available to convert the RAW files and the one we will use is Planetary imaging pre-processor (PIPP) freeware which you can download from the following website: https://sites.google.com/site/astropipp/
7.1.1 Using Planetary imaging pre-processor (PIPP)
PIPP is used for pre-processing images or video before the stacking process. The software has many functions and features but we will only be using the software to crop and convert the files into a usable format. You should read the manual to understand the full functionality of the software.
The multiple RAW images, which we are going to convert to TIFF format, are taken with the Canon 6D with a lens at 600mm. An example of one of the RAW images is shown below. These are RAW CR2 files.

Open PIPP and the following page will open. You will notice seven tabs across the top which allow you to adjust the settings and select the functions which you want PIPP to carry out. PIPP can carry out many functions, but here we are focusing only on batch converting and cropping the RAW files. The first thing to do is to add the raw image files by dragging and dropping them into the box or using the add files option; all the files should show in the box as below.

Ensure that the Solar/Lunar Full Disk box is selected, as the whole Moon is within the frame.
Select the Input tab at the top and tick the Debayer Raw Image Files box; this will ensure that you preserve the colour detail within the image.

Select the Processing Options tab; these settings help with stabilising, centring and cropping the images. This step will support the stacking software by improving the alignment of the pictures, especially if you have image drift between shots.
Select Object/Planetary for the image stabilisation mode and enable object detection. This will ignore any frames which are framed significantly different or do not contain the object.
Select Centre the object in each frame and this will align each image and place the object in the same position on each frame and help with the stacking process.

As well as centring the image, you also have the option of cropping the image if you want to enlarge the object during the conversion. In this example, I have Enabled Cropping to do this.
You can select the Test Options button in the top right-hand corner to show you how the image will look with the crop settings you have added; you may have to adjust and test these crop settings a few times to get the look you want. The image below shows how these cropping settings have changed the image compared with the original RAW image and, if you proceed, all the photos will be converted and cropped to look like the image below.

Select the Output Options tab and ensure that the TIFF format is selected. The default file location for the converted images will be in the source file location where PIPP will create a folder containing the new files.

Select the Do Processing tab and start processing; PIPP will convert the files into TIFF format with a cropped appearance. These images will now be ready for stacking.
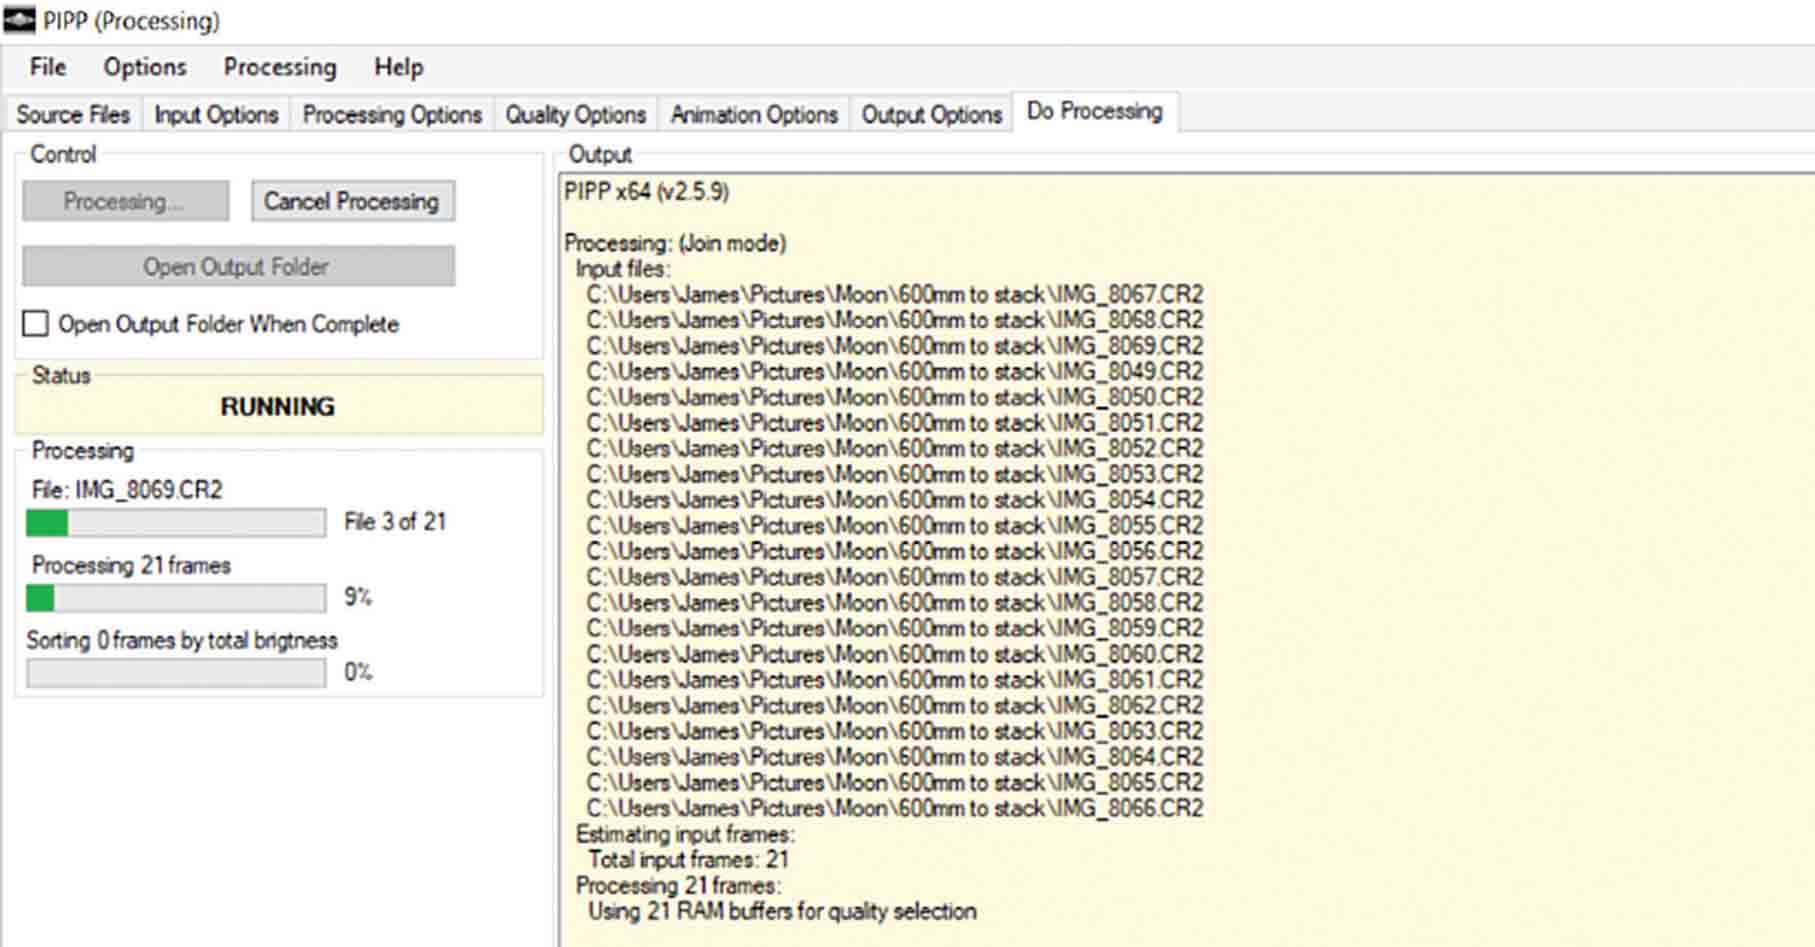
Each of the individual raw files will have gone through the process of being centred, cropped and saved in TIFF format. Compare this output image with the pre-converted photo to see how the software has changed the appearance.

Now that we have the images in a readable format, it is time to stack the frames.
7.1.2 Stacking the Images using Registax
The Registax stacking software is free to download and is available from this website: http://www.astronomie.be/registax/
This tutorial is only a rough guide to allow you to navigate through the stacking process; I thoroughly recommend reading the help guide for further details, as the software includes many more features and functions.
When the files are in a readable format ready for stacking, I recommend that you look at each one before using them and delete any which are blurred or obscured by clouds, etc., as these will not be suitable for stacking and will impair the quality of the stacked picture. It is preferable to remove these first rather than relying on the software to do this, as this is not always successful. When you have removed any obscure images, select all the files.

Open the Registax software. There are two ways of loading the files into Registax: you can use the Select button and find the file locations or you can drag and drop the selection into the box.
When the pictures are in Registax, the software will ask you whether you want to stretch the intensity levels. Click Yes


Occasionally the default view may be too close so select the show full image box.
The next thing to do is to set align points; the software will use these points as markers to align the images. Select an image which is on average sharper than the rest and click on Set Align points. Check the number of align points which the software has assigned. The following image has seventy-seven, but sometimes the software can assign over 1000 points which will work fine, but it takes more time and processing power. It is advisable to have no more than a few hundred points if processing power is an issue. To reduce or increase the number of align points, move the slider until you get the desired number.

Select the Show Alignment box and click on the Align button at the top and the software will start aligning all the images. The progress of the step is shown in the bar at the bottom left.
When the alignment is complete, select the number of pictures to stack. I find that for single DSLR images you can generally stack a greater percentage of the frames compared with video footage, as the images are usually more consistent and of better quality. This is the reason that the number of frames used for DSLR image stacking is relatively small compared with video frame stacks. You can decide how many frames to stack by looking at each picture and getting a visual feel for the quality of the images. There is a quality estimator in PIPP which shows you the relative quality of the images. If you look at all the saved pictures from PIPP, they each have a quality estimation assigned to them. By using visual assessment and the PIPP quality estimator, you can assess how many of the images you want to stack. I have used seventy per cent for this stack but note that for video this value would be much lower.

Select Limit and you will notice yellow circles on the image. These circles are occasionally accompanied by lines which depict how much alignment is required but, as alignment was carried out previously in PIPP, these lines are not evident.
Select Stack and the software will stack the percentage of highest quality images which you set previously. I find that the default stacking values usually work fine but feel free to play with the settings if the stacking process has failed. It is important to understand how different settings affect the final image.

Stacked Image.
When the stacking process has finished, the stacked picture will be displayed on the screen. Initially you may notice that the image does not look considerably different from the original, however, on closer inspection, the noise will be less. The real benefits of stacking will become evident in post-processing.
I usually save the image at this point and carry out all my post processing using Photoshop, but another effective and popular post-processing technique used by Astrophotographers is the Wavelets function which you can find in Registax. To access this function, click on the Wavelets tab at the top of the page and this will bring up a selection of sliders on the left and some function boxes on the right.
The Wavelets function is a handy sharpening tool, as you can make significant changes by slightly adjusting the sliders on the left. The six different layers improve the clarity of features using different embedded filters. Some of the sliders affect the finer detail and other sliders the larger detail. You will need to experiment with the sliders to produce the sharpening effect you want. When you are satisfied with your sharpening, you can either save the picture as your final image or use it for further processing in Photoshop or other photo-enhancing software. Ensure that you save your image in a non-loss format such as TIFF!
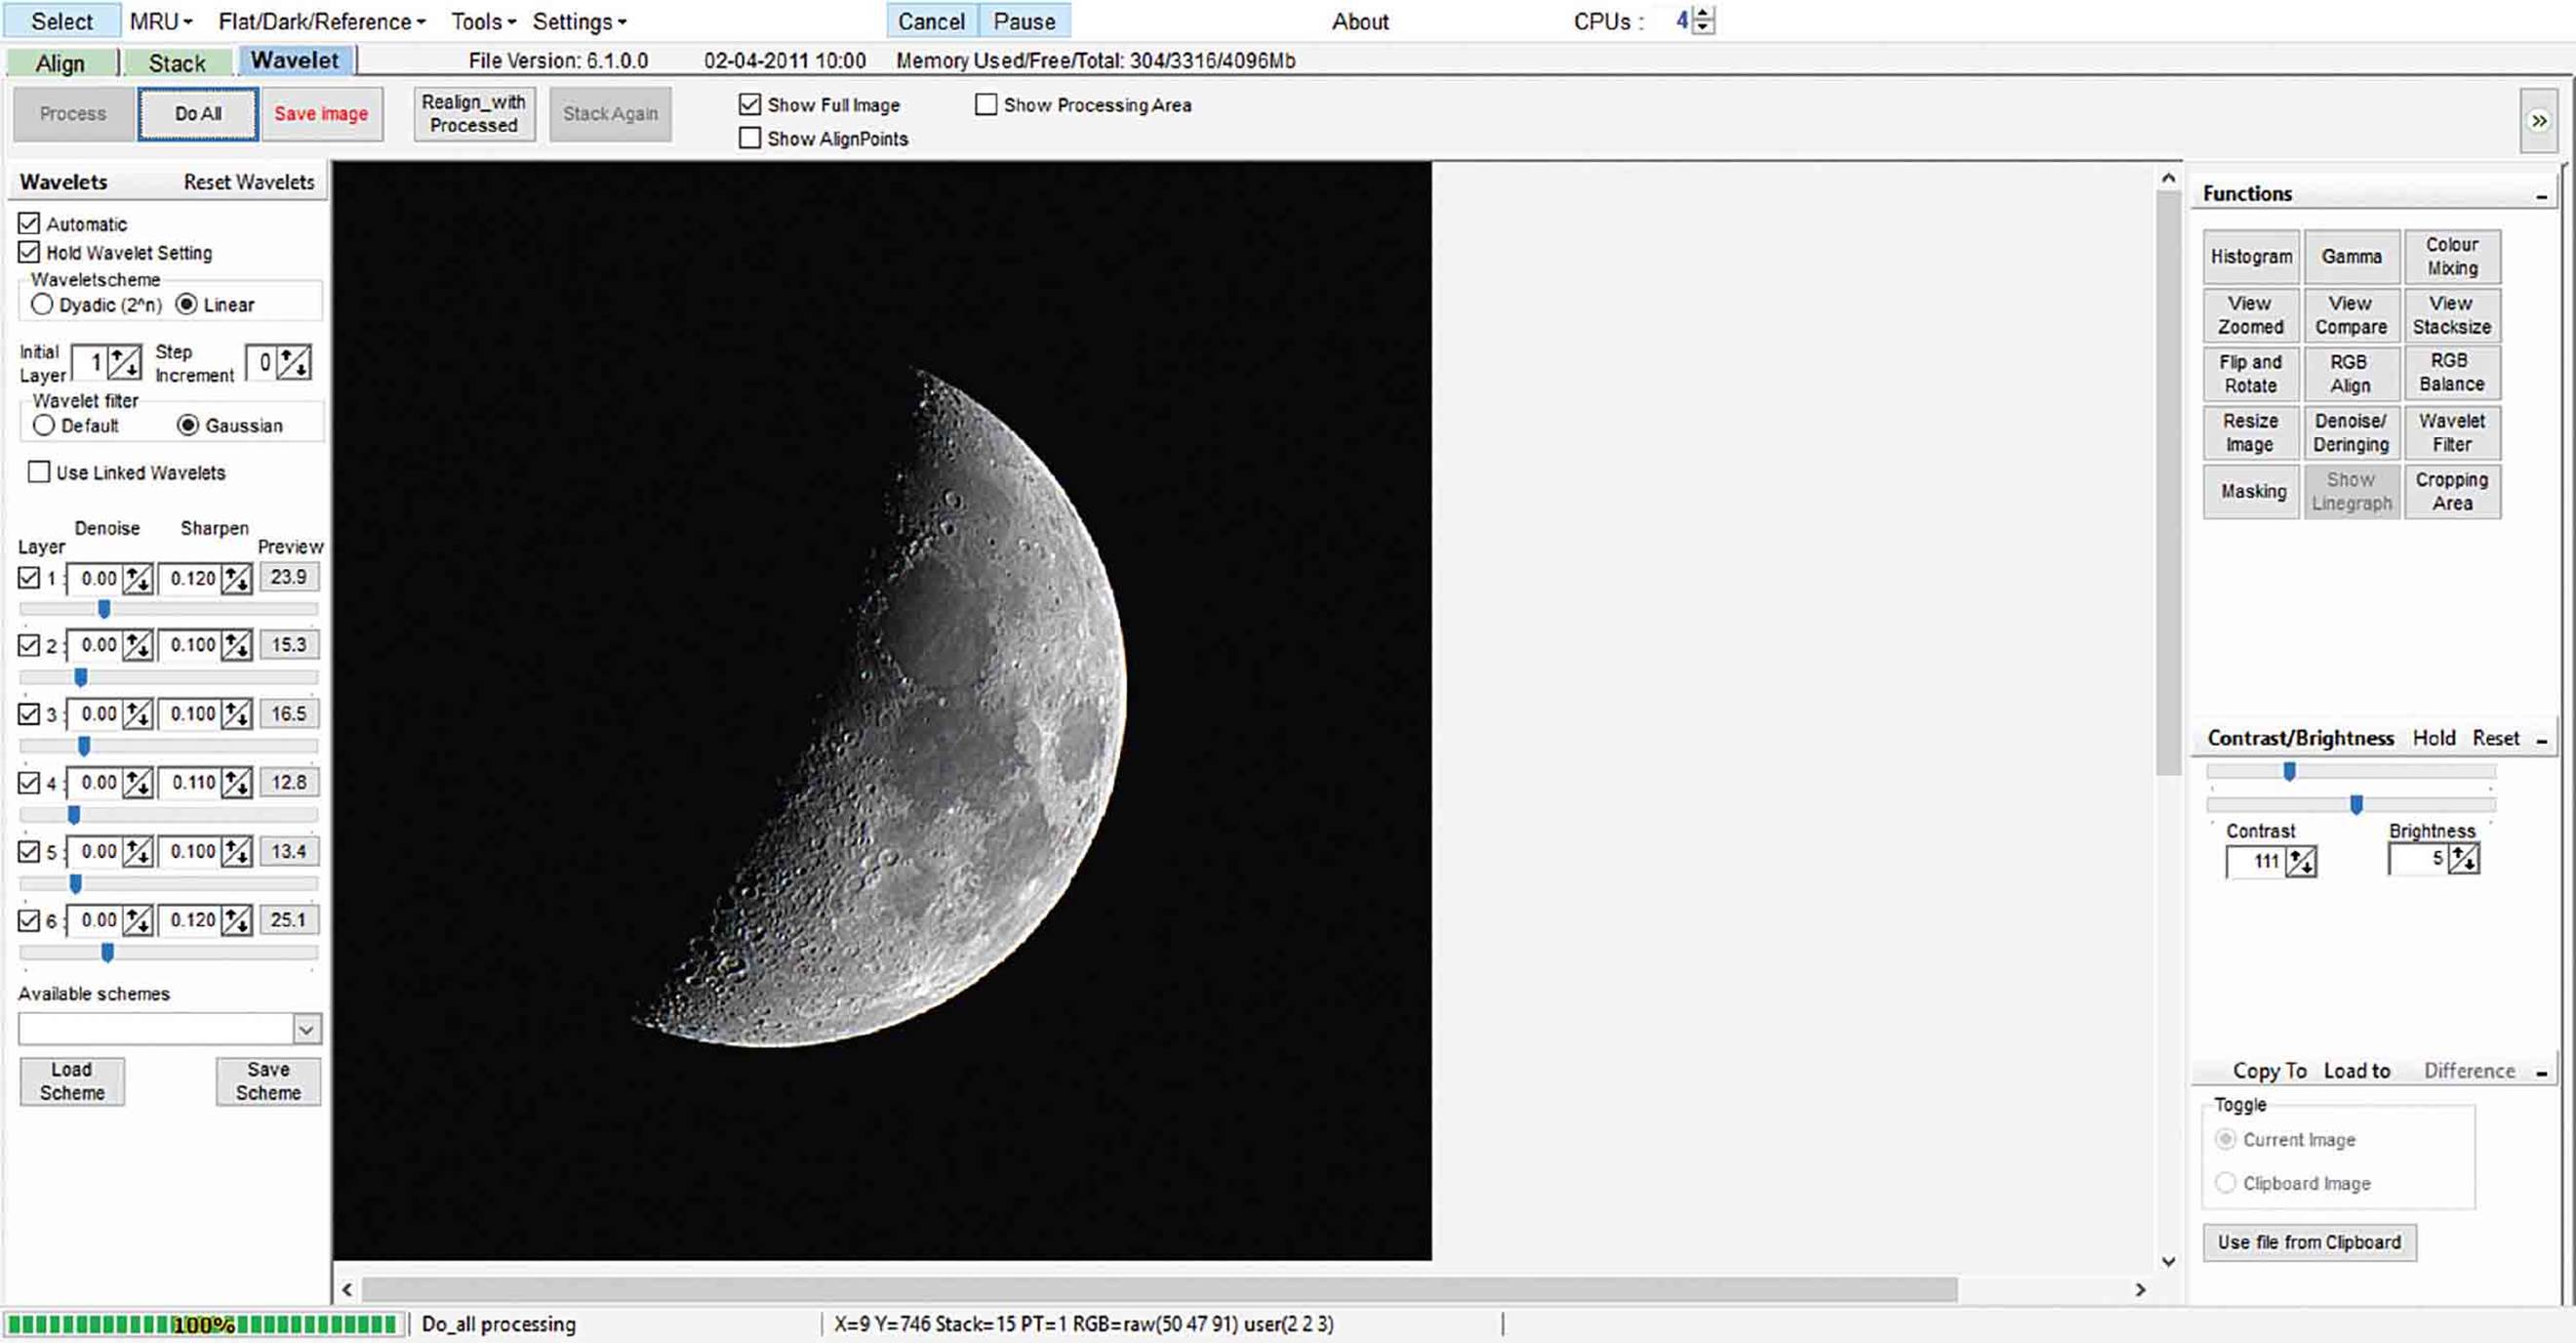
Sharpened image using the wavelets function.
7.2 Stacking Video Files Using Autostakkert
The capture software used with your high frame rate camera will save the video as an AVI, SER or FITS file; you can load these formats into the stacking software without issue. MOV files from some cameras are not compatible and will need converting to a readable format first. The captured video file should ideally contain a minimum of 5000 frames, and you need to select the best of these for the final stack. Of the 5000 images in the video, you will have a small selection which will be of a much higher quality than the rest due to the breaks in seeing. The stacking software will sort out these best frames for you. The use of low-quality images will impair the quality of the final image.
The software which performs this job exceptionally well is called Autostakkert and is free to download from the following website: https://www.autostakkert.com/
The software follows a process, initially sorting out the best quality frames, stabilising each image and then stacking a proportion defined by the user.
Process
The process and settings which I will highlight in this section are only a guide. The software can be used in different ways and I thoroughly recommend experimenting with different settings to find the best ones which suit you.
To begin with, you need to load the software. Two windows will open but you only need to work with this one initially:
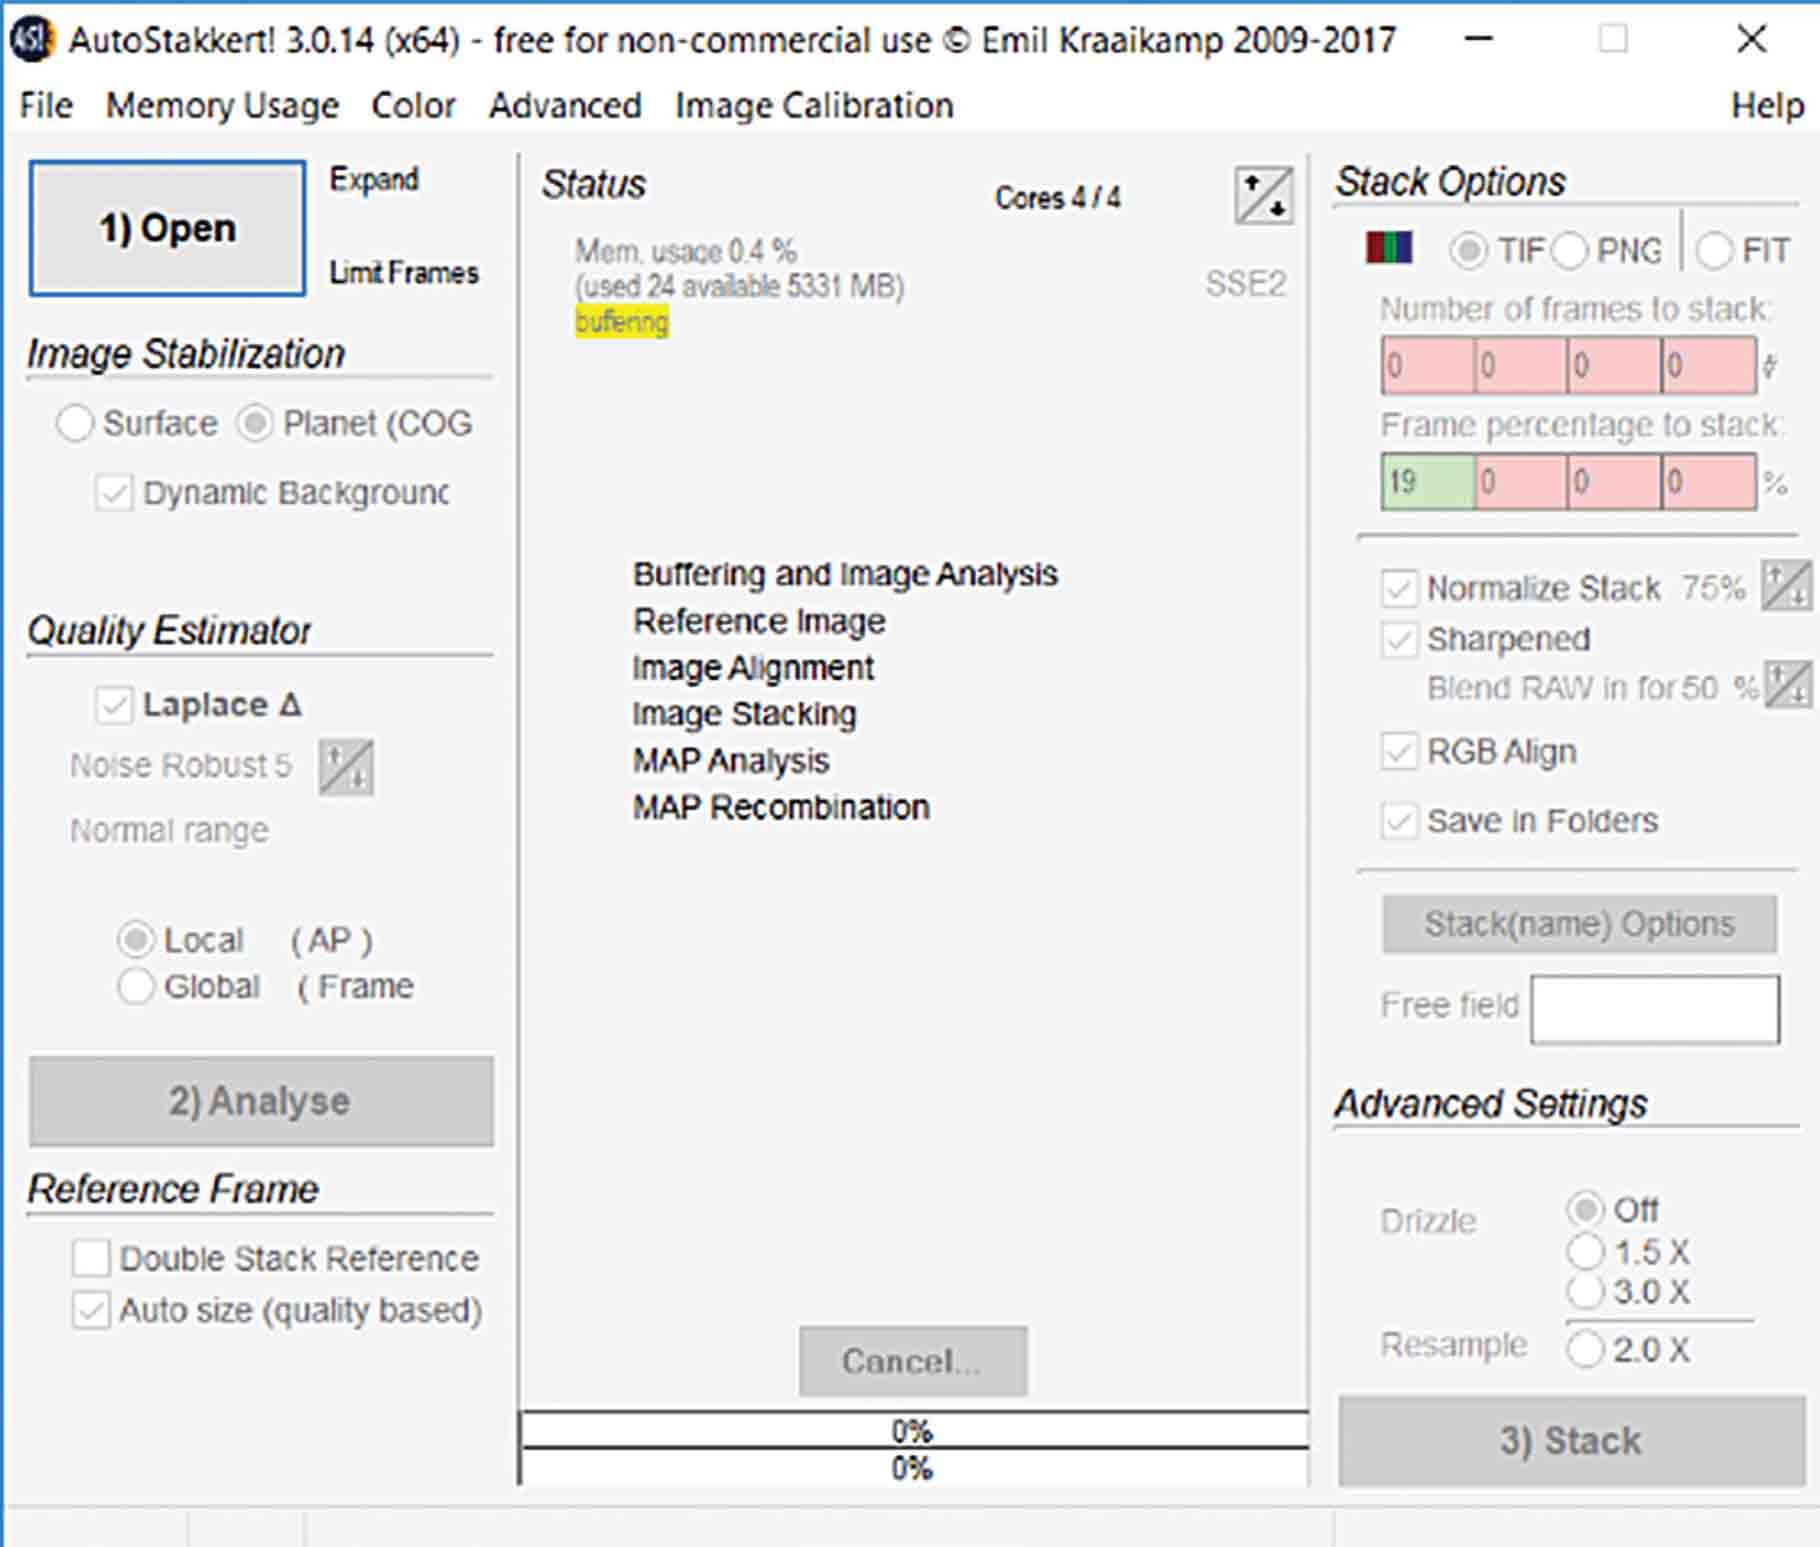
Press the Open button and select your file or you can drag and drop the images into the box.
When the video has loaded, you will see an image of one of the frames in the large window and the total number of frames shown at the top left.. You will notice a green box, this will need positioning in an area of interest which has plenty of features, as the software will use the features within this box to anchor onto for stabilising the images. To move the box press Ctrl and left click.

Before the software starts analysing the frames, ensure that you tick the following settings:
Image Stabilisation
Select Surface for close-up images. The planet option should only be selected if there is a full disc in the field of view.
Select Improved Tracking if the video is quite ‘jumpy’, otherwise leave it unticked.
Quality Estimator
Tick the Laplace quality estimator box and use the arrows to set the Noise Robust to 5.
Select Local (AP). The quality is determined around each alignment point; you set the alignment points after the initial Analyse stage.
Press Analyse and the software will scan each frame and sort them by quality.

Processing
When the software has analysed each image, you then need to place alignment points on the image so that the software can align and stack the images.
Select Place AP grid and the software will automatically place the alignment points on the image; aim for about 1000. However, the more points you have will increase the time it takes for the stacking process to complete. The number of alignment points can be altered by increasing or decreasing the number in the Auto AP box using the arrows.
The next step is to check the quality graph and to select the highest quality frames from the video. The chart is the output from the initial analysis step and has a green trendline running from left to right. The best quality frames are on the left and the lowest quality are on the right. Use the graduations to estimate the best quality frames. An annotation shows the fifty per cent mark which you can use as a guide. The point where the green line crosses the x-axis shows the best quality frames. Therefore, based on the above graph, this position is approximately ten per cent. Input 10 into the Frame percentage to stack box and ten percent of the highest quality frames will be stacked. It may seem wasteful not to use most of the images, but the addition of lower quality frames will reduce the quality of the final image.

The software is also able to create a sharpened version of the stacked image; this is not critical at this point as the image can be sharpened in post-processing.
Select Drizzle Off if the video is static, however if the video has a lot of movement select Drizzle 1.5
Select Stack and the software will now stack these best frames and automatically save the final image as a 16-bit TIFF file in the default Sharpcap captures folder. The software may save two versions of the stacked image, one of the images unprocessed, the other image slightly sharpened if you have ticked the ‘sharpened’ box. Either picture can be used for post-processing, although the unprocessed image gives you full control over the sharpening and post-processing. The Autostakkert software algorithm has started the post-processing with the pre-sharpened version and may not allow you to have complete control over the procedure if you use that image.
The image below is the unprocessed stacked image which is automatically saved by the software; you can see black stacking artefacts around the edges, and it is usual to see these on the image. These are usually caused by image drift during the capture process. However, you can easily crop these edges in post-processing. As the clarity of the stacked image has improved significantly over a single video frame, you now have the option to use the image as it is, or further enhance it in post-processing. I thoroughly recommend post-processing to extract the full detail from the image.

Stacked image from ZWOASI224MC using Autostakkert.