
ORIGINS
By 1943 the idea of using tank turrets as fixed fortifications was accepted practice. Turrets from captured tanks or obsolete German models were emplaced in all the major theatres. However, they tended to have thin armour and because the guns mounted were small by the standards of the day, these turrets posed little threat to Allied tanks. That was all to change in October of that year with the idea of using Panther tank turrets in this way. This was a major departure for the Germans because the Panther was the main German medium battle tank, it was still in production and it was well armed with the powerful 75mm KwK42 L/70 gun.
Initially it was planned to mount Panther turrets on one of the steel shelters designed by the Organization Todt that had been specially adapted for the purpose. This, it was hoped, would take significantly less time to install than a typical concrete structure and as such would ‘reduce [the] time of exposure to enemy fire during their emplacement’.1 Nevertheless, only a year later (October 1944) plans were drawn up to mount a Panther turret on a standard reinforced concrete bunker – the Regelbau 687. However, by this stage in the war it was clear that Germany had neither the time, the manpower nor the materials needed to construct such elaborate fortifications and plans were hastily drawn up for a wooden framework that was capable of mounting the Panther turret and its base plate. This led to the development of the third and final shelter, the Holzunterstand.
OT STEEL SHELTER
OT Stahlunterstand mit aufgesetztem Pantherturm
Other Designations: Pantherturm I Stahluntersatz By 1943 Hitler’s dreams of a Third Reich were in tatters with his armies in retreat on all fronts. Thinking now turned from the offensive to the defensive and how to consolidate the gains that had been made. In the west, work began on the Atlantic Wall. Concrete bunkers were time consuming to build and consumed valuable resources and it was clearly not feasible to build such defences in Italy or on the Eastern Front so the Organization Todt developed a series of prefabricated steel shelters, one of which was adapted to mount a Panther turret. This idea was of great interest to Hitler and he was in regular communication with Speer(81) about its progress and it is even reported that the Führer was intimately involved in the design of the shelter. In October 1943 Technical Directive No. 3 for Construction Work in Accordance with Führerbefehl 10 (Führer Order 10) was issued.2 This included detailed drawings of the shelter and how it was to be installed in the ground.
The OT Shelter was constructed in two parts from electrically welded steel plates. The oberteil or upper box was roughly 3m (10ft) square and 1m (3ft) high and essentially formed the fighting compartment. It held the ammunition for the main weapon and was sufficiently deep to accommodate the turret basket. The roof, which was 100mm (4in) thick, incorporated the turret ball-race onto which the turret was mounted. The walls were 80mm (3in) thick and were fitted with bins that were capable of holding 175 rounds of 75mm ammunition. The ammunition for the machine gun (4,500 rounds) was stored in the turret itself.
The uberteil or lower box was substantially higher than the upper box, at two metres (6ft) with enough room for a man to stand upright comfortably. Because it was lower in the ground it was less well armoured; the exterior walls being only 70mm (3in) thick, the interior walls 50mm (2in) and the base plate 40mm (1½in). It was divided into three compartments. The largest, which was lined with board, formed the living accommodation. It was fitted with fold down bunk beds(82) and a pressure-proof Wt 80K stove to heat the room. The stove was fitted with a flue which also served as an exhaust pipe for the machinery in the passageway.(83) In the right hand rear corner of the compartment there was an escape hatch. This led to a vertical shaft clad with wood and fitted with climbing rungs. Where no escape tunnel was provided the hatch could be sealed with a plate that was bolted in place. It was possible to fit a radio set in the shelter and a hole in the wall near the main entrance was provided for the aerial. However, if a radio was fitted then three of the bunks had to be removed.

OT Stahlunterstand mit aufgesetztem Pantherturm –OT Steel Shelter.

The top box of an OT steel shelter that has been destroyed and flipped upside down giving a rare view of the inside and the ammunition storage. The photograph was taken in September 1944 near Rimini. (QE II Army Memorial Museum)
An opening led from the crew’s quarters to a further compartment that acted as either a general store or as home to various pieces of equipment. These included a 2hp DKW motor with 600-watt dynamo, a 150-amp storage battery and a 20-litre compressed air tank. These powered the lights and the electric fan in the turret and a compressor to flush out the barrel. Initially it was planned to dispense with the compressed air but it was soon realized that without it, conditions in the turret became intolerable when the main armament was being used (unless the hatches were left open which compromised the operation of the turret) and the decision was reversed.3 The turret, however, was not gas proof, but the shelter was. It was fitted with a gas lock and a ventilator (located in the crew’s quarters), which was manually operated and was capable of producing 1.2m3 of fresh air per minute.
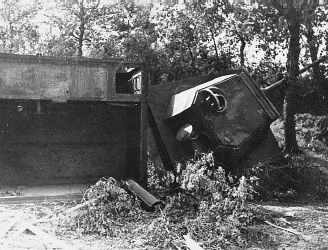
One of the Panther turrets that was to be installed in the Gothic Line near Rimini in September 1944. The lower box has been tipped on its side, which gives a clear view of the inside and in particular the ladder that linked the two boxes. (QE II Army Memorial Museum)
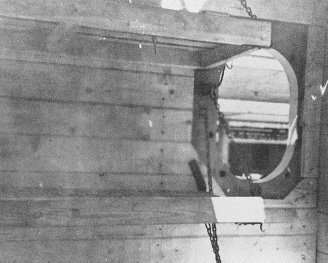
A very rare photograph of the inside of the lower box. It shows the escape hatch and two of the three bunk beds on that wall. The wooden cladding is also clearly visible. (Tank Museum)
A hinged door with pistol port led from here to the final compartment. This was fitted with a steel ladder that linked the upper and lower boxes and was also where the main entrance was located. From here a trench, which sloped fairly steeply upward, led away from the shelter and linked it to the main trench system at the rear. The trench was revetted with brush or cast building blocks and near the shelter was covered with timber cross members and spoil. Immediately outside the entrance was a soakaway to prevent flooding of the shelter. According to a captured German file the entrance had caused some debate, but in practice it had proved to be satisfactory.4
Table 1 Steel shelter weight
|
Turret |
8.8 tonnes |
|
Upper box |
13.5 tonnes |
|
Lower box |
18.5 tonnes |
|
Equipment |
1 tonne |
|
Total weight |
41.8 tonnes |
The initial turrets supplied for use on steel shelters were not fitted with power traverse and Inspektion der Festungen (Fortress Inspectorate) enquired of the Waffenamt whether it was possible to add this facility. Their response made it quite clear that shortages of parts meant that it was not possible to meet demand for Panzerkampfwagen V Panther production let alone meet this additional requirement and as such the modification was rejected. With no traversing gear the crew had to rotate the turret by hand.(84) This, as a captured German document stated, ‘was both slow and difficult and generally unsatisfactory’.5 The weight of the turret was such that the hand traverse had to be highly geared and meant that the turret could only be traversed at approximately 2 degrees per second.(85) To alleviate the problem an auxiliary drive was installed. This enabled the loader to support the gunner by hand and resulted in a marginally increased speed.6 Traversing of the turret also suffered from other teething problems. On early models the turret became jammed by splinters entering the turret ring. To overcome this problem, the area was covered by a plate, and sandbags provided additional protection.7
The shelter was to be installed by the Organization Todt and its personnel were responsible for ensuring that the position was ready for immediate occupancy by the crew, although in reality the crew was often required to help. A hole was excavated that was to be big enough to accommodate both the steel boxes and a collar of reinforced concrete blocks. These were to provide added protection to the steel boxes and were positioned so that they sloped away from the turret base at a gradient of 1:10. Approximately 55m3 of blocks each 20 × 25 × 50cm were needed and were secured with wire and pointed with cement. The whole was to be covered with turf and channels cut into the apron to direct rain away from the shelter at the front and on both sides.
OT Stahlunterstand mit Betonummantelung für Pantherturm
A year after Technical Directive No. 3 was promulgated Detailed Instructions No. 2 for the ‘Improvement of the Western Fortifications and the West Wall’ was issued. This included an annex detailing a slightly different method of installation for the Panther turret, the OT Stahlunterstand mit Betonummantelung. Instead of concrete blocks the boxes were to be encased in concrete 1–1.5m (3–5ft) thick and an inclined concrete apron, or sogplatte, was to be constructed that gave the shelter added protection and also served to counter blast damage to the loose soil around the turret when the gun fired.
This formalized a practice that had already been adopted in Italy in the Hitler Line and which, in the opinion of Waffenamt Prüf Festung (Fortification design office), was at variance with the original concept of this type of shelter. In a report sent to General der Pioniere und Festung (General in Charge of Engineering Works and Fortifications) and Chef des Generalstabs des Heeres) Chief of General Staff (Army)) in May 1944 it questioned the logic of encasing the shelters in concrete. The OT Steel Shelter, it contested, had been developed for use where rapid installation was necessary or when poor weather precluded the use of concrete. If this was not the case then a reinforced concrete shelter was preferable because it provided better protection and did not waste valuable steel that could be used more profitably elsewhere. Because of this the Waffenamt could not support the further mass production of Panther turrets on steel shelters.8
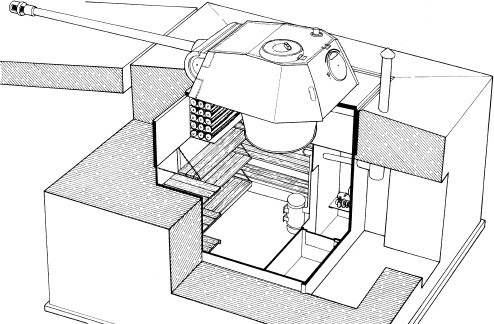
OT Stahlunterstand mit Betonummantelung für Pantherturm – Panther turret on OT Steel Shelter with concrete surround.

A Panther Ausf D turret mounted on a steel shelter. The concrete jacket that provided further protection for the base units is still under construction with only the steel reinforcing rods in place. The turret was located on the approaches to Rimini, Italy. (J. Plowman)
The concerns raised by the Waffenamt were not the only problems with the OT Steel Shelter. There were also more general difficulties with transportation and installation. The steel shelters were dispatched in two parts: the upper box with turret and the lower box. For the first part of their journey the sections were transported from the assembly plant on flatbed rail wagons. These were widely used to transport both war materials to and from the front and for the movement of supplies inside the Reich. As war production escalated demands on the railways increased and this, together with the impact of Allied air raids, meant that these wagons were in short supply and not always available to transport the steel shelters.

A good view of one of the twelve-wheeled trailers that were used to transport the Panther turret and lower box from the railhead to its final destination. This example was abandoned somewhere along the Gothic Line and was captured by Canadian forces. (Canadian National Archives)

A further view of the special trailer showing four of the six internal wheels. The large number of wheels dissipated the tremendous weight of the turret and box. (Canadian National Archives)
Matters did not improve at the rail terminus. Here the upper and lower boxes were loaded onto trailers. These were specially designed and were immensely strong since they were required to carry loads in excess of 20 tonnes. As such they were compact, being only slightly longer than the box they carried, and were fitted with twelve wheels with solid rubber tyres, six on the outside and six on the inside. These trailers were then towed by tractors to the final site for installation. The OT, which was responsible for transporting the Panther turrets, had very few tractors, which meant that they could not guarantee delivery and even if they could provide a vehicle to tow the trailer there was often insufficient fuel for the journey. A captured German document provided an insight into the transport difficulties of the OT Shelter. ‘A handicap is that they are heavy to transport and at present their use is limited to the vicinity of roads capable of taking the heavy trailer which carries them.’9

A Panther turret and steel shelter ready for installation. In the foreground are the rails on which the lower box, which formed the crew’s living quarters, was moved into place. The two sections have been covered in hay in an effort to camouflage them. (Imperial War Museum)
To ease the transport problems the turrets were to be installed as near as possible to the railway or at least near good roads a short distance from the railway station,(86) and increasingly the OT had to rely on Army Groups to provide help.(87) But even these expedients did not completely eliminate the problems. At the site itself the upper and lower boxes needed to be unloaded and lowered into place by means of a mobile crane, the two sections being assembled in the excavation. As the war progressed heavy lifting gear was increasingly difficult to find and instead the individual sections had to be manoeuvred along ‘rail tracks’ to their final resting place. It was then necessary to dig an incline down which the boxes were lowered. The soil was then backfilled.
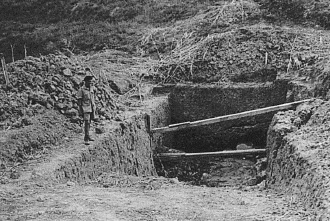
An excavation ready to accommodate the upper and lower boxes for a Panther turret. The base section would have been manoeuvred down the inclined plane, a technique used when no lifting gear was available. (J. Plowman)
REGELBAU 687 (STANDARD CONSTRUCTION)
Other Designations: Pantherturm II Betonsockel The difficulties of transportation and the concerns expressed by the Waffenamt about the value of using valuable steel in the production the OT Shelter prompted consideration of alternative structures to accommodate Panther turrets and in May 1944 Hitler agreed that surplus Panther turrets could be mounted on a concrete shelter. A design and technical note were drawn up and were issued in October 1944, along with the OT Stahlunterstand mit Betonummantelung, in Detailed Instructions No. 2 for the Improvement of the Western Fortifications and the West Wall.
The shelter on which the turret was mounted was installed below ground, so that when it was finished only the turret was visible. It was constructed from reinforced concrete with exterior walls 1.5m (5ft) thick and interior walls and the floor half as thick at 80cm (31in). Somewhat surprisingly the roof only measured 1.2m (4ft) at its thickest which may have been in recognition of the fact that the turret was more likely to be engaged by enemy armour and anti-tank guns that would have a flat trajectory rather than artillery fire. An apron of concrete that ran away from the leading edge of the bunker was also added, much like that constructed around the later OT Steel Shelter, with the same aim of providing added protection and to counter blast damage.

Regelbau 687 – A Panther turret mounted on a reinforced concrete shelter.
The bunker itself had three rooms, which were accessed via the entrance at the side of the shelter. A steel door led from here to the crew’s quarters. This measured 2m × 1.5m (6ft × 5ft) and housed a stove that provided heat for the crew and a means of warming food. The smoke from the stove was vented outside through a chimney. There were few other concessions to comfort. There was no room for bunk beds, but an escape hatch was fitted which led to a vertical shaft at the front of the shelter.
From the crew’s quarters wooden steps led to the fighting compartment below the turret. The room directly below the turret housed an 8.7hp DKW motor that was positioned on a concrete plinth in the middle of the shelter. A vertical shaft linked the motor with the hydraulic rotation mechanism in the turret. This enabled the gunner to turn the turret mechanically. Using this the turret could be traversed at 6 degrees per second. A V-belt from the motor ran a compressor that provided the compressed air to flush out the barrel. The motor also powered a dynamo that provided electricity for lighting, to operate the turret fan and for the electrical discharge. A coupling between the motor and the gears enabled the crew to disengage the motor when it was being started up. Exhaust from the motor was vented outside via the chimney. Metal rungs set in the wall linked the fighting compartment to the turret itself. Adjacent to the fighting compartment was a 1.64m- (5ft) high recess measuring 2.3m × 2.0m (7ft × 6ft) that could accommodate 450 rounds of 7.5cm KwK ammunition.(88)

Holzunterstand – Panther turret on wooden shelter.
HOLZUNTERSTAND
Other Designations: Schnelleinbau or Pantherturm II or A
As the war entered its final months it became clear that the ambitious plans for mounting Panther turrets on reinforced concrete shelters would not be possible so urgent consideration was given to the possibility of designing a quicker, simpler and cheaper alternative. This led, in November 1944, to the development of a wooden framework that was capable of mounting the Panther turret and its base plate. However, it was made very clear that the Holzunterstand was only a stopgap measure and was only to be used where it was not feasible to construct a reinforced concrete shelter.10
Construction of the shelter was very simple. Four wooden props, 20cm (7in) square, supported an upper and lower framework constructed from squared off timber (20 × 16cm, 7 × 6in), which was bolted together. Two sets of cross members (16 × 8cm, 6 × 3in) at the top and at the bottom provided added strength. The outside of the box-like framework was then lined with 25–30mm (1–¼in) thick baffle boards before being installed in the ground. On top of this framework the turret and its base plate – which weighed 11 tons – were affixed with 14¾in (37cm) bolts.
It was essential that the upper and lower frameworks were absolutely horizontal and true if the turret was to operate effectively because, like the concrete shelter, the Holzunterstand was fitted with an 8.7hp DKW EL462 motor to rotate the turret. The motor sat on a welded steel grundplatte that was positioned at the base of the structure. A vertical shaft led from here to engage with the transmission gear in the turret. The motor simultaneously drove a dynamo and compressor. The dynamo provided electricity for lighting, the turret fan and the electrical discharge system. The compressor for the production of compressed air to automatically flush out the barrel was driven via a V-belt.11
Regardless of whether the framework had been constructed perfectly level, the motor, gears and coupling arrangement were not without their problems. Even when running for relatively short periods (thirty minutes) the gears became very hot. Some cursory investigations found no evidence of the shafts jamming or sticking and the bearings had enough oil, so it was concluded that the heat was simply the result of the number of revolutions (2,000–3,000rpm). With no time for design changes the crews were advised to uncouple the gears on the motor and only to activate them when turning the turret, so as to reduce the possibility of damaging the gears.12
Understandably, given the desperate situation for the Germans at this time, the shelter was functional with few concessions to the crew’s comfort. There was no room in the shelter for any bunk beds, but a Wt 80k stove was installed, which provided heat and somewhere to cook. A chimney and flue for the motor were fitted to vent fumes outside. A two-part recess was let into the side of the shelter that provided storage room for 162 rounds (eighty-one rounds in each) of 75mm ammunition, while a recess on the opposite side of the shelter accommodated a battery. The entrance to the structure was located at the side. It consisted of a simple board door, which ultimately led to the approach trenches.13
Despite the seemingly flimsy nature of the structure, test firing of the main weapon in the zone of Fest Pi Kdr I on the West Wall proved the framework was stable and did not move. Nevertheless, the shelters did suffer a number of teething problems. After installing the Panther turret on the wooden framework a number of the base plates on which the turret was mounted developed noticeable sags of approximately 6–10mm (under an inch). This was particularly evident along the diagonals and caused the turret to jam. The problem was exacerbated by irregularities in the plate surface, which had to be removed by rubbing down. Various solutions to overcome these problems were developed. One alternative developed by Fest Pi Kdr I in March 1945 was to use two timber props to support the base plate and this seemed to solve the problem. Another solution was the addition of 10mm thick steel ring between the turret and the base plate, which raised the turret just enough to allow it to rotate (although it was not clear whether there might be further sagging that might again jam the turret). The long-term solution it was suggested was increasing the thickness of the base plate, but by that time (21 March 1945) major modifications were not feasible.14
PANTHER TURRET
The Germans used three separate turret types on the different shelters. Initially, because of the critical nature of the situation, Panther Ausf A turrets were used. These were taken directly from the main Panther production line and were used largely unaltered on steel shelters in the Hitler Line, in Italy. Later refurbished Ausf D turrets were used. Somewhat confusingly this was an earlier design than the Ausf A but was easily distinguishable by the drum cupola. The Ausf D turrets used included the original version with a circular communications hatch in the left turret wall and later versions where the hatch had been removed. Similarly, early Ausf A turrets were employed which retained the pistol ports in the side and rear turret walls and also later modified examples where these had been dispensed with.

An emplaced Panther turret mounted on a steel shelter that formed part of the Gothic Line. The turret is an old Panther Ausf D model that is clear from the commander’s cupola and the side pistol port. The turret was captured by American forces in September 1944. (US National Archives, courtesy of S. Zaloga)
Later a specially designed turret was developed. The Ostwallturm, or Ostbefestigung, as it was known, differed from the standard turret in a number of ways. The mantlet was slightly narrower than the Ausf A, but it retained the two openings for the TZF12 gun sight (one of the apertures was sealed with a plug if the monocular TZF12a sight was fitted). The cupola was removed and was replaced by a simplified hatch with rotating periscope. A simple turret support was also fitted for when the turret hatch was open. Though simplified the turret did have ‘Nahverteidigungswaffe’, or close defence weapon, which could fire grenades, smoke or flares. The roof armour was also increased in thickness from 16mm to 65mm. This was simply because of the greater threat to the turret from artillery fire and tests showed that the thicker roof could withstand a direct hit from a 15cm artillery shell.
The turrets mounted on the concrete and wooden shelters, in common with the standard production tank, had power traverse and used a slip ring transfer to connect the communications cable and the lighting circuit to the shelter.15 In stark contrast the turrets mounted on OT steel shelters had to be rotated by hand and rather than a slip ring were fitted with a drag cable. This prevented the turret from rotating more than three times either clockwise or anti-clockwise, although trials had shown that the cable would withstand 4–5 rotations. To avoid twisting off the cable completely an indicator was provided in the turret that showed the number of revolutions out of the zero position. The commander was also advised to turn the turret back to the zero position after every exercise and following any engagement with the enemy.16
17
PRODUCTION
Initially the Heereswaffenamt Amtsgruppe für Industrielle Rüstung (Industrial Armaments Department of the Army Ordnance Branch) had ambitious plans for Panther turret production. After the initialramp up in production in late 1943 it was hoped to produce one hundred Ostwallturm per month. However, shortages of steel meant that this was not achievable unless other more important areas of war production (U-boats and tanks) were sacrificed and that was patently unacceptable. Consequently a more realistic target was set, at first thirty per month and then finally fifteen per month.

A close-up of the Ostwallturm with its thicker roof plate and turret hatch with swivelling periscope. This turret is on display at the Westwall Museum, Niedersimten, Germany. (Author)
The basic Panther turrets were to be manufactured by Dortmund Hoerder Hüttenverein (DHHV) and Ruhrstahl. DHHV began work on the armoured components in November 1943 and by the middle of May 1944 the two companies had completed 104 of the 259 turrets that were now planned. The unfinished turrets were sent to Demag Falkensee for final assembly. By the end of May 1944 the company had completed ninety-eight of the turrets but because of the need to increase Bergepanther production (a recovery tank), the last of the 130 turrets were not finished until the end of October. The remaining 129 turrets were to be mounted on concrete shelters. The majority of these turrets were completed before the end of 1944, but an Allied air raid damaged ten turrets beyond repair. These had to be replaced and were not finished by Demag until the first week in February 1945.(89) 18

A Panther turret at the Rheinmetall proving ground, Hillersleben. The turret appears to have been taken from a standard production Ausf A tank because it still has its zimmerit and camouflage paint scheme. The tracks on either side would appear to be for the mobile crane to lower the turret onto the bunker. (G. B. Jarrett collection, US Army MHI, courtesy of S. Zaloga)
The steel upper and lower boxes for the OT shelter were also assembled by Demag of Berlin. Once completed they were dispatched to the Heimat Festungspionierpark (Home Fortifications Engineering Depot) Pardubitz where they were fitted out with additional equipment including bunk beds, stove, motor, compressor, dynamo and battery as well as having the walls of the lower box lined with board. The Heimat Festungspionierpark at Pardubitz was also where minor modifications were carried out, like the alterations to the motor support. Other problems, like the sagging and poorly finished base plates, had to be rectified on site.
The concrete and wooden structures were constructed at the front with the work overseen by the Organization Todt, but they in turn relied on industry to produce some of the key components. Alkett, the tank manufacturer, built some of the foundation plates19 and Daimler Benz designed the motor support and the arrangement for transferring power to the turret for these shelters. DKW produced the motor, the Osthoff Company supplied the ventilation piping and Boehringer the hydraulic power traverse.20
CREW
The Panther turrets were manned by a specially trained crew of three – a Kommandant (commander), a Richtshütze (gunner) and a Ladeschütze (loader) –who were assigned to a Festungs (Panther-Turm) Kompanie made up of twelve turrets. In April 1944 Tenth Army in Italy established a Panther turret company to man the positions on the Hitler Line. This was attached to 15th Panzer Grenadier Division that initially held the Liri valley.21 When this division was relieved the Panther turret company was absorbed by the Straffner Battle Group, a group of miscellaneous units, which formed part of 44th Infantry Division and later 90th Panzer Grenadier Division.22 Other turrets along the line, in the zone of 1st Fallschirmjäger Division, around Monte Cassino, were manned by Fallschirmjäger Pz Jäger Abt 1. After the battle for the Hitler Line Gefreiter Fries of 2/Fallschirmjäger Pz Jäger Abt. 1 was awarded the Knight’s Cross for his part in the battle.23 The turrets manned by crews from 15th Panzer Grenadier Division were similarly successful, but were not as fortunate as their comrades and ‘In the absence of any definite evidence, the telephone conversations of the period permit the conclusion that many crews of the armoured turrets perished in the Senger line …’24
The Panther turret company that manned the turrets on the Hitler Line was later reformed under AOK10 and given the designation Festungs (Panther-Turm) Kp.1. This unit manned the Panther turrets at the eastern end of the Gothic Line. A sister unit, Festungs (Panther-Turm) Kp.2, was established by AOK14 in July 1944 to man positions in the west and to cover the central passes.25 In December a platoon of the company was ordered to man Tiger and P40 turrets in the Massa Line while the rest of the company was ordered to remain ready to transfer to the Voralpenstellung.26 At the end of September, with the Gothic Line unhinged, Festungs (Panther-Turm) Kp.1 was ordered to prepare for Operation Herbstnebel, the evacuation of the Po Plain, and by April both Panther turret companies were stationed at Vittorio Veneto in north eastern Italy.
Later in the war the organization of Panther turret crews became more ordered so that in addition to Festungs (Panther-Turm) Kp.1 and 2 Festungs Pantherturm Kp. 1209 and 1210 were formed as part of Heeresgruppe C. The companies had been established at the end of December 1944 and in mid-January 1945 were sent to Vittorio Veneto. At the beginning of April the two companies were located around Görz (Gorizia).
This numbering system was adopted on all fronts following an order from General-Inspekteur der Panzertruppen (Inspector General Armoured Troops) in November 1944 that called for the creation of thirteen companies. Thus in addition to the two companies in Italy, Festungs Pantherturm Kp. 1201–1208, which were to be ready for employment by the beginning of December 1944, were to serve with Der Oberbefehlshaber West (Commander in Chief West) and Festungs Pantherturm Kp. 1211–1213, which were to be ready by the end of December, were to serve on the Eastern Front. These companies were sent east during January 1945 and were stationed in Küstrin (Kostrzyn), Frankfurt an der Oder and Stettin (Szczecin) respectively.
Note: The numbering of the Panther turret companies has caused a little confusion since numbers adopted by the German army were not repeated and in the official lists27 some of these numbers (for example, 1204, 1205, 1206, 1209 and 1210) were used by other units. However, the Panther turret companies are quoted in official documents and as such the author has retained these numbers.
The dire straits in which the German army found itself in the closing months of the war meant that the Panther turret companies did not simply man their respective positions, they were also called on to undertake other duties. In Italy one of the Panther turret companies stationed on the Gothic Line was given guard duties and also ordered to undertake night patrols to counter partisan activity in and around Monte Cimone, near the strategically important Poretta pass (on route 64 Pistoia to Bologna).29 In the West Wall the crews were also required to help install the turrets.30
Table 2 Panther turret companies west wall

* Festungs Pantherturm Kp.1204 formed part of Festungs PAK Verband 17 in Wehrkreis XVII and Festungs Pantherturm Kp.1205 and 1206 formed part of Festungs PAK Verband 18 in Wehrkreis XVIII.28
EMPLACEMENT
The positioning of the turret was dictated by tactical considerations and by ground conditions. The former was very much the domain of the army while the latter was the concern of the Fest Pi Stab (Fortification Engineer Staff) that oversaw the installation work. Not surprisingly this caused some friction. When considering possible sites to install Panther turrets the engineers had to take into account a number of factors. Firstly, the underground water level had to be considered, because any flooding would seriously jeopardise the operation of the turret – the motor and electrical equipment were below ground level. Secondly, it was important that the turret was positioned on slightly rising ground so that the turret did not stand out against the horizon. Finally, it was considered desirable to avoid prominent landmarks, like road junctions, even if this meant that in some cases the turret did not have all round operation. Clearly such a constraint was difficult for the army to accept, because Panther turrets were ideally suited to cover mountain passes and road intersections and not being able to traverse through 360 degrees meant the turret was vulnerable to attack from the rear.
Once the location of the turret had been decided, the actual installation work was to be carried out by the Organization Todt and its army of foreign labourers and locally employed workers. However, often men co-opted to help absconded, so the crews of the turrets were frequently forced to help.

One of the two Panther turrets that were built to protect the Futa Pass. This turret was carefully positioned to cover a blind bend in the road. (US National Archives)
Each of the three designs required a different installation technique. Typically, a hole was dug large enough to fit the sub-structure whether it was concrete, steel or wood. For the concrete shelter a lattice of reinforcing rods was fabricated in the excavation. Once this was complete and the shuttering in place the concrete was poured. For the steel shelter a level concrete base was laid at the bottom of the hole onto which the first of the steel boxes was lowered. The upper box was then attached to this. Sufficient soil had to be removed to accommodate the concrete blocks, or concrete jacket, which provided the shelter with added protection. For the wooden shelter, care had to be taken when excavating the earth to remember to allow for both the battery and ammunition recesses which protruded from the base of the structure. Once this was done the framework could be installed and the turret mounted. The spoil could then be backfilled and the approach to the entrance could be completed which included a soakaway to prevent flooding.
Because the turret sat so close to the ground it was essential that nothing prevented the turret from rotating and that it had a clear field of fire. The crew was therefore required to clear plants and trees (and in the winter – snow), which might otherwise impair the effective operation of the turret.
CAMOUFLAGE
The Allies’ air supremacy meant that the Germans had to go to great lengths to camouflage the structure when it was under construction and when the work was complete. Much of the building work was carried out at night when the threat from Allied air and artillery bombardment was much reduced. During the day construction work was suspended and the area covered with camouflage nets and mats. Some positions in Italy were even constructed within or near to buildings. When the turret was ready for action these structures were demolished. To eliminate the telltale shadow of the gun-barrel it was depressed into a channel between two rows of sandbags and painted to blend in with the surroundings.
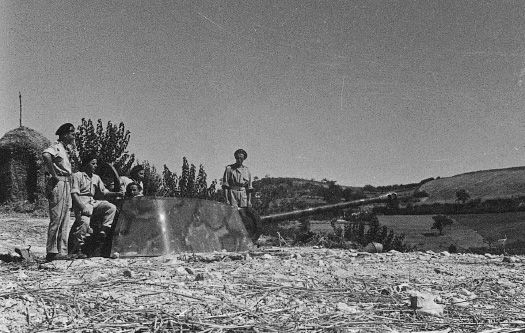
A Panther turret with the three-colour camouflage scheme clearly visible. The position was captured by Polish troops during the battle for the Gothic Line in September 1944. (Polish Institute and Sikorski Museum)

The barrel of the Panther turret cast a long shadow, which could be seen by Allied air reconnaissance planes. To conceal it, a sandbagged line trench was dug in which to depress the barrel. (Imperial War Museum)
The turrets also received a camouflage paint scheme that was much the same as that given to standard production models. Photographic evidence suggests that the normal three colour camouflage pattern was used and the only two colour images in existence that depict Panther turrets(90) do not suggest any different. This would imply that the turrets (and upper and lower boxes of the OT Steel Shelter) received a base coat of Dunkelgelb (dark yellow) which was applied in the factory. The field units were then able to apply Olivgrün (olive green or drab) and Rotbraun (reddish brown) in a variety of camouflage patterns. Those turrets taken from older Ausf D and Ausf A tanks and the dug in Panthers seem to have been left largely unaltered with at least one example retaining its turret identification number.
HULL DOWN
In the final months of the war Panther tanks were also used in hull down positions. In Italy, in the Gothic Line, disabled tanks were manoeuvred into specially dug pits and the soil back-filled around the tank to produce a very simple fortified position. On the eastern front Panther tanks, often minus their running gear, were used as improvised strong points. They were often positioned at street intersections in major cities and towns to cover the main avenues of attack. No effort was made to dig the tanks in, although cobbles and masonry were often heaped around the structure to provide the position with a little more protection.

One of the Panther tanks buried in the ground and used as improvised fixed fortifications. The driver and machine gunner’s hatches of the Ausf A are clearly visible in the foreground. It is also possible to see the tank’s original zimmerit paste covering. This example was captured by Polish forces in the fighting for the Gothic Line. (Polish Institute and Sikorski Museum)
DEPLOYMENT
Emplaced Panther turrets were encountered by the Allies on all fronts in the European campaign. In Italy they were used to strengthen the various defensive lines that were constructed. On the western front they were installed in the West Wall and in the east they were employed in a last desperate attempt to stem the advance of the Red Army. A number of turrets were also used in the so-called Sudwall, on the border with Franco’s Spain. (See Table 3 below.)

A Panther Ausf G, minus its running gear, being used as a fixed fortification. Paving slabs and spoil have been heaped around the structure to provide added protection. Tanks of all types were used like this in the latter stages of the war as the Germans became increasingly desperate. This picture was taken late in the war, probably in Berlin. (Sergei Netrebenko)
Italy
The Allies’ decision to invade Sicily and the landings on the Italian mainland in 1943 in many ways helped the Germans to crystallize their thinking on the strategy to be adopted in Italy. Once the Allies had a secured a foothold on the toe of Italy and the prospect of dislodging them had disappeared, it was decided to fight a series of delaying actions with the aim of keeping the Allies as far from Germany as possible. The topography of Italy was ideally suited to this type of warfare and by constructing defensive lines across the most likely routes of any advance it was hoped to entangle the Allies in a protracted and bloody battle of attrition. The first real opportunity to put this strategy into practice was along the so-called Gustav Line which was dominated by Monte Cassino. The Allies launched four large-scale assaults against this position over a period of four months before it was finally captured. This delay gave the Germans valuable time to construct a further defensive line to the rear which was initially called the Fuhrerriegel or Hitler Line, although this was quickly changed to the Sengerriegel(91) after the Anzio landings in January 1944, because the collapse of a line bearing the Führer’s name, it was believed, would be used for Allied propaganda.(92)
Table 3 Locations31

*This source quotes the number of turrets as being installed in the Atlantic Wall/West Wall, but aside from the six turrets used on the Spanish border, no Panther turrets were used in the Atlantic Wall proper.
Hitler Line
The Hitler Line straddled the Liri Valley through which ran Route 6, the most direct route to Rome.(93) It was vital that this potential avenue of advance be blocked and all the more so now that the Allies attempted outflanking manoeuvre at Anzio had been contained. As such great efforts were made to fortify this line and included in its arsenal for the first time were a number of Panther turrets that had been delivered at the end of 1943. In total eleven turrets(94) were installed in the valley and were positioned in a single defensive line in such a way that they were able to cover the line throughout its length of approximately 3km (2 miles). They were deployed in a series of spearheads. At the tip of each spear there was a Panther turret and echeloned back on either side were two or three towed 75mm or 50mm antitank guns. The turrets were located so that they commanded the approaches to the line with particularly long fields of fire to their front where trees had been cut down to approximately 45cm (18in) from the ground. The turrets, however, had more restricted fields of fire to the flank and particularly the rear, and these weak spots were covered by the towed anti-tank guns, which at the same time supplemented the turrets’ firepower. The towed guns were generally employed in pairs approximately 150/200m behind or to the flank of the turrets and were often hidden behind houses, in sunken roads or in thick cover. Some twenty-five self-propelled guns also took up fire positions along this same line with some in position further to the rear to give depth to the defences (or provide the punch for any counterattack). In all there were some sixty-two anti-tank guns.

A Polish soldier inspects the damage to a Panther turret that formed part of the Hitler Line defences. It was positioned just below the town of Piedimonte and was destroyed in the fighting of May 1944. (Polish Institute and Sikorski Museum)
Gothic Line
With the defeat of the Hitler Line and later the Caesar Line, which protected Rome, the Germans now fell back to their next prepared position, the Gothic or Green Line. Work on these defences had begun in late 1943, but had been suspended to concentrate resources on the construction work further south. Now, in the summer of 1944, work was resumed. As with the Hitler Line, the main anti-tank defence was to be provided by emplaced Panther turrets, which were extensively used on the eastern coastal plain and to protect the passes through the Apennines.
The eastern end of the Gothic Line was the responsibility of von Vietinghoff’s 10th Army (AOK 10). At the beginning of July there were plans to install sixteen Panther turrets and to use disabled Panther tanks as improvised strong points. One of these had been dug in and three more were under construction, but work had only been started on four of the Panther turrets.32 The pace increased through July and August so that by 28 August it was reported that four Panther turrets had been completed, eighteen were under construction with a further seven planned.33 Further headway was also made digging in disabled Panther tanks with seven ready for action and another one being installed.


A Panther turret mounted on a concrete shelter, which was positioned in the Gothic Line to protect the strategically important Futa Pass. This was one of the main passes through the Apennines and led directly to Bologna. The turret was destroyed by a direct hit from US artillery in September 1944. (US National Archives)
The Panther turrets (both mounted on shelters and dug in) were heavily concentrated along Green I(95) in the section of the line that ran along the River Foglia from Pesaro on the east coast to Montécchio. Turrets were also installed further to the rear to provide depth to the defences. Two Panther turrets were installed at Miramare airport near Rimini, another was positioned near Bellaria and another at Celle.34 A veteran responsible for scrapping these turrets also recollects one turret located just north of Rimini at the fork in the road where the main road from Rimini to Forli branches off from the Rimini to Ravenna road and another at the junction south of Forli on the high ground north of the Forli to Ravenna road.35 A number of veterans of the campaign also recounted seeing turrets installed much further north in the breakout from the River Senio to the Po Valley. Two in particular were located north of Ferrara on the high ground covering the approaches to the bridge over the River Po.36

A Panther turret under construction on the west coast of Italy. Barbed wire entanglements are visible in the background along the length of the beach. The roof section was erected in an attempt to prevent observation by Allied aircraft. (US National Archives)
The western section of the Gothic Line was dominated by the Apennine Mountains and as such offered fewer opportunities for an Allied breakthrough. Nevertheless, Lemelsen, who commanded 14th Army (AOK14), which was responsible for this portion of the line, was not complacent. Between 8–19 August, possible sites for the emplacement of Panther turrets were reconnoitred with particular emphasis placed on the strategically important mountain passes. At the Futa pass, through which passed Route 65, which linked Florence and Bologna, two turrets were installed, one close to the village of Santa Lucia, guarding the long anti-tank ditch dug a few kilometres south of the pass, and another on the pass itself. To the west, a Panther turret installed at the Poretta pass protected Route 64, which also led to Bologna.37(96) At this time there were also discussions with SS Pz Abt 16 about the possible installation of Panther turrets on the Magra estuary near La Spezia and on 25 August possible locations were assessed.38 However, it is unclear how far this work progressed.(97)
Voralpenstellung
Determined resistance and poor weather meant that the Allies were not able to exploit the breach of the Gothic Line and the German engineers were again given time to prepare further defensive lines. The last of these was the Voralpenstellung, which was to be constructed in north-eastern Italy and across the so-called ‘Ljubljana Gap’. In January 1945 the Der Oberbefehlshaber Südwest (Commander in Chief South West) wrote to the Kommandostab Voralpen (Command Staff of the Voralpenstellung) concerning anti-tank defences and particularly plans to install thirty-seven Panther turrets in the Voralpenstellung. At that time, work to install the Panther turrets had begun but was hampered by Allied air attacks.39 At the beginning of March 1945 nineteen Panther II turrets destined for Laibach (Ljubljana) (twelve) and Görz (Gorizia) (seven) were damaged in an air raid on the marshalling yard at Wörgl. These turrets were to be recovered and returned to Pardubitz for repair, but snow and the bomb damage made this difficult. In early April there were still plans to send a crane to Wörgl to rescue those turrets that had only suffered minor damage, but it is doubtful whether this salvage operation was ever successfully completed. A further eleven turrets to be mounted on wooden shelters, seven destined for Asiago and four for Ospedaletto, were dispatched at the beginning of January 1945 and were delivered, but it is unclear whether they were installed before the Allies overran the position at the beginning of May.
Sudwall
Somewhat surprisingly given the situation in Italy and on the Eastern Front in early 1944 a decision was taken by the German High Command to send six Panther turrets to France. This might have been comprehensible had the turrets been destined for use in the Atlantic Wall to counter any invasion threat, but bewilderingly they were to be sent to southern France to be installed along the border with Spain. The requirement for the Panther turrets on OT shelters had initially been made in a note from the Chef Heeresrüstung und Befehlshaber des Ersatzheeres (Chief of Military Armaments and Commander of the Reserve Army) to O.T Zentrale (OT Headquarters) in Berlin on 22 February 1944.40 This detailed destinations for the Panther turrets and for eighty OT steel shelters. The Panther turrets were to be sent to:
Bayonne railway station (three in number);
Bouluo railway station (one in number);
Oloron St Marie railway station (one in number); and
Latou de Carol railway station (one in number).
By June the turrets had been supplied and some progress had been made to install them: two were useable and another was in the process of being completed.41 Today it is still possible to see the remains of one of these turrets. It is located close to border marker 570, below the south-west point of the hornwork of Fort Bellgarde near the strategically important town of Le Perthus.
West Wall
After the fall of France in June 1940 much of the West Wall was abandoned or dismantled, its job seemingly done. However, with the Allied invasion of occupied Europe in June 1944 and the subsequent breakout from the beachhead it was realized that these outmoded defences were all that stood between the Allies and the German homeland. On 24 August, the day before the fall of Paris, Hitler issued an order that called for the renovation of the defences with particular emphasis on anti-tank defences. The bunkers built in the late 1930s were incapable of accommodating the new generation of anti-tank weapons, so new, larger shelters were to be built and a series of improvised positions were also to be constructed to mount the so-called Sockellafetten (see Chapter 3, Part 2). Various tank turrets were also to be installed. These tended to be fitted with smaller calibre weapons or machine guns, but there were also ambitious plans to emplace large numbers of Panther turrets.
Table 4 West Wall Panther turrets by Festungspionierkommandeur42
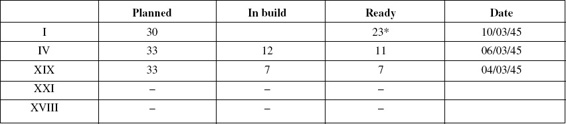
*Originally planned to be installed on concrete shelters, but eventually mounted on Holzunterstände.
By the beginning of September, US forces had already crossed the German border and were threatening the historic city of Aachen. To meet the threat, plans were instituted at the beginning of October to install the first of the Panther turrets in the Eifel (Fest Pi Kdr XIX). And by 27 November, thirty-three turrets to be mounted on steel shelters had been dispatched and were under construction. Further south Free French forces were advancing towards the Vosges and similarly excavation work was started and even some concrete poured for the planned shelters (Regelbau 687). However, by the beginning of December it was clear that this was not practical and the sixteen turrets destined for the region were redirected to the West Wall proper.43

A Panther Ausf A turret with its application of zimmerit paste still evident. The turret is atop a steel and wooden framework prior to being buried in the ground. This turret was captured in the Vosges in 1944. (US National Archives)
These turrets were now to be mounted on reinforced concrete shelters in the section of the West Wall from Saarbrücken to the Swiss border. In total it was planned to install sixty-three turrets here, thirty in the area of the Upper Rhine and thirty-three in the Saarpfalz. On paper the figures looked impressive, but there was little progress on the ground and at the express order of Hitler on 28 November 1944 work to install these turrets was expedited. With the clarion call of the Führer ringing in their ears the commanders responsible for the construction of defences in these zones (Fest Pi Kdr I and Fest Pi Kdr IV) redoubled their efforts. They, together with Fest Pi Kdr XIX (Eifel) were responsible for the portion of the West Wall that was most vulnerable to attack and, accordingly, were where most of the Panther turrets were to be situated. The two remaining zones under the commands of Fest Pi Kdr XXI and Fest Pi Kdr XVIII that covered the Lower Rhine were considered of less consequence and little effort was made to fortify this section of the line.(98)
Fest Pi Kdr I
In the Oberrhein (Upper Rhine), which was the responsibility of Fest Pi Kdr I, there were initially plans to install thirty Panther turrets, all of which were to be mounted on reinforced concrete shelters (Regelbau 687). By early January 1945 all of the turrets had reached their respective rail terminus: ten at Offenburg; ten at Rastatt and ten at Freiburg and by the end of the month work had begun to install three of these turrets.44 However, no further progress was made on these positions and in February the decision was taken to mount the turrets on the new Holzunterstand. By 10 March all the turrets had been delivered to their final destination and most of the turrets were installed. In Fest Pi Stab 4, despite the fact that the turrets had had to be transported to their respective construction sites without the benefit of a crane, all ten turrets were ready for action in Sector Oa. A further five were ready in Sector Ob with five more in various stages of assembly. In Fest Pi Stab 11, progress was similarly advanced and in spite of enemy pressure on the bridgehead west of Breisach, eight of the turrets were ready for action and two more had been mounted but could not be rotated.45
Fest Pi Kdr IV
As was the case in Fest Pi Kdr I’s zone, the thirty-three turrets to be installed in the Saarpfalz (Fest Pi Kdr IV) were all to be mounted on concrete shelters. From the middle through to the end of November the turrets were dispatched from the Schwer-slastengerätepark West (Heavy Equipment Depot West) at Aschaffenburg and, despite the effects of Allied bombing which necessitated a number being taken by road,46 by the New Year all of them had reached their designated railway station: twenty at Einsiedlerhof and thirteen at Rinnthal.47
The turrets were now transported to their installation sites, but the proximity of the enemy meant that it was not feasible to mount the turrets as planned on concrete shelters and instead it was decided to use the new Holzunterstand. A number of these had been preassembled in the zone of Fest Pi Stab 9 but were destroyed by enemy aircraft and had to be rebuilt. This work was hampered by enemy artillery fire and further air attacks and meant that installation work had to be completed under the cover of darkness. This severely delayed progress and by the beginning of March only five of the twenty turrets allocated had been completed, with a further seven under construction.
And progress was little better in the sector of Fest Pi Stab 17. By the beginning of March 1945 six of the thirteen turrets planned were ready for action with a further five still under construction. By the middle of the month the turrets that were being installed had been completed, as indeed was the case with Fest Pi Stab 9, so that in total twenty-three turrets were operational. Of the remainder, two units that were damaged in transit were returned to the Seibert Company in Homburg for repair, the rest were not installed.48

A Panther turret mounted on a Holzunterstand. Chicken wire on the barrel would have been used for camouflage. This example was installed near Püttlingen in the Saarland and was photographed in the summer of 1945. (Alfred Schmidt, courtesy of Dieter Bettinger)
Fest Pi Kdr XIX
Further north in the Eifel, under the auspices of Fest Pi Kdr XIX, there were plans to install thirty-three turrets on OT steel shelters. Of these two were transported to Jülich, three to Kall and twenty-eight were destined for the Rurstellung; one of the forward defences of the West Wall. However, by December 1944, US troops had already reached the River Rur at Bergstein (near Nideggen), which meant that work on this defensive line had to be carried out under the cover of darkness. This provided the construction workers with some respite, but the heavy lifting gear required to manoeuvre the components into place created such a noise that it drew heavy enemy fire and it was therefore decided to suspend work on these defences. Only two of the turrets were installed and the rest were taken back to the Erftstellung for employment. This position protected Cologne and was the last defensive line before the Rhine. By Christmas 1944, 500 men from the Organization Todt and 150 men from the three Panther turret companies assigned to man the turrets, were set to work transporting the turrets back from the Rurstellung, or, when suitable sites to locate the turrets had been identified in the middle of January, were employed installing them.49
At about the same time, Christmas 1944, Fest Pi Kdr XIX drew up plans for two improvised structures to mount the Panther turret and upper box. Drawing No. 104 Panthertürme mit Oberteil des OT Stahlunterstandes auf Holz-Unterbau was a design for a wooden structure and Drawing No. 105 Panthertürme mit Oberteil des OT Stahlunterstandes (Stahlbetonunterteil) was a design for shelter constructed from concrete. The catalyst for the development of these blueprints is not clear but it may have been prompted by the loss of twenty Stahlunterstände für Pantherturm earlier in December. Regardless of the motive, the two designs were sent to Inspekteur für die Landesbefestigung West (Inspector of Fortifications West) for approval. Both designs were eventually accepted in the second half of January, albeit that the concrete alternative was only approved by exception after it was explained to Insp.d.L. West that a lack of wood meant that the Stahlbetonunterteil could be built more quickly. Soon after consent had been given for their use (and it is not clear if the two events were linked) Fest Pi Kdr XIX reported that twenty-five Stahlunterteile were so close to the front that in the opinion of the Organization Todt they could not safely be retrieved and would have to be abandoned.50
The difficulties of constructing defences almost literally on the front line, which were exacerbated by a lack of fuel for transport and poor weather, meant that work to install the turrets in this section of the line was severely delayed. It was not until the New Year that construction work began in earnest and even then little headway was made. By 4 March 1945, of the thirty-three turrets supplied to Fest Pi Stab 21, only seven were ready for action.51 And progress was not helped by sabotage. A note written at the end of February stated that the turrets were not being guarded during their installation and one shelter (P17), which had been completed, was damaged by persons unknown to such an extent that it had to be dismantled and new spare parts sourced.52
On 7 March 1945 the Allies finally crossed the Rhine and as such the West Wall became an irrelevance. Accordingly, the Festungspionierkommandeurs were set to work on the east bank of the river. One turret stored at the Heimat-Festungs-Pionierpark (Home Fortifications Engineering Depot) at Siegburg, and probably the last Panther turret on the Western Front, was to be installed near the depot itself some time on or after 18 March 1945 as a shortage of petrol meant that it was impossible to transport it elsewhere.53

A Panther turret and top box captured by American forces near Bonn, 1945. The serial numbers are clearly visible. The letters may have been applied by the manufacturer to ensure that the upper and lower boxes were correctly aligned. (Tank Museum)

A rare photograph of a Panther turret installed on the Eastern Front. The turret is from an Ausf A and just distinguishable on the side is the turret number, suggesting it has been taken from a disabled tank. (Soviet National Archives)
Eastern Front
At much the same time that there were plans to install Panther turrets in the Hitler Line in Italy and along the border with Spain, plans were developed for the employment of sixteen Panther turrets on steel shelters on the Eastern Front. In April 1944 these turrets were sent to the OT-Lager at Brest Litovsk. From here the turrets were to be sent to their final destinations at the rear of 56th Panzer Korps front.54
Soviet offensives in the summer and autumn of 1944 saw the German forces pressed back into Poland and Panther turrets were hurriedly rushed to the east for defence of the die Heimat (homeland). German records state that as at 27 November 1944, thirty-six Panther turrets were available to be sent to the eastern front for installation on concrete shelters (Regelbau 687).(99) On 30 December the turrets were dispatched to Thorn (Torun) and Graudenz (Grudziadz) on the River Vistula (Wisla) in what was then East Prussia.55 This neatly corresponds with a report written in March 1945 that lists thirty-six turrets as having been installed on the eastern front, albeit that six were subsequently installed on OT steel shelters.56
However, in the middle of January the Soviets launched the largest single offensive of the Second World War and the 2nd Belorussian Front, under Marshal Rokossovsky, smashed through the German lines towards Thorn and Graudenz. The plans for the Panther turrets were now changed and they were allocated for homeland defence with turrets sent to Stettin (Szczecin), Küstrin (Kostrzyn) and Frankfurt an der Oder.
The first two of the turrets for Stettin were dispatched at the beginning of February and, despite damage to one, one had been installed and the other was under assembly by the beginning of March. Soon after, four more turrets arrived, which were also to be mounted on wooden shelters. Three of these were installed to the east of the Oder River, but did not fulfil the role for which they had been designed. One was demolished without firing a shot when the area was evacuated; another provided some indirect fire support before being ordered to cease fire for fear of drawing enemy fire on troops retreating across a nearby bridge and was blown up when the withdrawal was complete; the other turret was damaged by enemy fire, but was repaired before finally being destroyed by enemy action. The three other turrets were installed to the west of the Oder, although it was realized that one of these had been incorrectly sited and needed to be moved. However, it was recognized that such action would be futile because of inevitable enemy interdiction. The city fell to enemy forces on 26 April 1945.(100)
The six remaining turrets that were to be mounted on steel shelters, were dispatched to Stettin on 11 March, but circumstances now dictated that they would have to be mounted on wooden shelters like the rest of the turrets in the city. This caused a problem because the carpenters and joiners had since been released. The problem was soon resolved, however, albeit unconventionally, with the turrets being redirected to Dresden. Delays meant that they did not arrive in the devastated city, that was now classified as a Verteidigungsbereich, or defensive area, until 5 April.(101) The men and equipment to install the turrets were available, but there was no fuel for the tractor and it seems that the turrets were not installed by the time the Soviets entered the city on 8 May 1945.

A dug-in Panther turret at a road intersection somewhere on the Eastern Front. Masonry has been stacked around the base of the turret to provide further protection. There are at least fifty spent shell cases littering the floor, which indicates the ferocity of the fighting. (Unknown)
Küstrin lay in a direct line between the Soviets and Berlin. Because of its strategic importance it was declared a fortress and allocated twelve Panther turrets for its defence. The high water table complicated the installation of the turrets and so it was decided to mount them on a foreshortened wooden shelter measuring 1.10m (3½ft) high compared to 2.84m (9ft) normally. This overcame the problem of flooding, but meant that it was not possible to fit power traverse and nor was there room for the loader to pass ammunition. However, it was a compromise that had to be made to get the turrets installed as quickly as possible.
By the beginning of March, eight of the turrets had been destroyed by enemy action. Three further turrets were readied for action by the end of the March and another was under construction on a concrete shelter. The fate of these turrets is uncertain following the fall of the city on 29 March 1945.
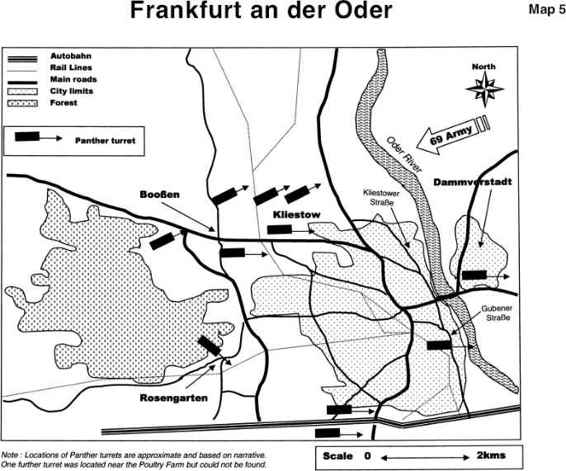
Further to the south, Frankfurt an der Oder was another strategically important city and was also given fortress status. By the beginning of February the first of the twelve turrets were being installed and, as in Küstrin, there were similar problems with flooding. In addition, installation was hampered by difficulties with the tractor and trailer, exacerbated by poor ground conditions, and a lack of timber. Nevertheless, work continued on the wooden shelters and considerable progress was made, but because the OT did not follow the instructions issued by the Wa Prüf Fest (Fortification Design Office) for the construction of the Holzunterstand, additional strengthening work had to be undertaken. Problems with the power traverse meant that it was temporarily dispensed with. It was to be installed later if circumstances permitted, but in the meantime the turret would be traversed by hand. In spite of all this, and the impact of enemy action which necessitated the abandonment of the work at the eleventh site (Dammvorstadt) and the installation of the turret elsewhere, all the turrets were ready by the beginning of March.
In addition to the turrets mounted on specially designed shelters, improvised positions were constructed using disabled tanks with their running gear removed. The parlous situation meant that there was no time to dig the tanks in, but cobbles and masonry were heaped around the structure to give some added protection. The turrets tended to be placed on road intersections of larger German towns and cities and it is believed that in Berlin alone as many as twenty-five of these extemporized strong points might have been constructed.
Panther Turrets in Action
Hitler Line
During the winter of 1943/4 the British Eighth and American Fifth Armies had been involved in a bloody battle of attrition to break the German Gustav Line south of Rome. But despite three major assaults on the German defences, which were constructed around the Cairo massif and in particular the Monastery above the town of Cassino, the Allies failed to break through, and suffered heavy casualties. The failure of the Allies to breach the defences of the Gustav Line had given Kesselring and the German High Command time to reappraise their strategy in Italy and it was decided to reinforce the defences south of Rome with the construction of the Hitler and Caesar Lines, rather than fall back to the prepared positions on the Apennines. Work on the defences continued apace through the winter and by the spring of 1944, work on the Hitler Line, which straddled the Liri Valley to the rear of the Gustav Line, was well advanced. At the same time, Eighth Army, which was tasked with capturing Monte Cassino and advancing along the Liri Valley, had taken the opportunity to rest and refit and stockpile ammunition and stores and by May was in a position to launch what was hoped would be a decisive blow.

A disabled Panther tank used as a strong point. This is the same Panther Ausf G as as shown on p. 159, but this time a view from the rear, showing how the crew entered the tank. (Sergei Netrebenko)
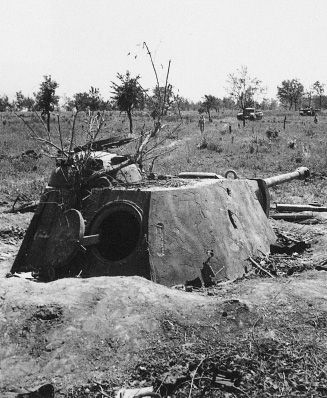
This Panther turret was positioned in front of the Aquino-Pontecorvo road. It was credited with knocking out two enemy tanks, which can be seen in the distance. The Germans cut the trees in front of the turret to give a better field of fire. (Imperial War Museum)
The first attack on the Hitler Line was launched on the morning of 19 May 1944 and was, in terms of casualties, to set an unwanted precedent for future attacks. At first light, two battalions of infantry supported by tanks of 17th/21st Lancers and the Ontario Regiment of Canada moved off. Screened by the early morning mist they advanced to within 300m of the town of Aquino, destroying an enemy anti-tank gun in the process. But as the sun rose the mist began to clear and the tanks found themselves in the open, almost literally looking down the barrels of the enemy’s anti-tank guns, which included a number of emplaced Panther turrets. Despite strenuous efforts by air-photo interpreters to identify certain patches of camouflage it had not been possible to determine the exact nature of the structure they covered. The mystery was soon solved. ‘At that moment a well camouflaged high velocity anti-tank gun, in a steel and concrete pillbox, opened fire at point blank range from the right, holed all three tanks at least twice and set them on fire.’57 The supporting infantry also came under heavy fire and were forced to retire. The tanks of the Ontario Regiment, however, were ordered to hold their ground and await a renewed infantry attack. This they did, but as the battle unfolded it became clear that there was little hope of breaking the enemy line and it was decided not to renew the assault. Under the cover of darkness the remnants of the Regiment withdrew. The Ontarios had lost thirteen tanks in this costly attack – twelve to anti–tank fire –and of those tanks of the two leading squadrons that withdrew, not one escaped at least one direct hit.58
By the evening of 19 May it was clear that the attempt to ‘bounce’ the Hitler Line had failed and that in order to breach the formidable German defences it would be necessary to launch a concerted attack. This was planned for 23rd May and was to be led by 1st Canadian Division, in what was to be the first major operation by a Canadian Corps in the Second World War. However, the success of the French on the Canadian left suggested that the German resistance around Pontecorvo might be weakening and Gen Vokes, the commander of 1st Canadian Infantry Division, ordered his 1st Infantry Brigade to attack the town on 22nd May with a view to turning the line from the left. A small detachment of tanks from 142nd Royal Armoured Corps (the Suffolks) was ordered forward prior to the main attack to reconnoitre the enemy positions. This was met with a firm rebuff and an emplaced Panther turret knocked out three of the Suffolks’ tanks. Unperturbed, the main assault was launched with 48th Highlanders supported by ‘C’ Squadron of 142nd RAC, but the tanks were held up by an anti-tank ditch and eventually the attack was suspended and all efforts were concentrated on the main assault, Operation Chesterfield.59
Mindful of previous failures, Gen Vokes planned to attack with two battalions of 2nd Infantry Brigade – the Seaforth Highlanders on the left supported by two squadrons of tanks of the North Irish Horse (B Squadron with C in reserve); and the Princess Patricia’s Canadian Light Infantry on the right supported by A squadron. At 0600 hours the offensive began.
The Patricias, despite suffering heavy casualties, reached the enemy wire. However, their supporting tanks were stopped by an undetected minefield and as they struggled to find a way through came under heavy anti-tank fire, which knocked out four tanks. The remainder fell back and attempted to find an alternative route forward. The Seaforth Highlanders made better progress but their armoured support, when only 100m from the first objective, came under intense anti-tank fire which accounted for five of its number, including the squadron leader. His tank was later found to be no more than 30m from a Panther turret emplacement.(102) The remaining tanks withdrew and, together with tanks from C squadron, advanced on a new axis. They had not progressed far when they came under heavy artillery fire and were ordered to withdraw. Unfortunately, in trying to carry out this order the composite force was caught in a fusillade of enemy anti-tank fire, which resulted in seven tanks being destroyed, while the defenders lost one emplaced turret and a 75mm anti-tank gun.60
In accordance with Vokes’ plan, and knowing nothing of their countrymen’s plight, the Loyal Edmontons, together with a squadron of 51st Royal Tank Regiment (RTR), advanced according to the second phase of the attack. The tanks, however, were soon halted by mines, just as those of the North Irish Horse had been previously, and provided the enemy anti-tank gunners with yet more inviting targets. With the reserves committed the commander of 2nd Infantry Brigade, Brig Gibson, had nothing with which to exploit the success of the Seaforth Highlanders and so the battle on this portion of the front reached deadlock.
In front of Pontecorvo, 1st Canadian Infantry Brigade maintained the pressure on the German defenders. On the morning of 23rd May, ‘B’ Squadron 142nd RAC moved forward in support of 48th Highlanders and in the ensuing engagement accounted for another of the emplaced Panther turrets protecting the town.61 On their right, a feint by 3rd Infantry Brigade, supported by two squadrons of 51st RTR, enjoyed rather more success. Indeed, the tanks, after a fierce battle with enemy anti-tank and self-propelled guns, fought their way forward to the Aquino-Pontecorvo road – the first objective of the main thrust. During this advance another Panther turret was spectacularly put out of action and is described here by G. Birdsall, troop sergeant of 5th Troop ‘A’ Squadron 51st RTR:
‘We kept moving forward (A squadron) and eventually came within sight of the objective, the Aquino-Pontecorvo road. In front of me was a Churchill tank, which I later identified as the Colonel’s (Lieutenant Colonel Holden) that was engaging a Panther turret, which was the only one in our immediate front as far as I could see. As I came up behind the COs tank I saw the gun barrel on the Panther turret suddenly shoot up in the air to an almost perpendicular position followed by a message on the wireless exhorting the battalion to “stand fast” and to “look what Father’s done.” Lieutenant Colonel Holden had advanced to approximately 300–400yd of the turret before engaging the target.’
This, as another veteran of the battle recounted, was the sole method of destroying these fortifications. As he stated, ‘The only way to knock the turrets out was to get in close, which was feasible, although extremely dangerous, and fire a round under the gun mantlet and above the base plate which stopped the turret traversing,’ or, as in the example above, exploded the ammunition stored immediately below.62
By the end of 23 May the Hitler Line in the south had been broken and the enemy began to fall back in some disarray. Accordingly, on the morning of 24 May, a probing attack was launched against the northern part of the line around the town of Aquino. In light of the enemy’s heavy defeat the previous day, it was hoped that they might have withdrawn during the night. But soon after moving off the Lancashire Fusiliers were pinned down and to assist them two troops of tanks of 14th Canadian Armoured Regiment pushed forward and began to bring fire to bear on the enemy. When they were within 400m of the town, however, they were engaged by two Panther turrets.(103) Four of the six tanks were instantly holed and set on fire resulting in seventeen casualties. The remaining two tanks beat a hasty retreat as it was clear that the enemy, despite being outflanked, still held the defences in strength. Only on 25 May did the enemy finally withdraw having first demolished the two Panther turrets.63 (104)

Canadian soldiers pose beside the Panther turret knocked out by Col Holden of 51st Royal Tank Regiment during the battle for the Hitler Line, May 1944. (Canadian National Archives)
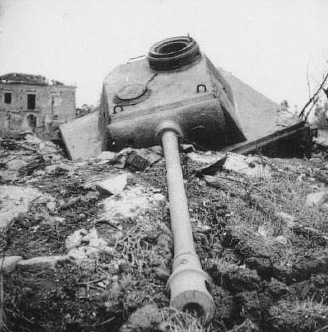
A Panther Ausf D turret mounted on an OT shelter. This turret was located near Aquino and was destroyed by its crew before being captured by the Allies. (National Archives)
The two turrets protecting Aquino were the last of the eleven turrets to be destroyed – the nine others having been accounted for by the Shermans and Churchills of 25 Tank Brigade. The price, however, was high. An intelligence report written after the battle noted: ‘In front of each position there was a graveyard of Churchills and some Shermans … This is, at present, the price of reducing a Panther turret and it would seem to be an excellent investment for Hitler.’ Indeed it was, the Panther turrets inflicted on the Eighth Army its heaviest tank losses of the Italian campaign.64 In all 25 Tank Brigade lost forty-four tanks (although some were later recovered).(105)
And it could have been a lot worse. As another report stated, ‘If the enemy had been able to complete his preparations and received better (and more) infantry support, the attack would have been much more costly.’
Gothic Line
As the Allies approached the Gothic Line it was generally believed that the Germans would again use emplaced Panther tank turrets. Well aware of the damage inflicted on the Eighth Army in the Liri Valley, Clark, the commander of the US Fifth Army, decided to bypass the defences of the Futa Pass,(106) that guarded Route 65 to Bologna, and instead attacked the less well defended Il Giogo pass with great success. However, bypassing the enemy’s defences was not an option for Gen Leese, the commander of Eighth Army, on Clark’s right flank who was tasked with advancing up the east coast. The beaches had been fortified to prevent another sea-borne invasion (as happened at Anzio) and further defences had been constructed inland as far as the foothills of the Apennines in an effort to block the most promising avenue of attack for a mechanised army. These positions had been constructed in depth with Panther turrets situated at key strategic locations. One such strategic location was Miramare airfield, near Rimini, which was attacked by the Greeks and New Zealanders in September 1944. Reconnaissance of the area had identified ‘suspicious bumps’ on two corners of the airfield.65 These could not be identified immediately, but the truth soon emerged.
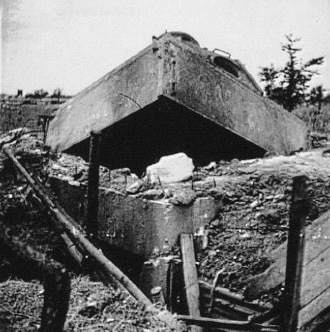
Another view of the same Panther turret. This view clearly shows the revetted trench leading to the main entrance and the reinforced concrete that encased the lower boxes. (National Archives)

The Panther turret located in the south-west corner of Rimini airfield that barred the way of Greek and New Zealand forces in the battle for the Gothic Line in September 1944. (Alexander Turnbull Library)
On 15 September 1944, the 3rd Greek Mountain Brigade began to advance towards the airfield but the lead elements were soon pinned down by enemy fire and the tanks of C Squadron, 18th NZ Armoured Regiment were ordered forward: 9 Troop on the right; 10 Troop in the middle towards the airport; and 11 Troop on the left. As the tanks of 10 Troop under Lieutenant Collins approached, the ‘suspicious bump’ at the southern end of the airfield opened fire; it was a Panther turret that had been sited to cover Route 16 (the coast road). One of Collins’ tanks was hit [Sgt Wood’s], not by the Panther turret though, but by a self-propelled gun on the left edge of the airfield which set the tank on fire. Collins reacted immediately laying down a smoke screen to obscure the view of the enemy gunners and advanced to the crippled tank and together with Cpl White attempted to rescue the crew. Collins now engaged the enemy infantry with his machine gun and with the support of the Greek infantry killed thirty-eight of the defenders and took twelve prisoners; the remnants beating a hasty retreat. Darkness prevented a concerted assault on the Panther turret, which continued firing until after dark. However, in the course of the night, abandoned by the infantry and no doubt unnerved by the ‘noisy demonstration’ put on by 10 Troop, the crew blew up the turret and withdrew. This came as an enormous relief to 9 Troop, commanded by Lt Barber, which had been ordered to attack the turret the following morning.
The following day was quiet, as was the start of 17 September, but this was all to change. On that day the Seaforths of Canada supported by a squadron of 145th Regiment RAC put in an attack on San Martino. The attack started well, but soon six of the supporting tanks (out of two troops of Churchills and two troops of Shermans) were knocked out and infantry casualties began to rise forcing the Seaforths to withdraw. The tank losses were believed to be due in part to the Panther turret located at the northern end of the airfield. Aircraft of the 250th Kittyhawk Squadron were dispatched to silence the turret and although near misses were scored, it still kept firing. The 25-pounders of 4th Field Regiment were also directed to target the turret but were similarly unsuccessful.
The only alternative was a direct attack by the tanks of 18th NZ Armoured Regiment. This presented something of dilemma for the new commanding officer, Maj Allen, because 9 and 10 Troops were in no position to engage the turret without exposing themselves to potentially deadly enemy fire. The other alternative, 11 Troop, on the left flank, seemed to offer the best chance of success but even this was deemed too dangerous. The turret had been shrewdly sited with a perfect field of fire in all directions.
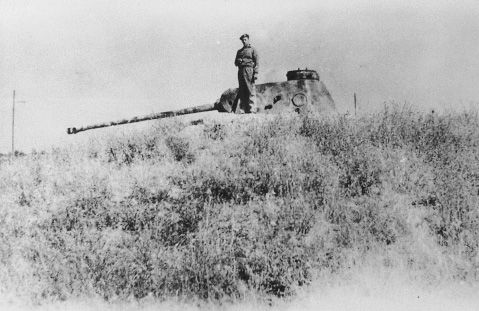
The Panther turret located at the northern end of Miramare airfield, near Rimini. The turret was knocked out by Lt Collins of 18th NZ Armoured Regiment in the fighting for the Gothic Line in September 1944 and he is pictured next to it with the shell holes visible in the side. (J. Plowman)
Lt Collins solved Allen’s dilemma, although he took some convincing that the proposed plan would work. Collins initially suggested advancing towards the turret under the cover of a smoke screen with sappers in the fore to clear any mines. He would engage the turret and then withdraw covered by another smoke screen. Allen was not persuaded that the risks were worth it and denied Collins’ request. In the meantime Collins had identified a less hazardous alternative that involved moving up the western fringe of the airfield. Then, covered by a smoke screen, move to a predetermined point near a house some 100m from the target which offered a little cover and engage the turret. Once destroyed he would withdraw again protected by a smokescreen. Collins’ confidence in his new plan convinced Allen and he was given permission to go ahead.66
Collins’ tank had a damaged radiator so a replacement was brought forward. This was stripped of all unnecessary equipment and loaded to capacity with armour piercing shells. It was also heavily camouflaged to make it less of a target. Then, under cover of a smoke-screen provided by 4th Field Regiment, Collins led his tank on foot through machine gun and mortar fire out to the west of the turret before striking north to the perimeter of the airfield. Meantime another tank advanced around the southern end of the airfield to create a diversion. Jim Sloan, the lap gunner of Collins’ tank, vividly describes the attack, ‘As we stalked the gun it came into view through the gaps in the scrub from time to time and we watched anxiously to see if that big 75mm traversed in our direction. It didn’t. We finally got within range and poked the gun around the corner of a casa [house] and then let drive. Maurie [Sergeant M. Woolley] got it with his fourth shot(107) and then we just kept blazing away at it, putting the gun out of action and knocking hunks of the emplacement while Joe [Collins] and I sprayed the area and the escaping gun crew with our Brownings. Altogether we fired off 14 AP [armour piercing] and two HE [high explosive] plus three smoke shells to cover our getaway.’67 Collins’ tank now came under mortar and small arms fire but, obscured by the smoke, it was able to withdraw safely. For his bravery in the battle for Rimini airfield Collins was awarded the Military Cross.68
Allen’s unit was relieved at first light on 18 September by C Squadron of 19th NZ Armoured Regiment, but any ideas they had that the threat from Panther turrets had been extinguished were soon dispelled, because, ‘The area of Celle and Route 16 bristled with dug-in Panther turrets … formidably manned by paratroops [of 1st Fallschirmjäger Division, elements of which had manned similar positions in the Hitler Line] …’69 On the night of 21 September the tanks attempted to cross the Marecchia. Their progress was slowed by mud and mines and whilst bogged down came under fire from what was later discovered to be another Panther turret situated near Celle, a small village half a mile west of Rimini. Once again, come the moment, come the man. Corporal Reeve, the section commander of 7 Platoon of 1 Company, 22 (Motor) Battalion, disposed his men in positions from which they could bring covering fire to bear. He then charged across the open ground in front of the turret and engaged the defenders with hand grenades. The defenders responded in kind, but Reeve got the better of the exchange and the defenders were forced to withdraw from their positions. Unable to spare any troops to secure the position, Reeve and his platoon pressed on to their ultimate objective, the Fossa Turchetta. In the meantime, the paratroopers, finding the emplacement empty, reoccupied the position and opened fire. Reeve was again given the job of capturing the position which he did, capturing six paratroopers in the process.70
POSTSCRIPT
After the war all traces of the emplaced Panther turrets were systematically removed as governments attempted to remove all reminders of this unhappy chapter in twentieth-century history, and, more pragmatically, these turrets presented a valuable source of scrap metal which was in short supply in the post-war world. By sheer chance two examples survived. One is on display at the West Wall Museum, Niedersimten, Germany. It was originally installed on a wooden superstructure near the village of Niederwürzbach in the Saarland and it seems that over the years the wooden supports rotted away and, unable to support the weight, the turret collapsed into the hole where it lay for some fifty years until it was recovered and restored. Another turret has recently been discovered near Szczecin (Stettin) in Poland and is currently being renovated.
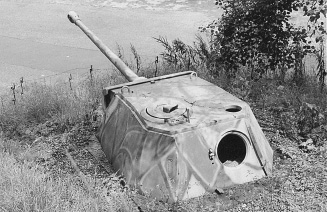
A Panther tank turret that was mounted on a Holzunterstand in the West Wall. It was originally installed near the village of Niederwürzbach in the Saarland but it is now on display at the Westwall Museum, Niedersimten, Germany. (Author)
Table 5 Dimensions

______
(1)The main differences were that the access corridor included a recess for ammunition racks and the combat area had a slightly larger diameter at 1.97m (6ft).
(2)In the interwar period Belgium had found tank turrets used in this way to be a cheap and effective way of protecting the coast and these were subsequently absorbed into the ‘Atlantic Wall’.
(3) So impressed were the Germans by the T34 that the initial design for the Panther was almost a carbon copy of the Soviet tank.
(4) Twelve because Bauform 232 had ‘a’ and ‘b’ versions.
(5) Exceptionally Bauform 235 was for the French R35.
(6)For example the concrete thickness could be reduced when the shelter was built in rock.
(7) See section on Sockellafetten for further details.
(8) In 1942 a simple log shelter mounting a T34 turret was included in Bildheft Neuzeitlicher Stellungsbau.
(9)At the time of the German invasion of France, the Somua S35 was rated by some as the best tank in the world.
(10)There are photographs of at least two different turrets used as fixed fortifications.
(11) Official sources state that relatively few (less than thirty) were released for use, but photographic evidence gives the lie to this statement. Report dated 5 May 1944 in T. Jentz, ‘Panzerstellung – Part Three’, AFV News, Vol. 9 No.5 (September 1974), pp.10–11.
(12)See section on Sockellafetten for further details.
(13)Where a machine gun was fitted to the FT17 this was the main armament.
(14) A number were sent to the Channel Islands to serve as a mobile reserve against any potential invasion. R. Heaume, ‘Panzers in Guernsey’, Channel Islands Occupation Review (1979), pp.38–42.
(15) It might be that these turrets were absorbed into the number of Somua S35 turrets quoted as being available, the two being broadly the same – see section on Somua S35.
(16) See Chapter 2 – Interwar.
(17)In the invasion of Poland the Germans also encountered FT17s, although most were used as static defensive positions or with armoured train units.
(18)Neither the French nor the Germans differentiated between the different versions.
(19)CE – circulaire élargie or widened turret ring.
(20)This appeared in Bildheft Neuzeitlicher Stellungsbau which was originally published in 1942 and reprinted in March 1943.
(21)Other models were undoubtedly used as improvised fortifications but formal plans were not drawn up. Often tanks were simply buried in the ground as strong points.
(22)As at the end of May 1943 official sources quoted fifty T34s as being in service with front line units.
(23)A number of T60 tanks were also used as artillery tractors, but it is unclear whether the surplus turrets were used for fixed defences.
(24)These turrets were also used for the Bauform 231, F Pz DT 4803 (see above)
(25)Twenty-nine were ordered but only twenty-eight TII(P) turrets were completed for both Bauform 236 and 237.
(26)Twenty-nine were ordered but only twenty-eight were completed TII(P) for both Bauform 236 and 237.
(27)VK or Versuchskonstrucktion (experimental construction) is followed here by a three-digit number. The first digit related to the weight and the last two to the classification.
(28) The VK3001 and 3601 (or Versuchskonstrucktion) tanks were experimental constructions. The first two digits referred to the weight of the vehicle (30 and 36 tonnes respectively) and the last two digits to the vehicles classification.
(29)A city in the Sudetenland of the former Czechoslovakia (modern day Brno).
(30)This was the new name given to the Czech manufacturer CKD by the Germans.
(31)It is possible that a number of these turrets were in fact released as normalserie because a paper written in May 1944 quoted 351 as being released but a report dated March 1945 stated 361 were installed.
(31a) Including: 385 metres (1,263ft) of 200mm (8in) diameter poles, 12m2 (39ft2) of 30mm (1in) boards and 2m2 (6ft2) of 50mm (2in) boards.
(32)Modern-day Brno.
(33)The suffix (f) is in recognition of the fact that the turret had its origins in France.
(34)The German strong point or stützpunkt was designed for all-round defence and tended to include a series of emplacements, including bunkers mounting various weapons, troop/munitions shelters and command posts and was either an artillery or infantry strong point. The positions were all linked by trenches and the perimeter was protected by mines and barbed wire.
(35) The resistance nest or widerstandsnest was the smallest type of defensive position which was sometimes a self-contained position or formed part of a larger defence zone or fortress. Though difficult to make generalizations they would often consist of an anti-tank gun position supported by machine gun and mortar positions linked by trenches and protected by barbed wire and mines.
(36) Broken down as follows: thirty-six FT17s with MG; sixteen FT17s with 3.7cm KwK; and nine APX R with 3.7cm KwK and MG.
(37)Codenamed Utah, Omaha, Gold, Juno and Sword. Utah and Omaha were the focus of American operations, while the other three beaches were to be used by British and Canadian units.
(38) Slightly to the north of Utah Beach Widerstandsnest 11 had two further emplaced French tank turrets and Stützpunkt 12 was equipped with four turrets; three covering the beach and one further to the rear.
(39) The main bunker at La Grande Dune is now home to the Utah Beach Museum and is still flanked by a Renault FT 17 tank turret.
(40)Jahnke was a veteran of the Eastern Front and had only recently been awarded the Iron Cross for his bravery.
(41) One of these was embedded in the side of the cliff and was fitted with a VK3001 turret.
(42) The André family farm was located on the plateau on which Widerstandsnest 66 was built. The son of the family, Albert, who was sixteen at the time, was conscripted to help with construction work on the defences. On 5 June he was helping to manoeuvre a tank turret loaded on a truck to its position on the lower level of Widerstandsnest 66. Late in the afternoon the position was strafed by American fighters and on the strength of this the work was abandoned for the day – and as it turned out –forever. The tank turret remained stranded on the truck tantalisingly close to its final position where it would no doubt have added to the American casualties on ‘Bloody Omaha’. (G. Bernage, Omaha Beach, Editions Heimdal, Bayeux Cedex, 2002, p.76.)
(43) Widerstandsnest 72 was targeted by the ten 14in guns of USS Texas and the defenders eventually surrendered. Widerstandsnest 60 was captured by L Company 16th Infantry Regiment by 0900 with the help of supporting Sherman tanks and the men of 116th Infantry Regiment, despite being caught in the cross fire between Widerstandsnester 66 and 68 and suffering heavy casualties, gradually infiltrated the German positions and advanced towards Saint Laurent.
(44)Between Juno and Sword beaches there was a series of Widerstandsnester but these were located away from the main landing beaches. No tank turrets were installed as part of these defences.
(45) Unusual because the turrets used for fortifications normally retained the original dome opening. The split hatch was fitted to those tanks absorbed into the Panzer arm proper, which seems to indicate that this tank may have formed part of an armoured division but for whatever reason the turret was subsequently surplus to requirements and was released for use in the Atlantic Wall.
(46)Numbers vary according to different sources: F. Hahn in Waffen und Geheimwaffen des deutschen Heeres 1933–45. Bernard & Graefe Verlag, Koblenz, (1986), p.174 quotes 194.
(47) Some 16 VK901 turrets (of the twenty-seven available) were emplaced in Denmark. Two of these were emplaced at the Börsmose village position. According to the plan of the defences they were equipped with 3.7cm main gun rather than the standard 2cm gun. This was either a modification to the turrets or a mistake on the plan – it is unclear which.
(48)Bauformen 243, 244, 246, 248 and 251.
(49)A semi-military organization created before the war that performed all kinds of constructional work that was deemed of importance to the outcome of the war. The officers were Germans but the labourers were generally foreign volunteers, conscripts or prisoners of war.
(50) Spain continued to supply vital raw materials and some troops did volunteer to fight, but this was not officially sanctioned.
(51) The note also included a status report on a number of Panther turrets, which are detailed in Chapter 3 Part 3.
(52) At least twenty turrets from Soviet T34, T70 and KV1 tanks were installed.
(53) No turrets were sent to either Army Group South or Army Group A.
(54) Napoleon Bonaparte’s army suffered heavy losses when crossing the Berezina near Borisov in November 1812 when retreating from Russia. Since then Berezina has been used in French as a synonym for any form of catastrophe.
(55) Until relatively recently this turret could still be visited but sadly it has now been removed. One turret does seemingly still exist in Poland near Tomaszow Mazowiecki in central Poland. It formed part of an isolated Stützpunkt of the A2 Line.
(56) It is not clear where the other turret was installed.
(57) After the war the weight of the turret caused the roof of the wooden shelter to collapse and this probably saved it from experiencing the same fate reserved for most of these weapons. The timber that had been used to build the wooden pedestal was subsequently removed by the landowner for firewood and a section of the turret was also cut away in an unsuccessful attempt to turn the turret into scrap metal. But apart from that, the position was in tact and was later recovered and can be visited today at Castle Königstein, Dresden.
(58) There is evidence to suggest that Panzer IV tanks and Panther tanks were used in this way, but it is conceivable that other tanks were also used.
(59)Interestingly, before the war the Italians had fortified the coast around Genoa, which was most exposed to a possible French attack. These defences ultimately included a number of concrete shelters that were built to mount obsolete Renault FT17 turrets. One FT17 was emplaced to protect the harbour entrance. C. Clerici and E. Vajna de Pava, ‘Coastal Defences of Genoa During the Second World War’, Fort, Vol. 23 (1995), pp.111–126.
(60) Although one photograph from the Alexander Turnbull Library, NZ depicts a Panzer II, which is quoted as having been taken in the Hitler Line.
(61) One source talks about Panzer I turrets but other records state that no Panzer I turrets were used in Italy and it is assumed that reference is being made to the F Pz DT4803 which was simply a modified Panzer I turret.
(62) The Mannerheim Line, named after the commander of Finnish forces, had been constructed on the Karelian peninsula and was instrumental in slowing the Soviet advance in the Winter War.
(63) Most of the permanent fortifications were located between the Gulf of Finland and Lake Kivijärvi.
(64) In 1939 Finland had used dug-in Renault FT17s as static defensive positions to blunt the Soviet attack.
(65)And at least one of these turrets can still be seen today.
(66)The 8.8cm KwK 43 was mounted on a four-legged framework, or kreuzbettung, that was not dissimilar to that of the Flak ‘88’.
(67)It was planned to build thirty-three of these bunkers in the Rurstellung, but only four were actually constructed in NordRheinWestphalia. By 25 February 1945 a further thirteen had been constructed in the zone of Fest Pi Kdr XVIII Niederrhein (Lower Rhine). M. Gross, Der Westwall zwischen Niederrhein und Schnee-Eifel (Rheinland-Verlag GmbH, Colognes 1989), pp.364 and 374.
(68) The remaining four are unaccounted for.
(69) More correctly called the 10.5cm leFH18/1 L/28 auf Waffenträger GWIVb.
(70) A further design, the Heuschrecke 15, based on the unsuccessful Leopard chassis was also developed. In early 1944 a further weapons carrier, the Geschützwagen Panther für sFH18/4(Sf), based on a shortened Panther chassis was ordered. Like the Heuschrecke it was fitted with a lifting beam for emplacing the turret. Daimler Benz built a prototype, but the end of the war prevented any further work. P. Chamberlain, H. L. Doyle and T. L. Jentz, Encyclopedia of German Tanks of World War Two (Arms and Armour Press, London, 1978), p.132.
(71) Germany was not alone in using tanks and tank turrets to provide added firepower to armoured trains. In the interwar period Poland had invested heavily in armoured trains and constructed a number of reconnaissance versions that mounted FT17 and Polish TK and TKS Tankettes. These could be unloaded for use in the field.
(72) However, unrest in the new republic meant that the authorities were allowed to establish ‘railway protection trains’ which were to prevent disruption to rail services.
(73) Armoured trains were also deployed in occupied France, Greece and Yugoslavia. These mounted obsolete French FT17 and Hotchkiss H39 tanks on flat bed wagons in much the same way as the Somua S35 was employed.
(74) A number of captured Soviet armoured trains were also supplied with additional flatbed wagons to accommodate Somua S35 tanks.
(75) French Panhard armoured cars were also used as reconnaissance vehicles. They had their road wheels replaced with flanged steel wheels so that they could run on tracks. With a quick wheel change they could revert to their original role.
(76) Captured T34/76 Model 43 turrets were also used.
(77) Although this was reduced for the turreted model.
(78) Known as Littorina Blindate or Eisenbahn Panzerwagen Littorina Modell 43.
(79)After the war the Schmel Class boats, which were built from 1965 to 1970, were fitted with PT76 turrets.
(80) Another PiSi boat was built but lacked any armament. This was captured by the Czechs and after the war the Defence Ministry decided to make the boat operational. It was fitted with a Panzer IV turret mounting a 7.5cm KwK 40 gun both of which were in plentiful supply after the war. It was sent for trials in 1948 before becoming part of the Danube Flotilla and served with this unit until it was decommissioned.
(81)Minister for armaments and munitions.
(82)The official drawings depict the shelter being fitted with nine, but in practice, three to six was more normal.
(83)‘When the turret was in use the chimney could be collapsed to allow free turning of the turret through 360 degrees.
(84)The power for the turret traverse was normally drawn from the main drive shaft of the tank.
(85)Even then a full rotation would take three minutes, which compared with seventeen seconds when the hydraulic traverse was used on the tank.
(86) The difficulty of transporting the turrets in Italy was such that, according to Italian civilians, the Germans were seemingly forced to use oxen to tow the trailer. E. Thomas (12 RTR) letter to author dated 19 November 1992.
(87) In the construction of the Gothic Line in AOK14’s zone in August 1944 Pz.Berge-Kp.9 (9th Panzer Recovery Company) was responsible for transporting the Panther turrets from the railway station to their final destination. BA, RH20-14/48.
(88) 4,500 rounds of machine gun ammunition could be stored in the turret.
(89)And of these, six were ultimately used on steel shelters.
(90)A painting by Maj C. F. Comfort of a destroyed Panther turret in the Hitler Line, May 1944 and another by Capt G. C. Tinning of a turret in the Gothic Line in September 1944.
(91)After Fridolin von Senger und Etterlin, the commander of 14th Panzer Corps, who was responsible for the defence of the Liri Valley at that time.
(92) However, the Allies continued to use its original name in an anglicized form and it is this widely accepted, if not wholly accurate, title that is used in this book.
(93) The Line actually ran from Monte Cairo in the north to Terracina on the coast, but the main defences were constructed in the Liri Valley.
(94) Maj Gen Erich Rothe in his interrogation after the war on the defences of the Senger Riegel states that 18 PaK Panzertürme were installed, but this may have included other turret types like the Panzer II. CNA, RG24, Vol. 20513 The Senger Riegel, Maj Gen Erich Rothe.
(95)Green I ran from Pesaro in the east to La Spezia in the west. Green II was approximately ten miles to the rear.
(96)After the war the turret at Pistoia was destroyed and the metal taken for scrap.
(97)According to one source a number of Panther turrets were installed along the Tyrrhenian Sea coast. These did not see action and a number were destroyed by their crews as the American forces approached. The others were destroyed by the Allies at the end of the war. D. Guglielmi, ‘Linee fortificate tedesche in Italia 1943–1945’, Storia & Battaglie, pp.21–32.
(98)In the zone of Fest Pi Kdr XXI (Niederrhein) no Panther turrets were planned to be used, but in a paper dated 3rd March 1945 there was a request to transport two steel shelters for Panther turrets to Rommerskirchen railway station. BA, RH12-20/44, p.241.
(99)Originally sixty-six were to have been sent, but in the event only thirty-six were. BA, RH 12-20/44, p.198.
(100) One of the turrets mounted on a wooden shelter was recently discovered in Stettin (Szczecin), and is being restored.
(101) On 16 April Dresden was made a ‘fortress’ although this was more of ‘a propaganda device rather than [making] a practical difference’. F. Taylor, Dresden – Tuesday 13 February 1945 (Bloomsbury Publishing plc, London, 2004), p.437.
(102)The bombardment that preceded the attack, which was designed to neutralize the enemy’s defences, did little more than knock the camouflage away from the Panther turrets.
(103)The original unit diary states that four turrets were present but this is undoubtedly an error.
(104) Post-battle reports talk about the Markl emplacement destroying seven Allied tanks on 24 May at a distance ranging between 1,400 and 1,700m and the Schmittsberger emplacement destroying a further seven tanks on the same day at a distance of between 200 and 400m but the numbers are probably exaggerated. W. Trojca, PzKpfw. V Panther, Vol. 6, (A. J. Press, Gdansk, Poland, 2003), p.73.
(105)A post-battle report of 15 Panzer Grenadier Division dated 29 May 1944 stated that fifty-three enemy tanks were destroyed during the battle for the Hitler Line including twenty-two that were accounted for by the Panther-Turm Kompanie, but again this is probably an exaggeration.
(106) Two Panther tank turrets were later found emplaced here.
(107)The official history and other sources state the second shot.