
Chapter Twelve
Contents
· Developing a Job Start Checklist
· Reviewing the Plans & Making Preparations
· Organizing the Job Site
The best way to make any project start smoothly is to adequately prepare for the job. This means spending time looking over the plans, and organizing information, and talking with whoever is overseeing the job before you start working on the job site.
Often, the lead framer does this preparation the night or morning before a job starts. You’ll find that the work will flow more smoothly if you begin preparation earlier and do it right.
If you’re a carpenter working for a framing contractor or a general contractor, many of the preparation tasks listed in this chapter will be done for you. If, on the other hand, you are the lead framer, framing contractor, and home builder all in one, then it’s up to you to get these done.
In this chapter, the word superintendent refers to the person on the job site who answers any questions related to the building. This person’s actual title might also be builder, owner, or framing contractor. Although this book is about house framing, we use the word building, since the preparation is very similar whether it is a house, multi-family housing, a commercial building, or any structure where wood framing is used.
If you are preparing to start the job with the foundation slab in place, you will need to perform these four tasks:
1. Develop a job start checklist.
2. Review the plans and make preparations.
3. Organize the job site.
4. Conduct the pre-start job site review meeting.
Developing a Job Start Checklist
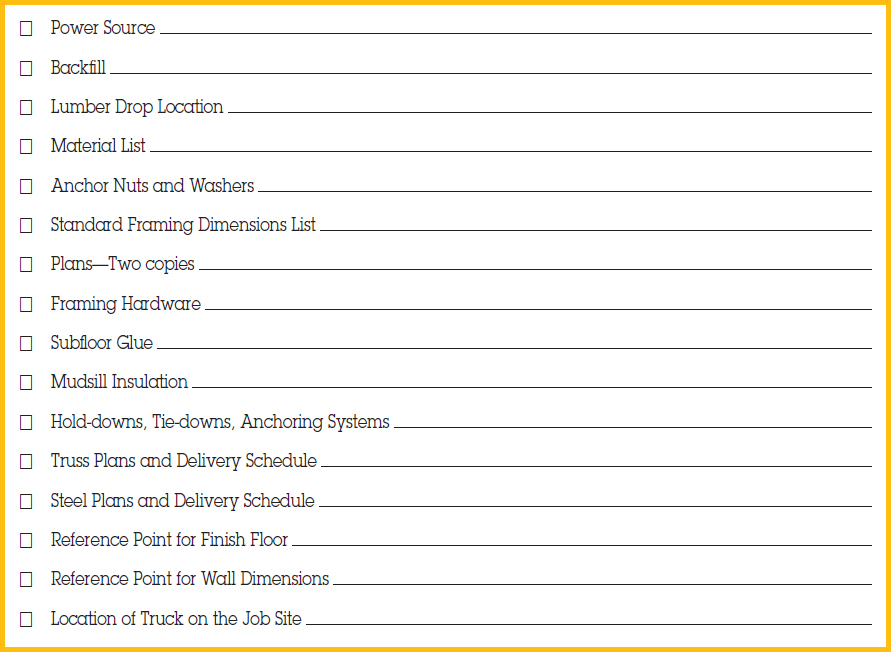
Using a job start checklist is a good way to prepare. Your framing will be organized and will move at a steady pace if all the items on this list are addressed. You can fill out the checklist in a pre-start job site review meeting. While the pre-start visit is not absolutely required, it is a very productive part of the preparation.
Following is a blank Job Start Checklist that can be used at the job site review meeting. Along with the checklist is an explanation of some points to consider as you check off each item. Although the items may vary from job to job, most items on this list are common to all jobs. You should also add your own items to this list.
Job Start Checklist—Explanation
Consider as you check off the job start items.
1. Power Source
· Will you need more than one power source? Bigger jobs sometimes require more than one source.
· What length of extension cords will you need for power tools? A cord that’s too long can burn out your tools.
· Will you need a heavy lead cord?
· Is there enough voltage for your tools? A compressor, for example, may require 220 volts.
2. Backfill
· Backfill all possible areas before you start. The more backfill completed, the easier it will be to perform your work.
3. Lumber Drop Location
· Ask for lumber to be dropped as close as possible to the building, and in a central location. If a forklift will be available, you can have the lumber dropped in a more out-of-the-way location, as long as it’s easily accessible.
· Often the lumber you need first is on the bottom of the lumber load when it is dropped. Sometimes you can request that the lumber company load the lumber in the order you will use it.
4. Material List
· Be sure you have a copy of the material takeoff list. This list will help you figure out which size, length, and grade of lumber will be used for which part of the building. It is a good check, and helps prevent mistakes.
5. Anchor Nuts and Washers
· The anchor nuts are generally delivered with the anchor bolts used by the foundation crew. Ask the superintendent to have the nuts located before you arrive on site, since trying to find them can be difficult.
6. Standard Framing Dimensions List
· Go over the list (shown later in this chapter) with the superintendent if applicable. He/she may need to check with the architect, or door or window manufacturer, in order to verify rough openings.
7. Plans: Two copies
· Be sure you have two copies of the plans. You will need one set for the job site. The second set can be used by others, such as the framing contractor, by yourself off site, or by the layout framer on bigger jobs.
8. Framing Hardware
· If you purchase the framing hardware yourself, you can have good control of quantities and delivery. If you don’t purchase it, request a hardware purchase list, which will help you identify quantities and type of hardware. It is common for the architect to specify a piece of hardware with a specific identifying number on it, then have the superintendent purchase an equivalent piece of hardware with a different identifying number. It helps to carry a hardware manufacturer’s catalog with you for identification purposes. The Simpson Strong-Tie catalogs are most often referenced on plans.
9. Subfloor Glue
· Is subfloor glue required? It may not be called out on the plans or specifications, but sometimes superintendents require it.
10. Mudsill Insulation
· Determine whether mudsill insulation is necessary. Again, it may not be identified on the plans or specifications, but the job superintendent may intend to use it.
11. Hold-downs, Tie-downs, Anchoring System
· It is best to install the hold-down studs when the wall is built, and it is easiest to drill the holes for the hold-down bolts before the hold-down studs are nailed into the wall.
· Have at least one hold-down of each size on the job site when you start. Because the hold-down sizes vary, it’s good to have different sizes available so you can determine stud locations and bolt hole sizes and location. If you do not have the hold-downs, you can use a hardware catalog to determine hole sizes, locations, and stud locations.
12. Truss Plans and Delivery Schedule
· Many buildings have truss plans in addition to the plans provided by the architect. Because you want to line up the studs, floor joists, and roof trusses where possible, it is important to know where the truss manufacturer started the layout. You should use the truss layout and align the studs and floor joists. Truss plans typically call out where the layout starts.
· Often the truss plans are not drawn until shortly before they are needed. It is best to request the plans early so that they will be available when you need them.
· Check on the delivery date. Depending on the economy and the local truss manufacturers, the lead time for trusses can vary from days to weeks. You don’t want to get to the roof and have to stop because the trusses aren’t yet built.
13. Steel Plans and Delivery Schedule
· Typically if you have steel on the job, it should be in place before the wood framing is started. Check to see when it will be ready.
14. Reference Point for Finish Floor
· When you check the floor for level, it helps to have the benchmark used for the concrete work. If you don’t have the benchmark, then you have to take a number of different readings to come up with an average before you can determine whether the concrete work is within tolerance. Sometimes the superintendent will be able to give you the benchmark.
15. Reference Points for Wall Dimensions
· Having the reference points will save you time in determining where the lines are actually supposed to be. Since the concrete work is seldom exactly where it is supposed to be, you will have to decide by how much the concrete is off and the best way to compensate for it without doing extra work or compromising the building.
· If you don’t have reference points to work with, you will have to spend extra time taking measurements to determine where the mistakes are located in the concrete.
16. Location of Job Site Truck
· Be sure to locate your truck, trailer, or storage container close to the job site. Planning ahead with the superintendent can often open up a location that later could be occupied by other trades, material, or supplies.
Job Start Checklist
Reviewing the Plans & Making Preparations
Plan review will save you time and energy, and make your work more productive. If you are framing a house with a plan you have used before, then you have already done the review. But if you are framing a new house design or, particularly, a multi-unit or commercial building, then it becomes very important to review the plans. Here are some of the most common ways of reviewing plans:
1. Study the plans. Sit down with the plans and figure out how the building is put together. Read the specifications. Most often they are standard and you can skim through them, but make sure to note anything that is new or different. Know enough about the new material so that you can understand the architect’s explanations. If you can’t figure it out, ask the framing contractor, superintendent, or architect about that particular element. If you are on a large job where the specifications come bound by themselves, you should know that they are probably organized under the Construction Specification Institute’s (CSI) MasterFormat. Under this system, rough carpentry is listed in Division 6 as 06 10 00. This section contains the basic specification information about framing this job.
2. Make a list of questions. While you are studying the plans, have a pad of paper and pencil handy so you can write down any questions. Go over these questions with the superintendent at the pre-start job site review meeting. Often, getting a question answered or a problem solved before the job begins saves an interruption in the framing. Even a little thing like the architect missing a dimension on the plans can cause a delay. If the superintendent okays scaling the missing dimensions, there won’t be a problem; but if you need verification on missing dimensions, it’s best to get them before you begin.
3. Highlight the plans. It’s a big help to highlight easy-to-miss items on your plans. Use the same color highlights on all jobs so that it becomes easy to identify items for you and your crew. An example would be:
Orange—Hold-downs
Pink—Shear walls
Green—Glu-lam beams
Blue—Steel
Yellow—Special items
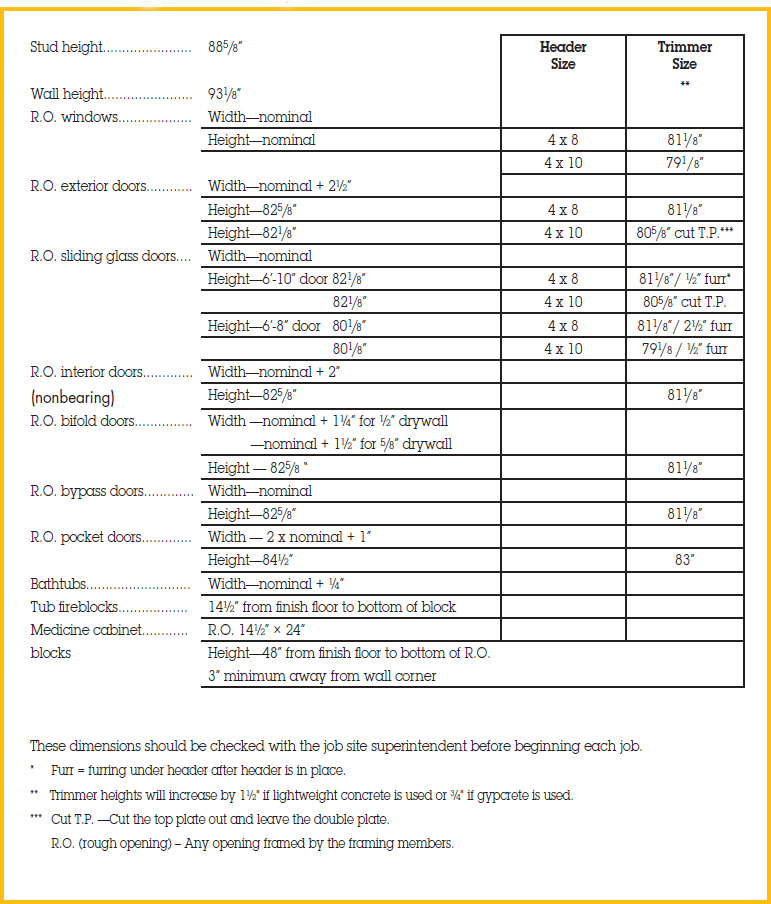
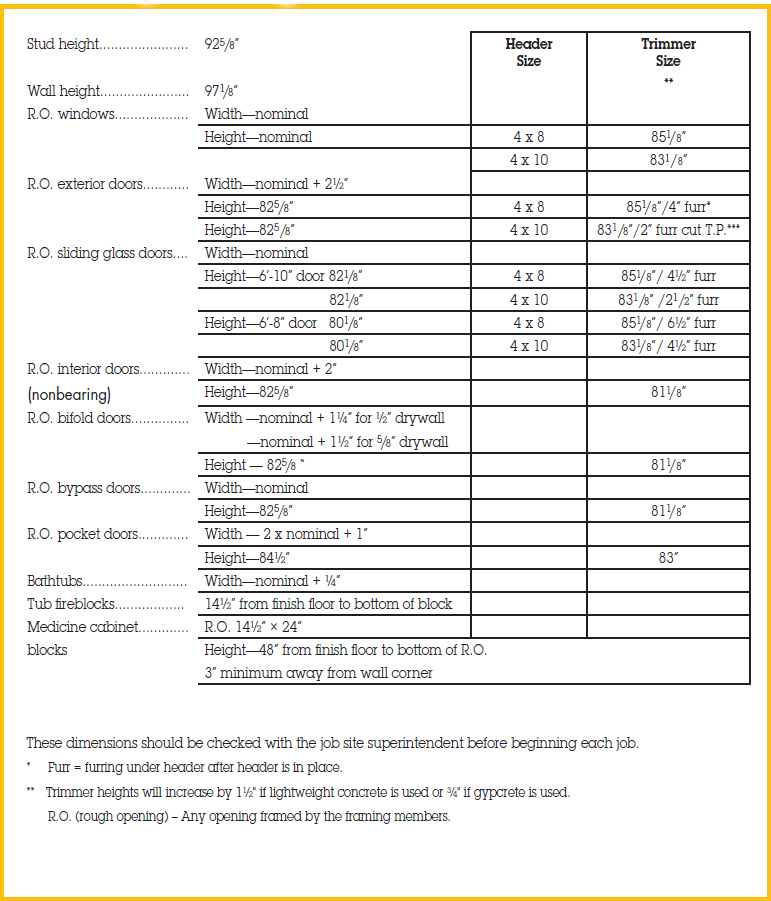
4. Establish framing dimensions. Most rough openings are standardized, but because of exceptions and differences in floor covering, it’s important to go over the rough openings before the job begins. The information sheets that follow can be used for reviewing these dimensions with the superintendent. There is a sheet for 885/8″ studs and one for 925/8″ studs. These can be adjusted for different size studs. Go over each item with the superintendent or whoever is in charge of the job. Ask him/her to review the sheet and indicate that you will be using the rough-opening dimensions listed unless you are instructed differently. Note that 885/8″ studs are standard because with a 4 × 8 header, they leave a standard 82½″ door opening. Note, too, that 925/8″ studs work with a 4 × 12 header. (See ″ Standard Framing Dimensions″ sheets.) These sheets apply to residential framing. Commercial framing is not so standardized. Note that the use of hollow metal (H.M.) door and window frames is common in commercial framing. The frames are usually 2″ in width. Rough openings (R.O.) for H.M. frames would typically be 2″ for the frame plus ¼″ installation space. As an example, a 3′-0″ door would have an R.O. width of 3′-4½", which is made up of 3′-0″ for the door opening, 4″ for the frames on each side, and ½″ for the ¼″ installation space on each side. The R.O. height would be 7′-2¼", which would be made up of the 7′-0″ for the door opening, 2″ for the frame, and ¼″ for installation space.
5. Tape the plans. Plan deterioration can be a problem, particularly at the end of a job. Use the same set of plans when possible so they include your highlighting and any changes that you have marked. When possible, request water-resistant print paper for the plans. If you’re in a rainy area or season, this will keep the lines from running. Plastic covers are made to cover plans, but they can make it difficult to turn the pages. Clear plastic adhesive covering can be used, but then you can’t write on the plans to note changes. A good system is to use clear plastic wrapping tape to tape the edges of the plans. This treatment usually provides the stability to make it through the job while still allowing for notes written on the plans.
Highlighting the plans

Taping the plans

Standard Framing Dimensions 885/8″ Studs
Standard Framing Dimensions 925/8″ Studs
Organizing the Job Site
After the plan review, you need to organize the job site. Figure out what your initial manpower needs and schedule are, and what tools you’ll need for the job. The first day on the job site is usually a challenge.
1. Manpower needs. Typically, on the first day, your crew is ready to go to work and will be looking to you for instruction. At the same time you may not be sure if the concrete is level or the right size. Meanwhile, the superintendent may be on his way over with his list of things you need to take care of. If you have too many framers, everyone might be standing around until you get the job organized. If your schedule allows, start with just a two-man crew to check the foundation or slab for level and size and to get some lines chalked and some detailing done.
2. Manpower tasks. Knowing which jobs you want each framer to do before you get there always helps. Also, keep a couple of back-up tasks (such as cleaning out the truck or fixing tools) in mind in case something prevents you from starting right away. First-day jobs might include:
· Cleaning the slab or foundation
· Checking concrete dimensions
· Checking level of concrete
· Cutting makeup and headers
· Nailing makeup and headers
· Chalking lines
· Setting up chop saw (radial arm or similar)
· Building plan shack
· Detailing plates
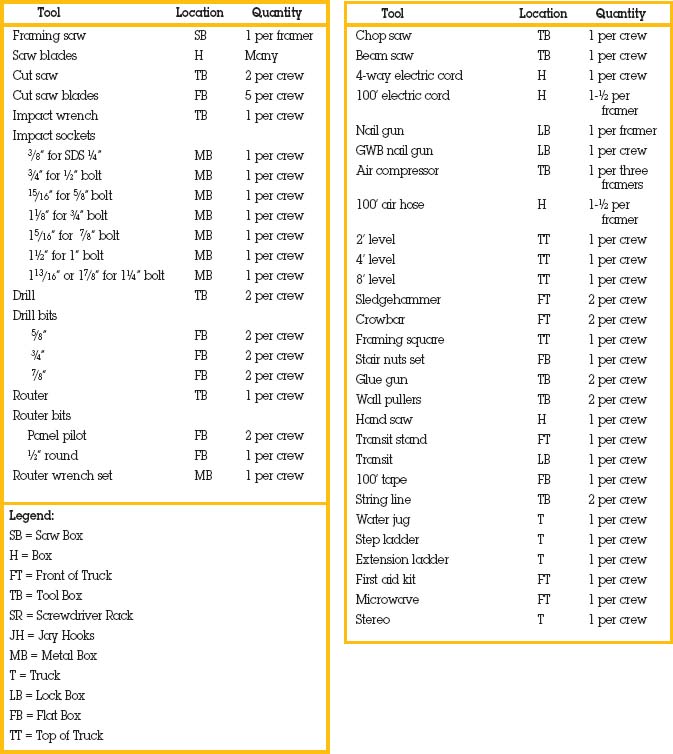
3. Tools. Not having the right tools can be like trying to cut the Thanksgiving turkey with a table knife. The tool list that follows will help you determine what you need. For example, you can look at the plans to find out what size bolts are being used so you can be sure to have the appropriate drill bits and impact sockets ready. It’s easy to show up the first day without some of the necessary tools. Also, you might use different tools at the beginning of a job and at the end of a job. Highlighting the tools you need on the Tool List before the job starts will help you prepare and save time. Note that the “Location” column on the Tool List at the end of this section refers to the location where the tools are kept. (See legend on tool list.) The locations listed can be adjusted to your own situation.
4. Plans. Any time you can devote to the plans before you start the job is probably well spent. Two things are particularly important for getting started. First, decide where you are going to pull your layout from (see Chapter 7), and second, decide which lines you are going to set for reference (see “Getting Started” in Chapter 13). Looking at plans on the job site can be like trying to read a map while on a motorcycle: there is always the sunshine, wind, or rain. On the job site, you’ll be juggling a number of things. Your crew will be asking you what to do next, and you’ll have to think about the material you need and if you have enough nails, for example. It will take you about an hour to absorb as much information from the plans on the job site as you can in fifteen minutes off the job site. A good habit is to review the plans for ten minutes every morning away from the job site. You’d be surprised at how many mistakes are avoided by doing this.
5. Schedule. Developing a schedule is a difficult task, and one that should be a responsibility of the contractor. If, however, the framing contractor does not provide one, the lead framer should create his own. It is a valuable tool that will help you organize the job and then analyze how the work is going.
6. Plan shack. On bigger jobs, a plan shack is a good tool to have. It doesn’t have to be fancy, but if it keeps your plans dry and helps keep the job organized, it is worth the time and material.
Tool List

Plan shack

Conclusion
Your time spent preparing for a job sets the tone for managing the whole job. It lets you hit the job running and puts everyone on notice that you are serious about making this job run smoothly.
With a picture of the plans in your head, a job site check list complete and your tools organized you will start out answering questions and taking control of what needs to be done to get your project framed.