
CHAPTER TWO
Duration – Two and a half hours by car
Distance – 20 miles or 32 Kilometres
Starting from the Airborne Museum ‘Hartenstein’: Set the trip meter to zero and from the car park behind the Kleyn Hartensteyn Restaurant, move to Utrechtseweg to turn left to follow the main road. As you do so begin to think of distances – long and short – since distance is something that will come to dominate your appreciation of what happened. As you make the left turn onto Utrechtseweg you will glance to your right to check traffic and will see the Oosterbeek Crossroads at the traffic lights about 100 metres away. This crossroads marks the eastern boundary of what would eventually be the Oosterbeek perimeter.
Drive along Utrechtseweg past the Hartenstein Hotel on the left and the monument on the right, and with your trip meter reading 0.6 miles/1 km reach a roundabout that marks what was known in 1944 as the Koude Herberg (Cold Inn) crossroads, now Oude Herberg (Old Inn). As you go straight over following Utrechtseweg glance to the left down the road heading downhill from the roundabout and this is part of the western boundary of the Oosterbeek perimeter. Bearing in mind the short distance you have travelled you will be beginning to get a feel for how small was the area into which 1st Airborne Division was crammed following its failure to reach, in full strength, the Bridge at Arnhem.
Utrechtseweg is the middle route of the three taken by 1st Parachute Brigade in its attempt to reach the Bridge, and was used by 3rd Parachute Battalion.
The Koude (Oude) Herberg crossroads looking west, replaced in 1999 with a roundabout. Courtesy Drs Robert P G A Voskuil.
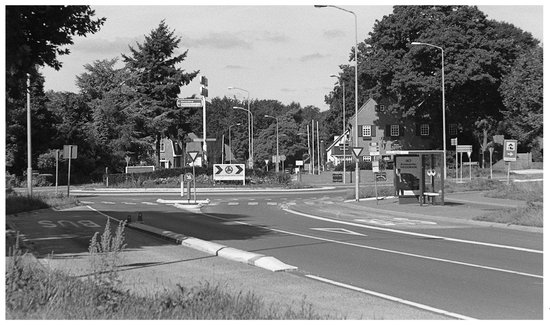
You are driving in the opposite direction to that taken by the paratroopers, and by the end of this tour will have returned to the area just beyond the roundabout to see what happened to them. In the meantime, you should follow the road, noting as you do the well-kept gardens with their fences and hedges very similar to the way they appeared in 1944. These fences and hedges were to prove a real nuisance, making it very difficult for soldiers, friend and foe alike, to move easily, especially when under fire. It is something worth keeping in your mind throughout your tour of the area.
The trip meter registers 2.6 miles/4.2 kms at a crossroads with traffic lights. Turn right, still on Utrechtseweg and signed Renkum, follow the road under the bridge and turn right shortly after it up Bennekomseweg. The road bears left after 100 metres and then almost immediately on the left is a small memorial beside a lay-by in which it is possible to park.

The Heelsum Memorial: 6-pounder anti-tank gun and parachute re-supply containers. Courtesy Drs Robert P G A Voskuil.
The memorial comprises a 6-pounder anti tank gun, beneath an arch constructed of containers used to deliver stores by air. These containers were the type dropped from the bomb bays of Stirlings over Oosterbeek. They would normally contain weapons, food, ammunition and radios. The other containers used in air dropping stores, a process known as ‘air despatch’, were wicker baskets, examples of which can be seen in the Hartenstein Museum. They were either ejected from the bomb bays of the Stirlings, four per sortie, or from the side door at the rear of a Dakota’s fuselage, sixteen per sortie.
There were fifty-two 6-pounder anti-tank guns despatched with the British to Arnhem, twenty-four with the three infantry battalions in the Airlanding Brigade and the balance with the two Royal Artillery anti-tank batteries. The Polish Brigade also sent some in, but they were almost completely destroyed on landing and played virtually no part in the battle. With a calibre of 57mm and an effective range of 500 metres it was a powerful weapon for its size. It defeated enemy armour using armour-piercing shot. Literally punching a hole through protective plating it would go through 146mm of armour.
Drive on up Bennekomseweg taking care to keep to the right until you reach a roundabout at 4.1 miles/6.6 km. Turn right along Telefoonweg and you will see in front of you DZ ‘X’ and LZ ‘Z’ on the wide expanse of arable land to your left and right, bordered by pine forests in the middle distance. Telefoonweg was the road used by the pilots of the aircraft and the gliders as their visual marker for the Landing and Dropping Zones for the first day. Do not stop or get out at this stage as the narrow road does not lend itself to this; and there will be an opportunity to do so in a few minutes. As you drive slowly along this road imagine that in 1944 the gliders of the Divisional HQ, Divisional Troops and those belonging to the battalions of 1st Parachute Brigade would have been on your right whilst the Brigade’s parachutists would have been mainly on your left, with some dropping to your right near the road.
At the top of the DZ/LZ is a small car park on the left in the corner of a wood, trip meter reading 5.6 miles/9 kilometres. Park here, leave the car and look out along Telefoonweg to the south across Dropping Zone ‘X’ and Landing Zone ‘Z’. Immediately behind you, to the north and about 400 metres away through the trees, is Landing Zone ‘S’, the destination of the Airlanding Brigade; and you will see that shortly.
On 17 September 1944 at 12.30 pm twelve Stirling bombers appeared from the south through the slight haze of a sunny day flying directly towards the spot on which you are standing. They had taken off from RAF Fairford in Gloucestershire at 10.00 am and they contained the six officers and 180 men of 21st Independent Parachute Company, packed in at around sixteen men per aircraft.

The Parachute Regiment
These were the pathfinders. Trained to an exacting standard their role was to mark out the DZs and LZs for the main force, which was about half an hour behind.
Flying at just 600 feet the first six aircraft would have flown directly over your head, carrying the Company Headquarters and one platoon onto LZ ‘S’. The other six deposited their loads, one platoon, each of some 48 men, onto the centre of DZ ‘X’ and LZ ‘Z’, before joining up once more as a group of twelve and heading back home. Floating silently down into occupied Holland, and not quite knowing what to expect, the pathfinder paratroopers went swiftly and methodically about their business. Some took up protective defensive positions whilst others busied themselves setting up Eureka Beacons onto which aircraft could home and yet more set up white panels and positioned smoke markers to await the arrival of the main body. The DZ for 1st Parachute Brigade was marked with its identifying letter, ‘X’, in large white panels, together with a ‘T’ shaped symbol, with the stem of the letter pointing in the direction of the wind. The LZs for the gliders had only the identifying letter.
By 1.00 pm they had done their job. All the markers were in place and everything was set. There had been a couple of skirmishes with some Germans with a few prisoners taken, but there was no enemy activity to speak of. Given where they were and what they had achieved it was remarkably peaceful. They settled down to wait, and then they heard in the distance the sound of the engines. Muted at first, it grew in strength as the huge numbers of aircraft bringing in two airborne brigades and their divisional headquarters approached. All hell was about to be let loose in this quiet corner of this most peaceful but occupied country; and no one, not least the Germans, had any idea what was coming.
The first to arrive were the gliders. Passing to the half-left of where you are standing and about fifteen hundred metres away the first to appear were the 134 gliders of the Airlanding Brigade that had made it this far, targeted to land on LZ ‘S’, beyond the trees behind where you are standing, of which more later. After some twenty minutes more gliders carrying divisional HQ and divisional troops arrived, to land to your half-left in the open ground on the left of Telefoonweg. They had been released by their towing aircraft at about two miles range to the LZ and at a height of between 3,000 and 4,000 feet. As they levelled out to land the pilots were denied the usual ninety-degree turn favoured for gliders in order to slow down, get their bearings and make a well-ordered landing. They were coming in straight from the flight path, and because of this there was a tendency to come in too fast and overshoot the prescribed landing spot. With the first gliders landing at the north end of the LZ, and subsequent aircraft landing progressively further and further south, some of those first landings overshot and ended up in the trees bordering the road at the northern end.

The RAF’s Short Stirling. TAYLOR LIBRARY
Looking south from the car park in the direction from which the gliders and aircraft approached. Telefoonweg is on the left.


A Hamilcar Glider. Courtesy Museum of Army Flying

A Horsa Glider. TAYLOR LIBRARY
A Jeep being loaded onto a Horsa Glider on an exercise. TAYLOR LIBRARY

There were two glider types used at Arnhem: the Horsa and the Hamilcar. The Horsa was the smaller of the two, and by far the great majority, able to carry twenty-six fully equipped troops together with a handcart in which they placed additional ammunition and stores. It could also carry, for example, a jeep towing two trailers together with the jeep crew, or one of the 75mm howitzers of the 1st Airlanding Light Regiment.
The Hamilcar was very much larger, and their role at Arnhem was, principally, to fly in Bren carriers, of which for example, there were two per parachute battalion, and the 17-pounder anti-tank guns in the two Airlanding Anti-Tank Batteries. Three Hamilcars were also used, on the second day, for the carriage of a bulk reserve of stores and equipment.
The landing was hard for the large Hamilcars, as they had no nose wheel. When the two landing wheels, located on either side of the fuselage under the wings, sank into soft ground the aircraft would often pivot forward, the nose would dip, the tail was forced up and, in a two cases, the glider was forced over in an ungainly forward roll onto its back. Many of the passengers were badly hurt in these crashes – often with serious crush injuries. The pilots, with the cockpit on top of the aircraft, were particularly vulnerable; and some were killed. Sergeant N G ‘Bill’ Griffin of Divisional HQ saw one such incident.
‘Hamilcars had a problem landing. I saw a man screaming from his injuries following a bad landing. I gave him morphine and left him. It was all I could do for him.’
Bill Griffin had been in the second glider to leave Fairford, and he did not enjoy the ride. Part of the reason lay with the flak his glider encountered crossing Holland. As if that were not enough, just as they were coming in to land another glider went straight past their front. Bill’s glider, in which there was a jeep and trailer in addition to its passengers, veered and they landed hard on the nose. The pilot was all right, but the tail was in the air and the load rendered useless.
However, most of the landings were successful, and very quickly the LZ was full of men departing from the side door of the aircraft to go to their rendezvous, marked by coloured smoke. Others were undoing the three retaining bolts on each side to release the Horsa tail section and remove it to allow vehicles or 6-pounder guns to exit and be moved away to join their units. The nose sections of Hamilcars were being elevated so that guns and carriers could depart and go about their business.
As they did so in the comparative silence of a glider landing and its aftermath the noise from the south heralded the arrival of yet more units. The aircraft, Dakotas of the United States’ 314th Troop Carrier Group, would drop paratroopers onto the open ground of DZ ‘X’, immediately in front of where you are standing. This time, however, the sequence was reversed. The first aircraft to arrive ejected their paratroopers at the southern end of the DZ, furthest away from where you are standing, and then progressively further north. There were nineteen men per aircraft, with the ‘planes operating in groups of nine across the area. The pilots would throttle back to adopt a speed as close to stalling as they safely could, and the first parachutist jumped at 600 feet.

A Dakota. Courtesy Museum of Army Flying.

Horsa gliders on the Landing Zone with their fuselages opened up.
The soldiers were wearing the normal webbing for an infantry soldier, and had strapped to their leg a kit bag containing those items they could not sensibly carry on their backs whilst parachuting. This included their personal weapon and any additional equipment they might have to carry, such as, perhaps, a radio or a PIAT. Having jumped they first checked that the parachute was functioning. They then turned their attention to the kit bag. It had to be released from the leg and then lowered on a rope attached to their waist to the point where it dangled some fifteen feet below them. A kit bag was supposed to carry up to eighty pounds in weight, but they were frequently overloaded. To land with the bag still attached to the leg guaranteed a broken limb, so lowering it properly was an important procedure, and it had all to be completed within the fifteen or so seconds between leaving the aircraft and hitting the ground.
Because of its slow speed and the need to maintain a level flight posture the aircraft lost height during the run over the DZ. Consequently, when the last of the nineteen men in a stick jumped he did so from a lower height than the first; sometimes as much as 100 feet lower. These men had to work very hard to sort out their airborne administration in the time left before they landed.
It could be a confusing experience, with a great deal to do in a very short time. Private Ted Mordecai’s abiding memory was: ‘the despatcher’s “best of luck, cheerio”. He was all right, he’d be back home for tea.’ He and his friend Kevin Heaney, both RAOC soldiers, were to rendezvous with 2nd Parachute Battalion before heading for the Arnhem Bridge. Kevin’s jump, however, was not without its problems.

The Royal Army Ordnance Crops.
‘As my parachute opened my helmet fell off and it landed before me. I thought: ‘this is a good start.’ However, when I landed the helmet, slightly dented, was only about ten yards away and, after taking off my harness, I picked it up and was able to wear it quite satisfactorily. We then made our way quickly to the rendezvous point. There did not appear to be any urgency; the sun was warm, everything was peaceful – had we really dropped into enemy territory?’

Ted Mordecai and Kevin Heaney board a Dakota at Barkestone Heath. Imperial War Museum
The Border Regiment.
Captain Ingram Cleasby of 1 Border, who had landed by glider nearly an hour before the parachute drop, remembers clearly the sight and sound of 1st Parachute Brigade arriving.
‘We had, thankfully, moved away from our gliders and we were taking up our pre-determined positions. Then we heard the roar of approaching aircraft coming in from the south-west. As wave after wave passed over us, the sky was filled with bursting parachutes. Moments later it was empty as the paratroopers reached the ground and almost immediately the great open polder was like a field of mushrooms with parachutes scattered all over it. It was an amazing sight. And then within minutes local men and women came running across the near empty field, appearing from nowhere to greet us. Such high hopes soon to be disappointed.1’
However, the event was not without its fatalities. There was probably only one malfunctioning parachute, or so the available reports would have it. Ted Mordecai, however, having landed safely, was subject to a rude shock:
‘Overhead the Dakotas were still spilling out their contents and above them some Spitfires were circling the DZ. It was then I saw our first casualty. A chap was coming down with a kit bag dangling below him. I think it must have contained mortar bombs already fuzed up because as the bag hit the ground it exploded with a mighty bang. As he was only about twenty feet above it he caught the full blast and there wasn’t much left of him.’
There were other reports of an explosion, said to be near the location of the Eureka Beacon2, and initially 1 Platoon of the Pathfinder Company had believed themselves to be under attack. It seems that whatever happened one unfortunate soul died without even landing. However, there was no time to think about anything but getting on. Picking up their kit, assembling their weapons and looking about them to see what was what men moved off towards rendezvous points marked in smoke from canisters positioned by men of 21 Independent Parachute Company. The Brigade was getting ready to make its move.
Most of them would be departing from the south-east of the area towards the middle and lower routes. However, the car park in which you are standing continues to be important to our story, as does Telefoonweg. In 1944 the car park was just the corner of a wood, but it was the rendezvous for the Divisional Reconnaissance Squadron, manned by soldiers of the Reconnaissance Corps and commanded by Major Freddie Gough. They operated in sections of two vehicles with three sections to a troop. A junior officer commanded each section. If you allow your imagination to drift a little you can picture them all round you, with a growing sense of impatience as they awaited the order to move.
Their task was to rush ahead of the Brigade and take the Bridge early, to await the arrival of their slower moving infantry colleagues. However, there were unexplained delays and they left later than one might have expected. There was a story, quite untrue, that most of their vehicles failed to arrive and so they could not carry out their allotted task. In fact, only some of A Troop’s vehicles did not make it, and as the Troop’s task was locally in the area of the DZs and LZs it meant that almost all the vehicles allocated to the Bridge task were available.

Reconnaissance
Corps.
We will now drive and follow the Reconnaissance Squadron route, but before doing so walk to the edge of the car park and look to the left along Telefoonweg.
This is the route that was followed by the Reconnaissance Squadron, and by 1st Parachute Battalion on its northern route to the area of the Bridge in Arnhem. Coming the other way, to take up their allotted positions in defence of DZ ‘X’ and LZ ‘Z’, would have been men of the Border Regiment, for the next day the balance of Divisional HQ gliders would come in on LZ ‘Z’, whilst DZ ‘X’ would become LZ ‘X’ ready to accept the gliderborne elements of the 4th Parachute Brigade. The parachutists of the 4th Brigade would land elsewhere, as we shall see.
Returning to your car, move out of the car park and turn left to continue along Telefoonweg, following the route taken by Freddie Gough’s Divisional Reconnaissance Squadron. As you do so it is perhaps worth remembering that if you were to have turned right to follow the 2nd Parachute Battalion route to the Bridge in Arnhem from here by road it is exactly 8 miles or 12.8 kilometres.
After about 100 metres the road bears sharp right, and you should follow it. Just as you make the turn you will see facing you a track over the railway line. It is along this track that the men of 1 Border made their way to their positions from LZ ‘S’ which is through the trees to your front, to the north.
After the right turn, and at a safe and convenient place of your choosing, you might wish to stop.
Looking to your right you will see the vast expanse of LZ ‘Z’, and you will be parked in the very tree line into which something like nine gliders embedded themselves in overshooting the LZ. Shortly before you move off, glance to your left at the railway line, and, remembering where the Border Regiment crossed it, spare a thought for two young Cumbrian lads who formed a PIAT crew.
Lance Corporal ‘Ginger’ Wilson and Private Frank Aston of 11 Platoon, B Company were ordered to cover the railway line with the objective of firing at any locomotive that might appear from either west or east. Given the size of the potential target, and the limited capabilities and range of the PIAT, this was a task best described as ‘different’. What Messrs Wilson and Aston thought of it is probably not printable; and would have been less so had they known there was a national rail strike and there were no trains running.

The Reconnaissance Squadron route.
Let us now return to the Reconnaissance Squadron, and to 1st Parachute Battalion, whose route we are now following. Before driving off it is worth taking a moment to consider timings, which at this stage were crucial.
By 2.45 pm all the battalions had made their rendezvous and their radios were in communication with each other. At 3.00 pm the 2nd and 3rd Parachute Battalions moved off at the southern edge of the landing zones heading for the lower and middle routes. At about 3.20 pm Urquhart was given the erroneous message that most of the Reconnaissance Squadron transport had been lost and they would not be making the rush to the bridge as planned, and at 3.30 pm 1st Parachute Battalion was given the order to move.
It was not until 3.40 pm that the Reconnaissance Squadron began its move. There is no real explanation for the delay, except that it took some time to bring together all the vehicles that were to go to the bridge. They may also have been waiting for the four vehicles of 9 Field Company Royal Engineers that were to accompany them. However, these had landed by mistake on LZ ‘S’, not ‘Z’, and never joined the Squadron. Realising the importance of their mission, and chafing at the delay, Lieutenant Peter Bucknall commanding 8 Section of C Troop, on hearing the order to move, leapt to his vehicle, grabbed the first three men of his section he could and, ignoring the man-to-vehicle allocation that had been pre-planned before departure, drove helter-skelter out of the RV towards Arnhem. His vehicle would have driven past where you are now parked and according to reports he was driving very fast. His section sergeant, Tom McGregor, was left behind at the RV to gather the rest of Bucknall’s men and follow him, which he did a few moments later.

Johannahoeveweg as it becomes a dirt track.
Courtesy Drs Robert P A Voskuil.
Drive on until you reach the level crossing turn left and immediately right into Johannahoeveweg and stop as soon as you sensibly and safely can on the right
Reconnaissance Squadron tactics were such that vehicles moved as section groups of two, moving forward from position to position being covered by other vehicle sections who were stationary and on guard against potential enemy interference. It was a process known today as ‘leapfrogging’. In front of Bucknall’s two vehicles, therefore, were those of 7 and 9 Section, whilst C Troop HQ brought up the rear. At the Wolfheze railway station crossroads, 9 Section went over the railway line and took position at the entrance to the small road immediately right over the level crossing. Called Johannahoeveweg, it parallels the railway line. Just behind them, on the south side of the railway, near the entrance to the mental home, 7 Section positioned itself. Between them the two sections created a ‘safe’ gateway through which Bucknall would pass to lead the squadron along Johannahoeveweg.

The track by the culvert taken in 1960. Note the light tree density. Photograph Jos-Pe, Arnhem, ca. 1960; Renkun Municipal Archives Collection.
Follow the route taken by 8 Section and Johannahoeveweg becomes a dirt track after about 100 metres going straight on at the junction with the turning into Mansveltweg on the left and with the trip meter reading 7.4 miles/11.8 km. Going down the dirt track imagine yourself in the position of Sergeant McGregor with your section commander racing ahead out of sight, you are trying to catch up and suddenly there is the sound of firing ahead. Pressing on, McGregor was anxious to find out what was going on.
As you drive along the wooded track you will emerge into open ground with heath on the left, a post-war motorway bridge 100 metres ahead and a tunnel under the railway embankment to your right. Pull over to the right and stop just off the track in front of the small tunnel. It is just here, on the track, as it emerged into the open ground, that Sergeant McGregor’s jeep was struck across the front by a burst of machine gun fire, probably from the high railway embankment up to the right.
Major Sepp Krafft, reacting instantly to the parachute drop, had moved his training battalion into a blocking position along Wolfhezerweg. Where you turned left over the railway just a few moments ago, the road to your right is part of Wolfhezerweg, and from where you stand now it is on the other side of the steep embankment and away to the south. However, concerned about his exposed right flank, and wishing to protect it, Krafft had put his reserve platoon on the north side of the embankment near where you are standing and across onto the small hill to the left of the track, just this side of the modern motorway bridge. In the time it took the paratroopers, and particularly the Reconnaissance Squadron, to get organised and move off Sepp Krafft had, unknowingly, straddled the Squadron’s route.
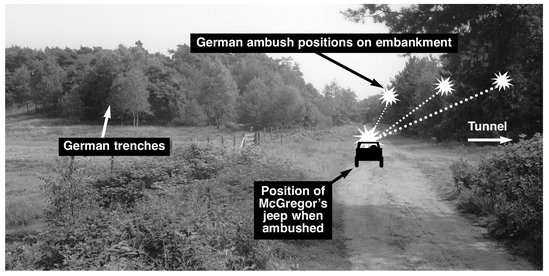
Johannahoeveweg at the ambush scene. Note the tree density today. Sergeant McGregor’s jeep was stopped on the track just by where the modern gate now stands on the left. The small track to the right reaches the tunnel under the railway in 20 metres.
The machine-gun fire wounded one man, Trooper Minns. Two of the others jumped from the jeep and with the wounded man crawled under the vehicle. The remaining three sought cover on the open ground to the left of the track, Sergeant McGregor in a shallow ditch and the others behind some small trees. The section’s difficulty was that they could see clearly Germans moving about on the hill to the left of the track, but could see nothing on the embankment and it was from here that the fire was coming. In seeking to find out what was going on, Sergeant McGregor was killed. Trooper Arthur Barlow saw it happen:
‘I remember seeing Sergeant McGregor rear himself up on his hands to have a look around. He fell flat on his face and died without making a sound.3’
Within the next few minutes the four remaining soldiers were wounded by rifle and machine-gun fire from the German positions all around them. Exposed, as they were, their sergeant dead, no idea what had happened to their officer and all having been hit they had no choice but to surrender. The German sergeant who came down to take them prisoner spoke perfect English, and took the four less seriously wounded away. Minns was too seriously hurt to be moved and the German assured them someone would be back for him, although it never happened.
Further back up the track 7 Section had heard the firing, and dismounted to move forward on foot. Initially they saw the wounded men. However, the section moved back to report what had been seen and it was during that time that the injured soldiers had been taken prisoner. There followed a number of attempts by the Troop to recover Minns, during which one of the 9 Section men saw Bucknall’s vehicle burning and with dead bodies around it in the area of the modern motorway bridge. There were further casualties in C Troop, two of which resulted in death. One of them, Trooper Edmond, was badly hurt, and with a huge sucking wound in his back he knew his time was limited. He managed a few words with Sergeant David Christie who had been instrumental in recovering him, under fire, on a stretcher:
‘Jock, I’m dying. Tell my wife I love her and go and see her for me.4’
The field grave of Trooper Edmond, Recce Squadron, who was killed in the German ambush. Taylor Library

He was buried the next day. The following day Trooper Minns was recovered from a ditch still alive and was taken prisoner. He survived the war.
If you want to obtain an enemy view of the action go up onto the mound to the left of the track and look back on the ambush site. It is still possible to find old German trenches there.
The ambush that took place by the railway was to have far-reaching consequences. At its height, Freddie Gough had been called to see Urquhart. The reason, unknown to Gough, was to discuss his missing vehicles, which, of course, were not missing. However, he was pulled away at a vital time for the squadron. Having recovered, as best they could it’s casualties, the Squadron then withdrew and abandoned its attempt to reach the Bridge. Sepp Krafft, with just a platoon north of the railway, had prevented a key part of the British divisional plan from being carried out.
There were a number of other things that happened in this general area. Stand on the track, with the tunnel immediately on your right and facing the motorway bridge. This track featured in many plans, not only those of the Reconnaissance Squadron. It was also the approach march of 7 KOSB, for once they had seen 4th Parachute Brigade safely down on South Ginkel Heath they were to secure the LZ for the Polish equipment gliders for day three; and LZ ‘L’ is just over one kilometre ahead of where you are standing, and slightly left of the track.
A Willys Jeep in the tunnel (‘10 Para Culvert’) under the railway, driven by the author, supervised by Robert N Sigmond.

Four kilometres from where you are standing, and again just left of the track, is a 4th Brigade objective en route to its final planned position in Arnhem. The track, therefore, was also the approach march on 18 September, the second day, for 156 Parachute Battalion, the leading 4th Brigade battalion, and for 10th Parachute Battalion which very soon shifted some way over to the left moving through the woods to the north, following Amsterdamseweg as planned.
The battle in which 4th Parachute Brigade was involved on day three took place about three kilometres ahead and is described in Chapter 3. However, by mid-afternoon on 19 September 1944 the Brigade, by then comprising 156 and 10th Parachute Battalions and 7 KOSB, was withdrawing back through this area towards the Wolfheze level crossing with a view to moving south of the railway embankment and taking up a position in the defensive perimeter by then forming around Oosterbeek. The level crossing itself was being mortared, so many of the men sought to cross the embankment by climbing it, and a number went through the tunnel just by where you are standing. Nick-named by some the ‘10 Para Culvert’, its use was by no means limited to men of that battalion. Its particular value was for the passage of vehicles: it is perfectly possible to drive a Willys Jeep through the tunnel towing a trailer or a 6-pounder anti-tank gun. One simply needs to drop the windscreen.

The King’s Own Scottish Borders.
The scene on that afternoon was one approaching chaos. The Brigade was conducting that most difficult of military operations: a withdrawal in contact with the enemy. As it did so the gliders carrying the Polish equipment were landing on LZ ‘L’ mixing in amongst British soldiers rushing, many of them in small groups, to get to the south side of the railway. The Germans were hotly pursuing them, and in the confusion there were a number of casualties, some, reportedly, as a result of ‘friendly’ fire between the British and their Polish allies. The embankment was presenting a difficult barrier. It is very steep, and to tired, overloaded men it was, in many cases, too much. For those who did get to the top and sought to cross there was the gauntlet of enemy machine-gun fire to be run as the Germans sprayed the railway line constantly along the line of the embankment. Many died and many were taken prisoner.

Private Robin Holburn KOSB.
Courtesy R N Sigmond.
Private Robin Holburn of the Mortar Group, Support Company 7 KOSB was caught up in the melee:
‘The troops coming from the Landing Zone were a mix of units including, I seem to recall, 10th Parachute Battalion. Whilst moving along the track I passed two anti-tank guns lying on their sides and recall thinking that we could not afford to ‘lose’ these. At a point about half way between Johannahoeve Farm the confusion became pronounced with the general movement of soldiers climbing the railway embankment. There were instances of jeeps trying to get up the embankment which now appeared to be the general line of withdrawal. No one was moving towards Wolfheze. Everyone was climbing the embankment and crossing the railway. Our mortar team, using toggle ropes, endeavoured to manhandle the handcart up the embankment but were unable to do so. We rested for a moment before trying again. At this point I was called over to assist a Jeep which had been trying to climb the embankment, this was not possible. We managed to get the Jeep back on the track where it moved towards Wolfheze. I returned to the mortars, but no one was there. It suddenly became quiet. A few soldiers were climbing still over the embankment, but were well scattered, no other movement was apparent along the track. I followed over the railway embankment and found myself alone on the south side in a heavily wooded area.5’
Leave this scene that once witnessed so much confusion and return in your car back along the track to the Wolfheze level crossing. Turn right, heading north along Wolfhezerweg. In a short distance you break clear of trees and there is a large open area to your left and right, with the majority to your left. This is LZ ‘S’. Stop as soon as you can on the right of the road and remain in your car from where this part of the area is safest viewed.
This is the route taken initially by Lieutenant Colonel Dobie and the 1st Parachute Battalion. The Ede-Amsterdam road is about two kilometres ahead of you, running across your front at ninety degrees and he was to march to the junction and turn right towards Arnhem.
However, we are here to consider the scene on LZ ‘S’ which was a mirror of LZ ‘Z’, but remember that those descending onto LZ ‘S’ had been the first to land. Coming in from your right and flying overhead where you are parked, by now down to about 200 feet, the first gliders would land at the far end of the LZ. Looking into the distance it should be possible to see a grey-roofed building. This is Reijerskamp Farm, a main focus on the DZ as well as being the HQ of the 21st Independent Parachute Company. Some of the problems encountered, however, were the same, as witness the experiences of Lance Corporal George Hynd of the 7 KOSB Pioneer Platoon:
‘The platoon I was in went over in different gliders. In my glider were also one Jeep and two trailers loaded with explosives and pioneer equipment... After landing the fun started right away! We just couldn’t get the Jeep or trailers out. Both glider pilots, Fawler and Mitchell, did assist us. However, out of the woods came civilians who were keen to help us and with their combined effort we got the glider unloaded.6’
One key difference was that the arrival of a Scottish battalion heralded the presence of the pipes. As the soldiers set about sorting out the LZ and moving of to their task of defending DZ ‘Y’ for the next day they were encouraged in their work by Piper Willie Ford from Selkirk, playing the Battalion march – Blue Bonnets O’er The Border – at the top end of the LZ.

Piper Willie Ford, who would have been dressed as an Airborne soldier and not in his ceremonial accoutrements as shown here. Courtesy R N Sigmond.
Dobie’s men of 1st Parachute Battalion marched past here towards the road junction ahead, marked today by traffic lights, with a view to turning right and heading towards Arnhem. However, the Germans were too fast and they already had men of the 9th SS with light armoured vehicles in position. They were there to seek out the paratroopers, and had no idea that a complete British battalion was approaching them.
Drive on towards the junction, and just before the start of a wood on your right and about 200 metres short of the junction is a track leading off to the right, and it is easy to park across the entrance. In trying to picture the scene in 1944, the only real change has been the Ede-Arnhem road. It is now a wide dual carriageway, but in 1944 it was a normal two-way road taking the space currently occupied by the northern carriageway, furthest from you. The nearest, southern, carriageway, signed Arnhem, is a post-war construction. This means that the woods, whilst being of similar density, are not so extensive as they were.
The junction of Wolfhezerweg with the Amsterdam-Ede road. Park by the track junction on the right. Courtesy Drs Robert P G A Voskuil

It was in these woods that the Battalion fought its first battle. The leading company was soon embroiled with the enemy and fighting continued for several hours, until it became dark which made the engaging of targets virtually impossible. German armoured vehicles fired their machine-guns into the advancing soldiers. The British quickly began to take cover, and to dig themselves small scrapes in the earth, using their entrenching tools whilst lying down in order to obtain as much protection as they could whilst at the same time having a good position from which to return fire. Andrew Milbourne was the leader, known as the ‘No 1’, on a Vickers machine-gun team.
‘Shells began to burst amongst us. Yells and whistles filled the air and machine-guns opened fire. I noticed before I hugged the ground that one of the enemy guns was about 200 yards in front and to our left flank. My officer asked if I had seen anything and when I pointed the gun out to him ordered my gun section into action. Grasping the tripod I ran across the road, diving headlong into a very convenient ditch. Cautiously I raised my head looking for a position for my gun. Before having completed my look round No 2 landed on top of me. “You bloody awkward elephant”, I began to curse, then stopped. A burst of fire was spraying the ditch... Finally I reached my position and slowly spread-eagled the tripod legs. Then, raising it slightly to the required height for a low mounting, I clamped the legs tight. Shuffling round I yelled for No 2. Slowly he approached and as he did so I ordered No 3 to get near enough to supply us with ammunition. At last, after what seemed an age, No 2 reached my side and mounted the gun.7’
Eventually, in the dark, the situation became chaotic with Germans now all around and the airborne suffering constant bombardment from mortars, tank guns and machine-guns. Andrew Milbourne again:
‘We were swept by withering fire. Dead lay all around, wounded were crying for water. Groans and shrieks of pain filled the air. Time and again they overran our positions and had to be driven out with the bayonet. My gun was never out of action.8’
Eventually, Dobie decided that he had to get away, and instead of taking the Ede-Arnhem road, now denied to him, he began to move away through the woods to the right of where you are now parked, still intending to head for his objective. It was only later that evening, at about 8.00 pm, that he picked up a garbled radio message from the Bridge, realised that Frost was in trouble and decided to head south-east into Oosterbeek and then on to Arnhem to help out at the Bridge. By dawn the next morning he would be well into Oosterbeek, but with severely reduced numbers. Two companies had sustained around thirty casualties each, and another was down to half strength. A number of men had simply become lost in the confusion. Some would be taken prisoner and others would turn up, many hours later, in Oosterbeek.
Drive on to the junction and turn left, signed Ede. You are now heading in the direction of the 4th Parachute Brigade DZ. As a reminder, keep thinking about distances as you cross the motorway bridge and head towards the woods on the other side towards South Ginkel Heath; DZ ‘Y’. It was the task of 7 KOSB to guard the heath, but their orders, worked out from a map and photographs in England, were that they should ambush the road to the DZ to prevent interference by the enemy. Consequently, ‘A’ Company 7 KOSB, twenty-five percent of the Battalion’s rifle strength, was instructed to set up an ambush by a restaurant called ‘Planken Wambuis’, which means, literally ‘Wooden Skirt, or ‘Coffin’. It is on the left shortly after you enter the woods, and you can stop in the car park; and your trip meter should read 10.8 miles/17.3 km.
Private Bill Anderson of 1 Platoon, A Company describes what happened:
‘We proceeded to a slight bend in the road and we were told by our officer, Lieutenant Kane, a Canadian, to stop everything on this road. Some time later we heard engines and from Ede way an ambulance and a truck went by, but no one fired a shot! Lieutenant Kane shouted: ‘why did no one fire?’ I don’t know, but someone said one was an ambulance. So Kane repeated the order to stop everything. Once again more traffic drove up. Another ambulance and a small pick-up truck which we fired at and stopped both. The truck had two occupants who were bleeding terribly and the ambulance when the door opened was full of armed Germans with rifles. The German occupants were taken prisoner. During the night heavy fighting was taking place nearer to Arnhem and the noise was terrible.9’

Move on to South Ginkel Heath, which is about a mile further on. As you do so, bear in mind 4 Platoon of A Company that was sent along the road down which you are now driving to establish itself between the battalion and A Company to form some kind of link. The logic and the reasons are unclear, but presumably it may have had something to do with the range of radios. However, the move also deprived A Company of 25% of its firepower. Carrying on along the road and shortly after clearing the woods there is a pub on the right called the Ginkel. Opposite there is an entrance to a car park into which you should turn, trip meter reading 11.8 miles/18.9 km. Leave the car and proceed on foot to the mound under the tree on the corner of the heath. Here you will find a memorial to the men who landed here and to those who defended the LZ.
As you cleared the woods you passed the place, somewhere on the right of the road, where 4 Platoon, A Company, took up its position. The area can be clearly seen from where you are standing, and is marked on the sketch map on Page 60.
The memorial to 4 Brigade, 7 KOSB and the Dutch Resistance. It is located at the 10th Parachute Battalion RV. The Ginkel Pub is in the background.

Stand with your back to the monument and look out across the heath. In the far distance there is a tree line where runs a modern motorway, impossible to see from here. Under construction during the battle, it marks the southern edge of the DZ. The Ede-Arnhem road behind you is the northern edge, whilst the track running away south from the car park on your left is the eastern edge. Look to your right and away in the distance can be seen the line of a large wood, marking the western edge.
Positioned to defend the western edge and to be in a position to bring fire to bear on enemy approaching along the road from Ede was B Company of 7 KOSB. Further south where the motorway enters the tree line was C Company. Battalion HQ and D Company were at the bottom, south-eastern corner. D Company was the Battalion’s reserve, and was missing a platoon whose glider had not made it to the LZ. It would eventually arrive with the second lift. However, at this critical time D Company was without 25% of its firepower. A Company’s position you have already passed at the Planken Wambuis. This was a vast area of responsibility for a single battalion, and especially one with no inherent mobility. Furthermore, look at the distance of the A Company ‘link’, namely 4 Platoon, from where Battalion HQ was positioned, and perhaps wonder briefly how the link was to be established given the distances you have travelled and seen.
The main events here took place on the second day. However, the KOSB actually arrived on the evening of the first day and consequently had to endure a night’s attention from Germans who were keen that the British should not prevail. The outcome was that they lost a number of men. Perhaps not surprisingly, the detached 4 Platoon was eliminated with only a few of its members making their way back to their company the next morning. There was also some activity by the track that marks the eastern edge of the DZ where, about half way along, there were some workers huts in 1944. It was in this area that 16 Platoon of D Company had been positioned on the evening of 17 September. However, during the night and early morning German activity saw those of the platoon who were not killed taken prisoner. D Company was down to just two platoons as the Battalion prepared for the main event of the second day: the arrival of 4th Parachute Brigade on South Ginkel Heath.
However, the Germans had been given time to prepare, surprise had gone, the paratroopers were expected. What had given it away, at least in part, was the presence of a defensive force protecting this area. Clearly there for a reason and the reason could only be, so ran the German logic, further airborne landings. From the west General von Tettau’s hastily formed battlegroups were advancing, and from the north a Dutch SS battalion with its HQ in the Ginkel pub was causing trouble for the defenders. At the same time, the Germans were throwing up defences between the landing zones and Arnhem itself. By 3.00 pm on 18 September the odds were approximately fourteen German to six British battalions, not including tanks, artillery and heavy infantry weapons which the Germans had in preponderance. This considerable weight of military capability had formed a box into which 4th Parachute Brigade was about to drop.
The KOSB were under attack when they saw in the distance the small dots, growing ever larger, which heralded the arrival of the force they had been expecting for some time. Delayed in take off due to mist in England, the Brigade was on its way in. The KOSB, having fought off German probes all night, now swept across the area in a final counter attack that would clear, as far as possible, the DZ. Lance Corporal Tom Smith, an anti-tank gunner with the KOSB, recalls what happened:
‘At 3.00 pm we heard a mighty roar and all hell broke loose. We were ordered to fix bayonets and chase the Germans from the zone so, when the piper began to drone, we did that and they ran like hell.’
Counter-attacked from the ground, and assaulted from the air, the Dutch SS battalion broke and ran. However, there were enough German soldiers in the vicinity to pour a considerable weight of fire into the paratroopers as they landed and whilst still in the air. Many were wounded or killed before landing. Tracer and mortar bombs also set the heather alight and fires were raging all over the DZ, smoke adding to the confusion. At least one wounded soldier was heard screaming as the flames reached him, and then his ammunition exploded.

Dutch volunteers serving in the SS fought with varying degrees of effectiveness.
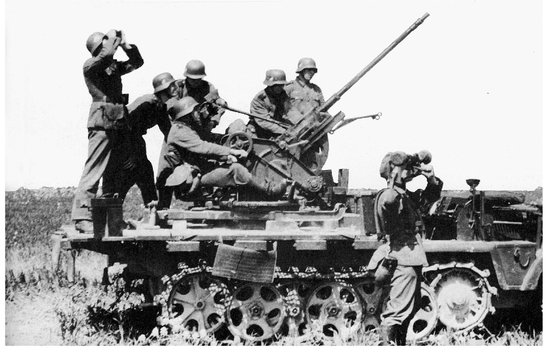
An example of a 20mm Flak gun mounted on half track. Alerted to the second drop the Germans were able to put up a withering fire on the transports and falling pararoopers of 4 Parachute Brigade.
The Brigade Commander, Brigadier Shan Hackett, was one of the first to land, and in doing so lost his walking stick. He found it eventually, having also found ten Germans who wished to surrender. Brandishing the stick, he marched them off to his headquarters. As he moved to his RV so did the units, 10th Battalion’s being near the memorial where you are standing. Landing for at least one person, however, was unexpected. Tom Smith again:
‘A para landed smack on our position. We helped him to his feet; he looked very young and sort of dazed, as if he was wondering what the hell he was doing here. We noted that he wasn’t armed or equipped. My officer asked him “why”. This is what he said: “I shouldn’t be here. I am on a forty-eight hour pass, I volunteered to push the supplies from the Dakotas because I had never flown before.” He was in the RASC. The Dakota was shot down. We equipped him from a dead man. The officer said: “your leave has been cancelled, and you are now in the KOSB. Your NCO is Corporal McKay”. I never saw him again, or knew his name or if he survived the battle. We pissed ourselves at the expression on his face.’
The previous day, shortly after landing, General Urquhart had gone forward with 1st Parachute Brigade to assess the situation. He had been cut off and had been out of touch since then. Brigadier Philip Hicks of the Airlanding Brigade, standing in as Divisional Commander, had decided that the assault on the Bridge in Arnhem needed additional resources. He had therefore decided to detach Hackett’s 11th Parachute Battalion for this task, and to do so as soon as it arrived on the DZ. The first Hackett learned of this was on landing. He was not best pleased, and so having consolidated his brigade, it was with only two of his three battalions that he moved eastwards in the direction of his objectives north of Arnhem. He had arranged to have 7 KOSB in his brigade to make up for the loss, but their task was to protect the Polish LZ ‘L’ for the landing the next day, and that was to be their primary task for the time being.
So, with the blocking lines moving into place, the formation of more and more German battlegroups, difficulties in Arnhem as the bulk of 1st Parachute Brigade, the divisional commander missing, was being prevented from reaching the Bridge and command and control muddles between the brigadiers, it was not looking good for the airborne soldiers. However, that would be to underplay the effect of the 4th Brigade landing on the Germans. The battalion ratio had now adjusted to fourteen German to nine British, and this further manifestation of Allied power had caused many to wonder if the assault was not unstoppable. SS-Hauptsturmführer Wilfried Schwartz summed up the view held by many in 9th SS Hohenstaufen Division:
‘In Normandy...we were too late. In Arnhem we were too few! How were we to stop this elite airborne division?10’
Returning to your car drive back the way you came. As you leave, bear in mind that 4th Brigade’s heavy equipment had landed on LZ ‘X’, which is some five miles or 8 kilometres away by road, although closer using a direct, cross-country, route. All this would need to marry up before the Brigade was properly resourced.
Turn right at the junction leading back down to the Wolfheze level crossing. Drive past the Johannahoeveweg junction, over the crossing and carry straight on. As you do, glance to the right and view the Wolfheze psychiatric hospital. It was rebuilt after the war having been bombed prior to the battle by the Americans on the instructions of the British. It was believed, quite erroneously, that it was a base for German soldiers and hence a threat to the landings.
As you drive on down Wolfhezerweg you have Sepp Krafft’s blocking position with his two forward companies in the woods to your left. It was from here that he sent out his initial spoiling patrols, and it was a line he held until about 9.00 pm on the first evening. When you reach the junction with Utrechtseweg turn left and after a few metres turn left again onto a track called Bredelaan at which is also the entrance to the Hotel Bilderberg and by now the trip meter should read 19.1 miles/30.6 km. Find a safe place to stop and leave your car. Return to Utrechtseweg and find a place where you can safely look left and right. To your right is the Wolfhezerweg junction, and to your left one kilometre away is the Koude (Oude) Herberg crossroads, the crossroads/roundabout you crossed at the start of this tour, and beyond that the Hartenstein. Remember, on South Ginkel Heath at the 4th Brigade landings we were discussing events on Day 2. Now we are back on Day one.
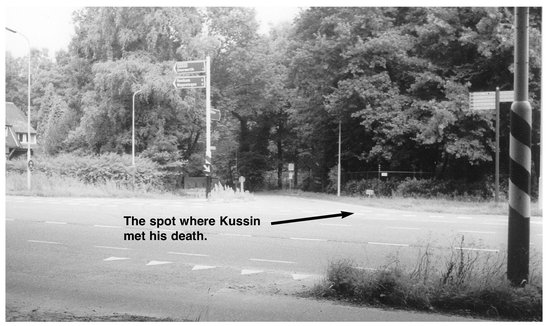
Utrechtseweg was the central route for the 1st Parachute Brigade advance on the first day, the one taken by 3rd Parachute Battalion. Having left the DZ at 3.00 pm the lead elements had arrived at the point where you are standing at around 5.00 pm. Bear in mind that a battalion strung out on a tactical march filled about a mile of road. The Arnhem town commandant, Major General Kussin, had been visiting Krafft’s battalion HQ at the Wolfheze Hotel, near the level crossing, trying to find out what was going on, and to give orders to Krafft. In planning his route back to Arnhem, he declined Krafft’s advice to take the Bilderberglaan.
‘I have no time to spare,11’ said the general driving down Wolfhezerweg, making for the faster route into town. He reached the junction at the same time as the lead platoon of 3rd Parachute Battalion.
Lieutenant James Cleminson was the platoon commander:
‘...owing to the high garden fences all that we could do was to string out on either side of the road and keep moving as fast as possible. There was no real opposition, but as we approached the crossroads a German staff car swept down the road from Wolfheze into the middle of my front section. We were all keyed up, so everyone let fly at it, stopping it dead and killing all the occupants. We pushed on leaving Company HQ to clear it up.12’
In the woods behind the Bilderberg Hotel was Sepp Krafft’s left-forward company. Shortly after the Kussin incident they brought mortar and machine-gun fire down onto the advancing paratroopers in the area where you are now standing. It was about now that General Urquhart appeared. Seeking to encourage a swift advance, and being out of touch with events because of failures in the radio communications he had gone along the southern route to push the Brigade Commander to redouble his efforts. However, Lathbury had been no longer on the southern route. As anxious as his Divisional Commander for the impetus to be kept going he was on the central route encouraging 3rd Battalion, so when Urquhart arrived on the scene as well, Lieutenant Colonel J A C Fitch, the Commanding Officer, was faced with both his Brigade and Divisional Commanders peering over his shoulder every time he made a decision. Not a happy state of affairs, especially since both commanders were now out of touch with their respective HQs. The Division and its lead Brigade were now leaderless.

General Kussin, the Arnhem town commandant, was killed in an encounter with 3rd Parachute Battalion. TAYLOR LIBRARY
The scene of General Kussin’s death, looking at the junction from the opposite side of Utrechtseweg.
Lieutenant Colonel Fitch’s response to Krafft’s attack was swift and positive. He ordered Major Mervyn Dennison’s A Company to clear the opposition so as to allow the battalion to get on. Major Dennison describes what happened in a battle that took place in the grounds of the Bilderberg hotel:
‘I sent Lieutenant Ashe’s platoon to the north to locate the mortars which were still bringing fire down on us. I then moved off with Lieutenant Baxter’s platoon to give support on the left. A German OP on a water tower which was obviously directing the fire was attacked and destroyed. The platoons swept on through the mortar position and destroyed it and some heavy machine guns. About twenty Germans were killed or wounded and another eighteen taken prisoner. We lost some twenty casualties, mostly wounded. It was just after dark before my company joined the rest of the battalion.’13
To allow you to orientate your position, Bredelaan in which you are standing, faces northwards.
Once Krafft’s forward company had been cleared and had moved away, the Battalion attempted to continue down Utrechtseweg. They had not gone far when a self-propelled gun met them. Whilst working out how best to cope with this new problem, Peter Waddy, B Company commander, and Lieutenant Cleminson saw a 6-pounder anti-tank gun detachment draw up. Being towed by a jeep, the gun was facing the wrong way to deal with an armoured vehicle to its front. Both officers were alarmed at the ‘casual’ manner in which the gun crew began to deploy their gun to deal with the threat. They were not fast enough: the Germans put a high explosive round down into the road just in front of the 6-pounder where it exploded killing or wounding the crew, although the gun was later recovered by another jeep. Equally surprising was the subsequent action of the German mobile gun. It drove down to the wreckage, a crew member alighted, picked up a wounded anti-tank gunner and draped him over the front glacis plate of the vehicle as protection from British fire. He then climbed back into his vehicle and withdrew, with the British not being prepared to fire on him for fear of hitting one of their own soldiers.
The advance resumed, and the leading elements were by now near the Koude (Oude) Herberg crossroads. But soon more armoured vehicles appeared, and Lieutenant Colonel Fitch decided to send C Company up Bredelaan, where your car is parked, in an attempt to ‘find an open route to the Bridge’. Len Wright was to take the lead with his 9 Platoon, and was giving orders to the key NCOs in his platoon when Brigadier Lathbury appeared on the scene, seeking out the leading platoon commander. In a scene typical of the sort of thing that happens when senior officers get involved where they ought not to be, Lathbury brusquely curtailed the giving of orders and told Len in no uncertain terms to get going. Remembering to salute, Len said:

SS soldiers riding on a Hummel self-propelled gun. This serves as an example of the sort of opposition the lightly armed airborne troops were facing (though not taken at Arnhem). TAYLOR LIBRARY
‘Sergeant Mason, get them going. I’ll brief you on the move.’ With that they dashed into Bredelaan and led the company away. That was the last they were to see of the Battalion, or the Battalion of them.
C Company, after some adventures, was eventually to make it to the Arnhem Bridge. Moving up Bredelaan it turned right along the railway, and eventually emerged in the town at the main railway station before making its way down to Frost’s position where it arrived, somewhat the worse for wear and at less than half strength, in the early hours of Monday morning.
The presence of more armour to his front caused Lieutenant Colonel Fitch to consider his position and, in company with the two senior officers, he chose to stay where he was until first light the next morning. It was a decision often since criticised, for the Battalion was relatively fresh and very many who were there, of all ranks, felt, and still feel, they should have moved on. The next morning instead of continuing down Utrechtseweg they moved just past the Hartenstein in order to avoid German opposition and then down to the bottom road in an attempt to get to the Bridge. They were never to make it, but that is another part of the story for another time.
Return to your car and proceed back towards the Hartenstein from where you can either continue with the next tour or perhaps pause for refreshment. Before you do, however, you might like to walk a little way towards the Wolfhezerweg junction and spare a look to the right at the house at No 269 Utrechtseweg. This is where Urquhart and Lathbury spent the night of 17 September 1944.