CHAPTER FIVE
Stands B and C
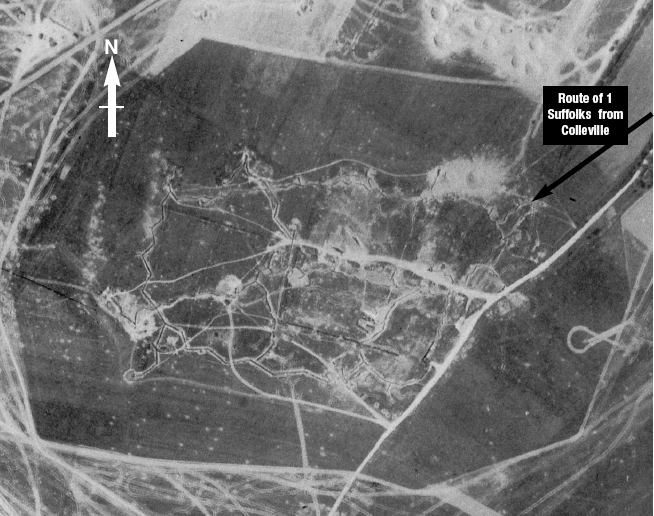
Route to strongpoint Hillman via Hermanville
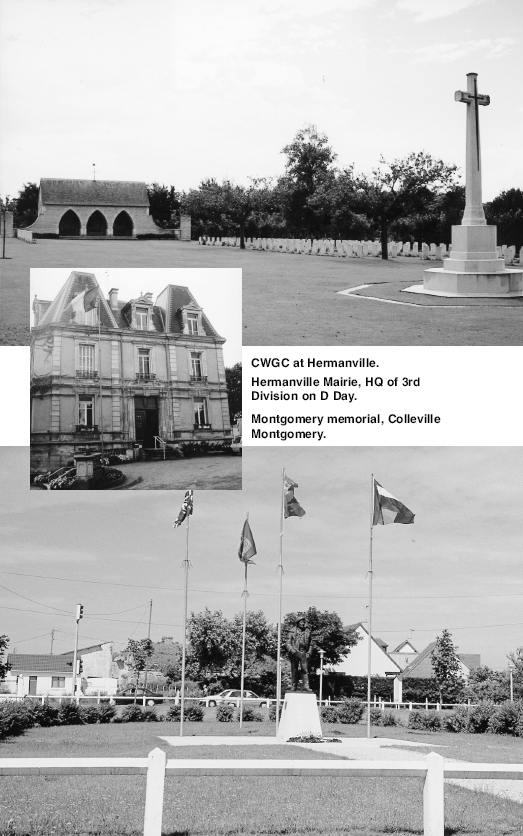
Rejoin your transportation and get back on the D514 by driving from the AVRE passed the memorial square by the hotel and out to the junction with the main road. Turn left and right at the traffic lights following signs to Hermanville sur Mer on D60. This was the road taken by much of 3rd Division as the troops and vehicles pushed inland avoiding flooded lower ground to the east. Before going directly to Hillman it is worth pausing in Hermanville. On entering the village you will note on the left a sign guiding you to the Commonwealth Wargraves Commission. Follow the sign and visit this beautiful cemetery located in Place des Combattants 6 Juin 1944. There are 1,005 burials many being from the 6 June. The burials include 986 British, 13 Canadian, 3 Australian, and 3 French. The British graves include a pair of brothers: the Davis brothers in Plot II Row O graves 7 and 10.
Rejoin the main road into Hermanville and stop in the small square opposite the church. Note the plaque on the wall that describes the use of the Mare Saint Pierre Well by the British Army. Records show that 1,500,000 gallons of potable water were drawn from here between 6 June and 1 July 1944.
Walk up to the Mairie located on the right hand side with its small park and note the plaque on the main gated entrance closest to the Chateau. This plaque recalls that on D-Day 3rd Division established its headquarters here. The building and grounds were subsequently used as an important British military hospital.
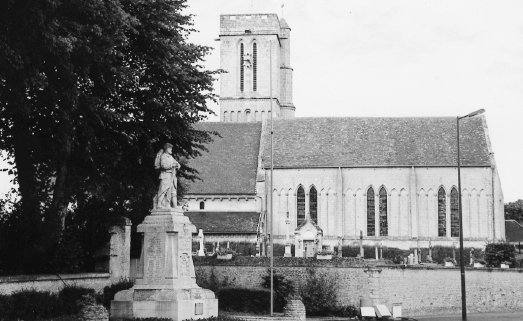
Hermanville-sur-Mer Church and war memorial.
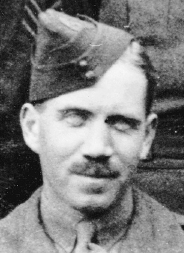
Across the road in front of the newer Salle Polyvalente is a green plaque and sapling oak tree planted to commemorate Harold Pickersgill MBE who died in 1998. A Citizen of Honour in Hermanville, Harold served in 3rd Reconnaissance Regiment on D-Day, having spent the previous year working on the mapping of German defences in Normandy.
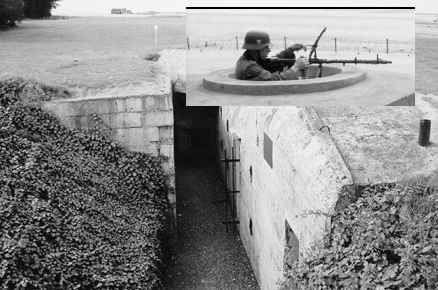
Rejoin your vehicle and proceed south on the D60 to the junction with the D35. Turn left towards Colleville Montgomery. After the water tower on the left and as you enter the village take the right fork towards St Aubin d’Arquenay. In Colleville at the crossroads with Rue du Suffolk Regiment look out for the signpost to Hillman and turn right (south) towards Caen. As you exit the built-up area the road rises and enters a cutting before opening out at the car park and the Hillman fortification. Park in the car park and examine the memorial plaque on the first bunker, the NTL post, and the viewpoint on top of the bunker adjacent to the flagpole. Note the schematic map of the position displayed as an orientation table on the concrete plinth. Note also the commemorative plaque on the bunker wall. This reads in English and French:
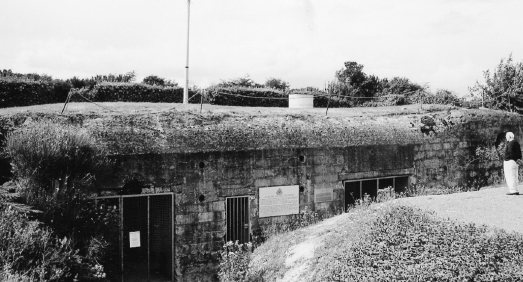
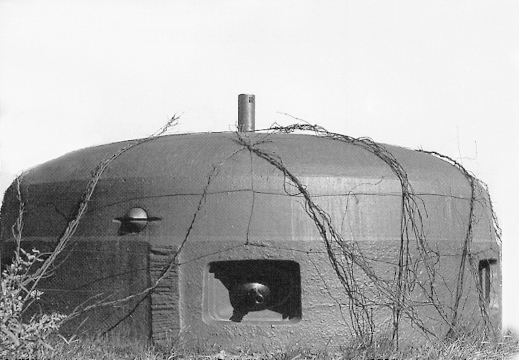
Hillman bunker and Memorial.
In 1944 this bunker formed part of the strongpoint known as HILLMAN, covering an area 600x400 meters. Hillman consisted of 12 emplacements, with concrete up to 3.5 meters thick. It was armed with anti-tank and machine guns, some in armoured cupolas immune to all tank guns. It was the Regimental HQ for the coast defences of the area, garrisoned by over 150 men. Despite the absence of the planned heavy air bombing and naval gun support the position was taken by the 1st Battalion The Suffolk Regiment on 6h June 1944. With the support of C Squadron 13/18th Royal Hussars (QMO), A Sqn Staffordshire Yeomanry, 2 batteries of 33 and 76 Field Regiments Royal Artillery, a detachment of 246 Field Coy Royal Engineers and a machine gun platoon of 2nd Bn The Middlesex Regiment.
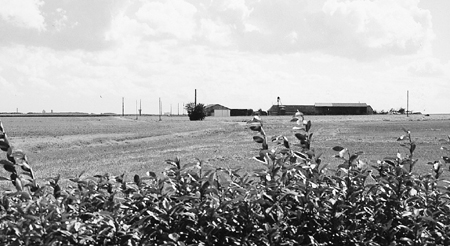
Looking south from Hillman towards Caen. The farm was defended by the Germans.
The forward bunker of Hillman. A German range card can still be seen on the wall in the right hand weapon pit.
Now walk from the car park using the path (not the road) to the north towards the seaward edge of the position beyond the hedge. Identify the symbolic cupola and walk over to the well-excavated bunker and stand looking out towards the coast. Note the Tobrouk (open weapon pit) and get in and examine the inner wall and see the very exact German range card painted on its inner side. You are now at grid 957606.
You are facing due north towards Sword Beach which is four kilometres away. You are standing on one of the forward bunkers of strongpoint Hillman. This position was the HQ of the 736th Coastal Defence Regiment, not simply a battalion HQ as the British Army Group, Corps and Divisional intelligence assessments had stated. Hillman extended over a 600x400 metre area and was surrounded by two thick barbed wire fences enclosing a forty foot wide mixed anti-tank and anti-personnel minefield. The thirteen reinforced concrete bunkers, four open weapon pits, and the command post were all interconnected by trenches. A garrison of 150 personnel manned this fortress. Although essentially on a forward slope (and thus vulnerable to observed long range naval gunfire) it was well sited with excellent fields of fire and observation in almost all directions.
From this second line position you can see the coastline and working from left to right the villages of Luc sur Mer, Lion sur Mer, la Breche where you have just come from, Colleville Plage, Riva Bella and Ouistreham (note the ferry port). On your right from Riva Bella running South-South West to Caen is the River Orne and its canal. Three kilometers southeast from here lies Benouville and Pegasus Bridge, seized just after midnight by Major John Howard and his gliderborne company. To your right rear and beyond the Orne, lies the Colombelles steelworks, much reduced in size now but still in evidence. In 1944 its original chimney-stacks and buildings provided cover to German observation posts and troops from 21st Panzer Division. To your immediate rear beyond the hedge line, lies the memorial bunker dedicated to the men of the Suffolk Regiment who captured Hillman on D-Day. Eight kilometers to your rear lies Caen itself – the divisional objective on D-Day.
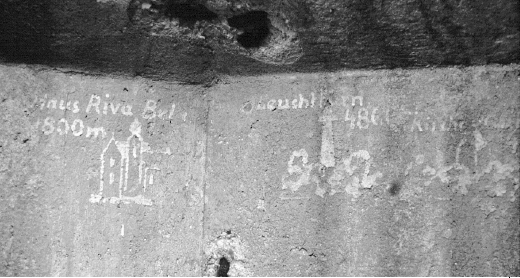
German range indicators are still in evidence in this Hillman bunker.
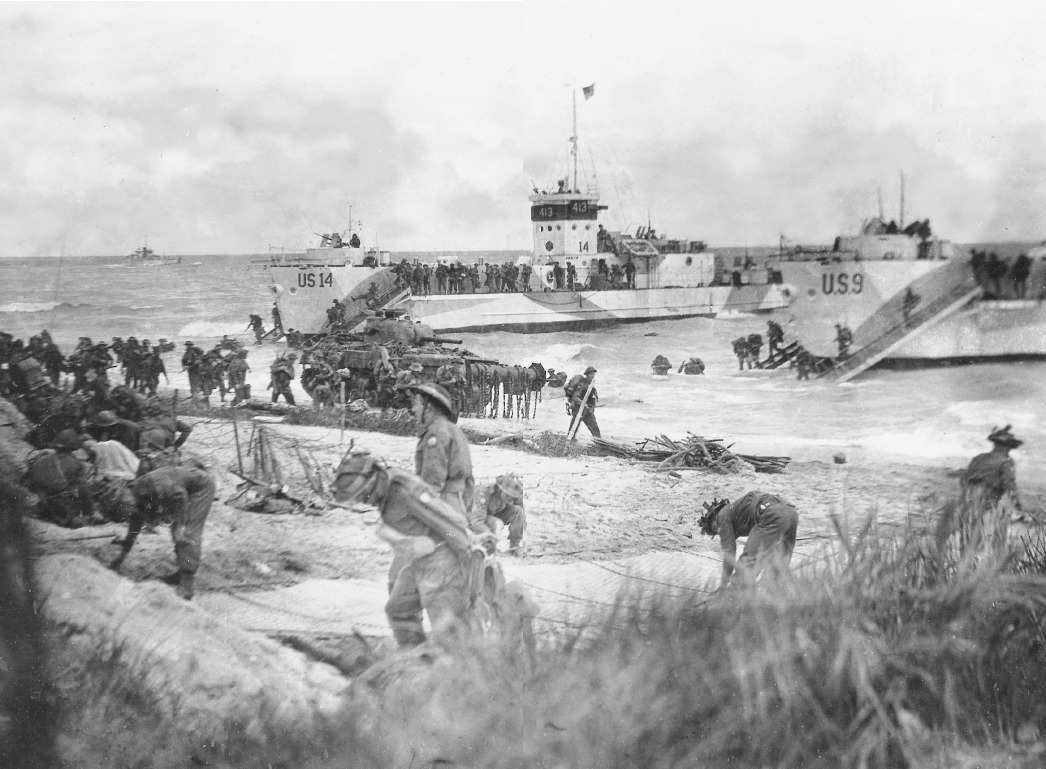
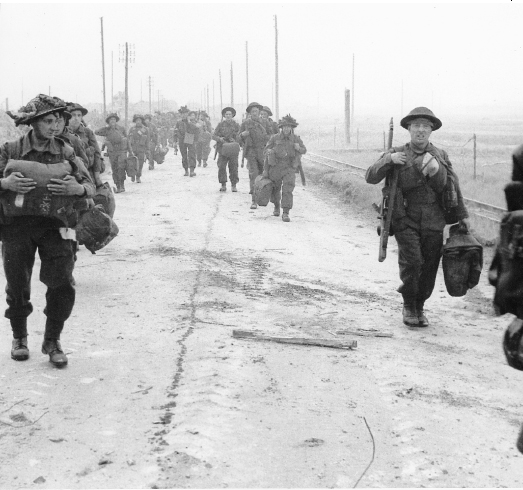
Queen Beach: Engineers and No.5 Beach Group work to improve a lane leading off the foreshore.
Navy and Army personnel of the Beach Group on Sword Beach.
The Move Inland
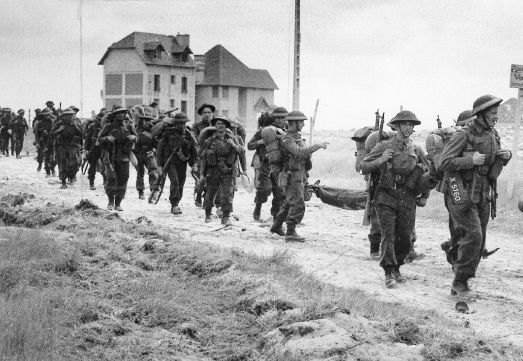
The reader can now follow the story of 3rd Division’s thrust inland and specifically the actions of the 1st Battalion the Suffolk Regiment. This was the reserve battalion of 8 Infantry Brigade. Having landed, the Suffolk rifle companies had moved off the congested beach to the west in order to find a suitable exit. The Commanding Officer (CO) met the second-in-command of the South Lancashires who informed him that his CO had been ‘badly hit’ on the beach (he was in fact killed in action). Having found the prepared exits off the two now very crowded beach subsectors, the companies moved to their assembly area about 800 meters inland. Bullets and shells were flying about in all directions but few casualties were taken. Unfortunately, and most seriously for the day’s subsequent operations, Captain Llewellyn RA, the Forward Observer Bombardment (FOB), and his party were hit by a mortar bomb as they left their LCA. They had all been killed or wounded. Without the FOB it would not now be possible to call on the fire support from the dedicated cruiser and destroyer for the subsequent battalion attack on strongpoint Hillman.
The assembly area on arrival was found to be devoid of cover. The trees, which had been there on a recent air photo, had all been cut down probably to make ‘Rommel’s asparagus.’ A German rifleman was hidden amongst the remaining piles of brushwood, but he was either quickly killed or made-off after the battalion arrived in force. The CO now decided to move two or three hundred metres further inland to an orchard where the companies could assemble in some cover. On arrival at his new location, an officer and five other ranks of a Canadian parachute unit who had been dropped in the wrong place during the night emerged and greeted them. They had spent an uncomfortable early morning, having been bombed by Allied planes and shelled by the fleet. They were glad to see the battalion and despite their experiences were determined to get on with the battle. They joined D Company for the morning.
At this stage large packs were taken off and breaching platoons from D Company joined A and B Companies. During this time, the enemy caused little trouble to the battalion although they did start mortaring the area of the cut down wood that had only just been abandoned. Off to the east a multi-barrelled mortar was firing towards the beach. Suddenly a ship started firing salvo after salvo for some ten minutes into a field about 100 metres to the east of the CO’s orders group. The Liaison Officer (LO) Captain Wardlaw from C Squadron 13/18th Hussars reported in his tank to say that the squadron had got safely ashore and was on its way to join the battalion. They were now ready to move, but there was still no sign of Rear Battalion HQ with the second in command and adjutant. They had in fact traveled in a LCI, which had been hit forward as it approached the beach and both landing ramps had been put out of action. The LCI had to pull-off and those aboard were transferred to other landing craft. They finally turned up about an hour late.
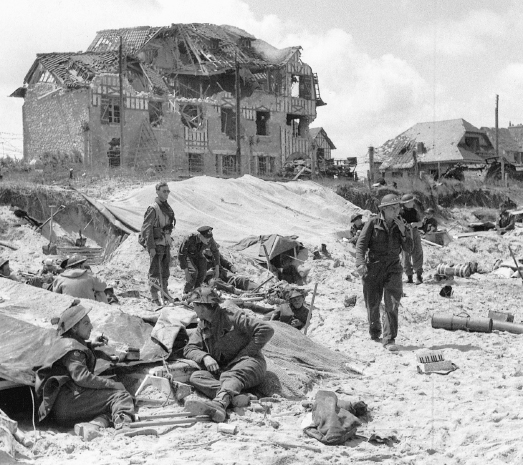
British infantry moving off Sword Beach.
It was from this forward Assembly Area that Captain Elliott commanding the antitank platoon was sent on a lonely mission to make contact with the 6th Airborne Division astride the Orne. He successfully completed this dangerous task covering some Fourteen kilometres that day, which he later described as rather like ‘walking across the front of the [range] butts at Bisley during a rapid fire practice’.
In his Assembly Area, the CO confirmed his orders and the companies moved off according to plan. D Company, less the two breaching platoons, moved south to a position where they could observe and bring fire down upon Strongpoint Morris that was their immediate objective. They found mine fields marked with boards showing the skull and crossbones and the words ‘Achtung Minen’, but the mines did not form a continuous obstacle and thus did not hinder their progress. C Company moved off immediately after, with a troop of tanks southeastwards towards Colleville followed by the remainder of the battalion. [Those left out of battle (LOB) remained behind under Captain Coppock; Major Gordon, who should have been in command of this group, had not yet turned-up being in the damaged LCI with Rear Battalion HQ.]
On the move to the village, the route chosen was through orchards where cattle were still grazing, this implied that there were no mines. Not long after the troops had left the assembly area a multi-barrelled mortar opened up on it. The bombs could be seen quite easily, and made an uncanny wailing noise. Luckily there were no casualties among the LOB. It was also noted that several of the bombs were duds and failed to explode.
In Colleville some of the commandos from 1st Special Service Brigade, who had landed twenty minutes after the battalion were encountered. They were from No.6 Commando and had just cleared two pillboxes north of Colleville. They had two or three frightened looking prisoners who were interrogated but produced little information of any value; one prisoner was a Pole. The commandos said they wanted to go and deal with the multi-barrelled mortar. They were given a couple of the 13th/18th tanks by the battalion and they moved off to do the settling. The mortar crew, wisely, quickly withdrew. The time would have been about 1030 hours. Also at about this time, the CO of 1 Suffolk met Lord Lovat the commander of 1st Special Service Brigade at the northern end of Colleville. He was described as looking as if he were out for a country walk. Colonel (then Major) Gough writing in 1991 related how he watched Lovat, at the head of his commandos marching in threes as if on a route march lead by Bill Millin with his bagpipes. They left for the Orne bridges by way of St Aubin d’Arquenay (to the northeast). After clearing scattered opposition on the way they got to the bridges at about 1330 hours.
Men of the 1st Suffolks moving inland on the morning of D-Day.
The Clearing of Colleville
Meanwhile C Company had started to clear of the village assisted by a troop of C Squadron 13/18th Hussars. In 1944 Colleville stretched for well over a kilometre along its main road, with two parallel roads or tracks on each side. There were probably nearly a hundred separate buildings in all. The issued maps showed some fieldworks in the area of the village with some motor transport bays marked near the church at the north end with more field works and wire at the southeast corner. Otherwise there was no information about whether it was defended. It is now known that the Germans did occupy houses in the village; one was a mess for the officers of Hillman and one was the headquarters mess for the artillery unit at Point 61; in addition to the individual German billets in various private houses.
C Company, under Major Boycott, quickly completed its mission of ensuring that the village was secured. They found few Germans and therefore had little problem as they worked through the village. In fact they had missed a couple of the enemy who had gone into hiding, and the next day some shots were fired by them from the church tower. By this time there were a great number of different British units around the northern end of the village. There was an immediate response from the gunners and tanks in the vicinity. One tank gun put a 75mm round through the tower and two Germans covered with dust gave themselves up shortly afterwards.
Corporal Ashby of C Company described how as part of the point section he went along the street of the village past the church to the Mairie. There his section established a defensive position on the first floor overlooking the street. Shortly after, Monsieur le Maire emerged from his shelter and joined them. So at 1000 hours on the morning D-Day he found himself sharing a bottle of Calvados and information concerning German dispositions with Monsieur Lenauld the mayor of Colleville.
In the meantime, Major Papillion, who was to die at Chateau de la Londe a month later, had reported from his position with C Company that the support squadron of the 13/18th was now in position off to his west and exchanging shots with Hillman. He also reported that there appeared to be no movement from Morris.
Morris was a four-gun 105-mm battery, three guns being housed in two-metre thick concrete emplacement; the fourth was still under construction on D-Day. Two belts of barbed wire further protected the bunkers. The outer wire obstacle was nine feet wide and the inner fence was three feet deep. In between was a mixed minefield (anti-tank and anti-personnel). Six machine guns and an ant-aircraft gun covered these perimeter defenses. As C Company was meeting no effective opposition in clearing the village the CO sent for Major McCaffrey commanding B Company and told him that it was possible that the enemy had already deserted the battery position. However, he was ordered to prepare his attack as arranged just in case it was a ruse. Major McCaffrey ordered his company quickly up into the village behind C Company. As soon as he had ‘elbow room’ he moved towards this formidable battery position for the attack.
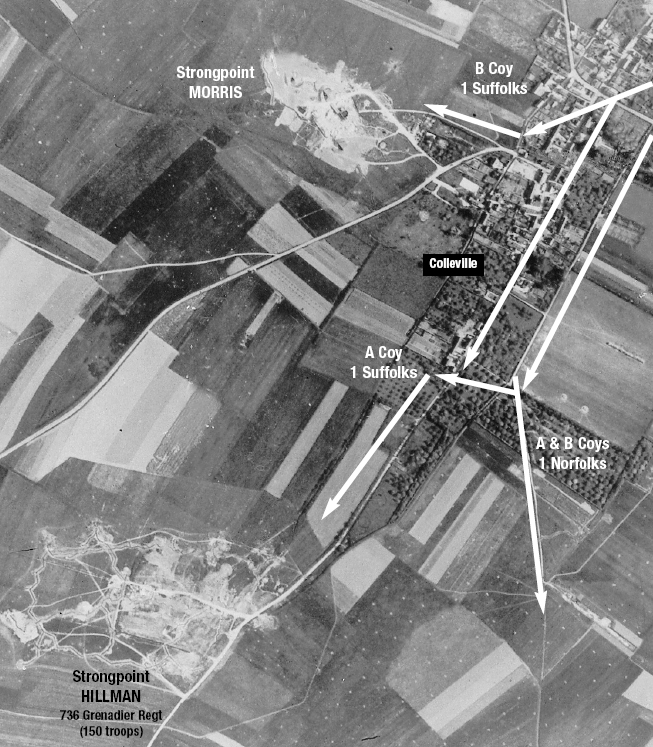
Aerial photograph taken a week before D-Day showing the two strongpoints code-named ‘Morris’ and ‘Hillman’ by the Allies. White dots are anti-glider poles. Morris gave up without a fight; Hillman put up strong resistance.
As B Company started preparing for its assault on Morris the guns of the supporting battery started to register on the target area. In view of the lack of fight shown so far, McCaffrey decided to quicken the procedure by blowing the outer wire before calling for an artillery concentration. However, just as the Bangalore torpedoes were being placed, a white flag was put up and the entire garrison emerged from their concrete emplacements with their hands up. There were sixty-seven Germans in all. They were brought back into the village by four highly delighted soldiers who moved them along the main street at the point of their bayonets at a smart pace. The garrison was not in good shape. They had suffered some heavy air raids on the 1st and 2nd of June, one of which is now known to have caused many casualties.
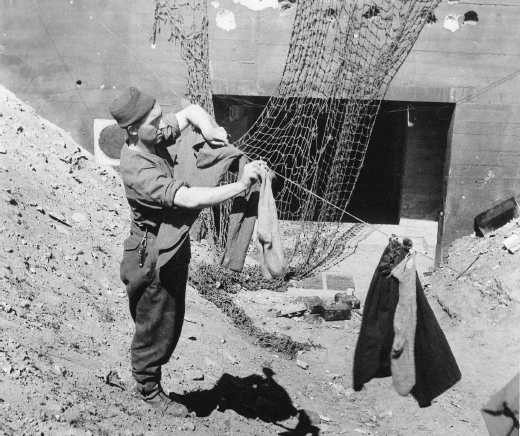
The Germans occupying Morris gave up without a fight. Here a British Tommy hangs out his washing at the rear entrance of the casemate to the west of the defence complex.
That morning Morris was allegedly attacked by the USAAF although there had not been any direct hits. The navy had then started a bombardment with the 6-inch guns from HMS Dragon and the guns of the destroyer Kelvin. A naval air spotter should have controlled their fire but they reported that they had difficulties in communicating with the aircraft. Dragon therefore was unable to engage Morris except by blind, estimated fire. Once the position was occupied it was discovered that the guns were still fully serviceable; a photograph taken a fortnight later showed one of the guns apparently intact, except for a small jagged hole in the gun shield, presumably from a shell or bomb splinter. The positions can still be seen today integrated into newer houses and gardens on the western outskirts of Colleville to the south of the D35a. They are still in very much the state they were left in in 1944, with no apparent damage from all the explosives hurled at them. The psychological effect of that bombardment, however, was enough for the battery troops to give up without a fight.
By midday the battalion was able to report that Morris had been cleared. Ten minutes after B Company confirmed that there was no enemy left in Morris the position was engaged by guns firing from the southeast (perhaps from the German battery just north of Periers sur le Dan or from the self propelled 150-mm battery of 17/16 regiment at Plumetot). Fortunately there were no casualties. The men from B Company were either sheltering in the concrete defences they had just taken, or were well outside the position. B Company now moved up to take supporting positions for A Company’s forthcoming attack on Hillman.
The First Attack on Hillman
As the enemy adjusted their shelling of Morris towards the south of the village, A Company was using a route to the east of the village away from the enemy bunkers so as to get into a suitable position from which to attack Hillman. Unfortunately they suffered some casualties from this blind shelling. One section of 9 Platoon was nearly wiped out with seven casualties from one shell, including a regimental signaler who was killed.
About a hundred metres clear of the village a Canadian parachute officer met up with the CO. He had been dropped in the wrong place and was accompanied by a sergeant who had broken his arm during the night-drop; the NCO received treatment at the Regimental Aid Post while the officer took the CO to a position from which Hillman could be overlooked; peering through the standing corn – then some 18-inches high – it was possible to see the outer wire some 150 metres away. It was difficult to see much more detail because of the corn, but one steel cupola was visible. Meanwhile C Company sent one platoon forward to provide flank protection to A Company and another platoon was directed through the orchards on the outskirts of Colleville so that they could cover across the open country. By doing this C Company had quickly established a flank security position for the next stage of the overall battalion plan.

German Todt Organization bunker plan.
D Company with a breaching platoon from B Company now waited in reserve at the southern end of the village. So at this stage, the tactical dispositions were:
A Company: reinforced waiting to attack.
B Company: on the right prepared to support the assault company.
C Company: left forward.
D Company: close by in the village to provide mutual support. Major ‘Jock’ Waring, the battery commander from 76th Field Regiment was in the meantime registering his guns on the position. The Battalion’s own 3-inch mortars had also moved up into position and were also ranging-in on the fortress. There were, however, some difficulties with the artillery registration. This was because the No.18 Radio Set, which was the only means of communication between Major Waring and his gun line, was not working well. Many problems emerged on D-Day because of the inferior communications on the smaller radio sets. Many of the communications difficulties were certainly caused by the very great density of radios working in a very confined area. It may also have been hampered because the radios had been ‘netted’ several days prior to embarkation; as a result some sets had almost certainly come ‘off-net’.
At about 1130 hours Captain Ryley set off on his own reconnaissance of Hillman. Although he can have had few illusions about the task to be done he must have begun to realize just how difficult his mission really was on seeing the extent of this fortress. His reconnaissance indicated that there had been no effective preparatory bombing of the position although there were some bomb craters close to the wire; fifty-three years on it seems that the poor weather on D-Day had prevented the USAAF from completing this priority-bombing mission in the early hours of the morning of 6 June. Tragically, as a result of the loss of the FOB Party, he was now also deprived of the use of the available naval guns on HMS Dragon. He was also rather surprised to see the armoured cupolas in the position of which he had received no warning.
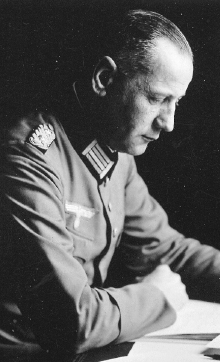
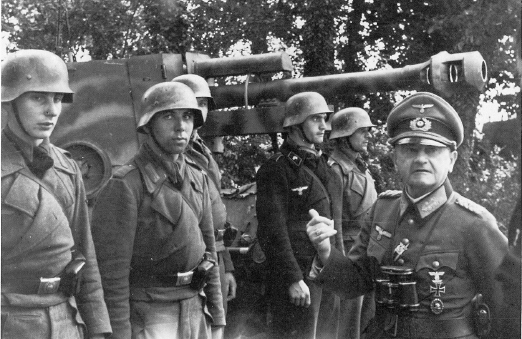
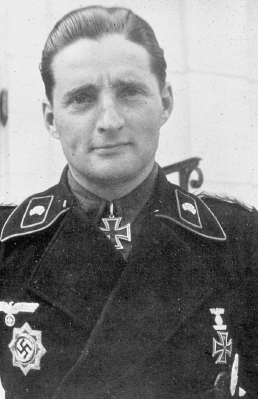
Oberst Krug.
From the excellent vantage point at Hillman the German garrison could observe the invasion fleet and the progress of British troops as they made their way inland towards them.
Inside the fortress Oberst Krug, the commanding officer of 736th Regiment, had been alerted very early in the morning that something out of the ordinary was going on. At 0140 hours he had told his divisional commander about the nearby airborne landings. Throughout the small hours of the morning he would have been aware of the attempts by 21st Panzer Division to retake the bridges at Benouville, and heard the tank exploding in the village near the canal in the failed attempt to push Howard’s men off the Orne bridges. At first light he and his men would have looked north and seen the great armada out to sea and have witnessed the assault on the beaches and its deadly progress inland. There could have been few surprises for the garrison at Hillman that morning with their grandstand view of D-Day. Even though 7th Army and Army Group B both considered the overall situation to be under control at 0530 hours there could have been few tactical commanders in this area that felt quite so optimistic as daybreak illuminated the terrible spectacle.
By 1300 hours, Captain Ryley of the Suffolk’s had notified his CO that he was ready to attack Hillman. ‘Grab’, the codeword for the supporting fire mission was sent over the airwaves at 1310 hours by the CO. At that time the guns began their five minutes of shelling together with the tanks of C Squadron, and the battalion’s 3-inch mortars. The men of D Company’s breaching platoon now crept forward to the outer wire to carry out their allotted task. This approach was to be followed by A Company, by way of a sunken path (not apparent on the air photos and may actually have been the road to Hillman itself) to within a fairly short distance of the wire. Thereafter they were able to crawl through the corn to the outer wire. They were protected from sight to some extent because of the undergrowth that had been allowed to flourish around the position.
Hillman.
Platoons of A Company were deployed on either side to provide additional protection for the breaching party. The bangalore torpedoes were pushed under the twelve feet of outer wire and blown. The mine clearance party, with sapper help, then started on the clearing of a three-foot wide lane through the minefield that they marked with white tape. When the inner wire was reached the second Bangalore section came up and placed the torpedoes under the wire. The platoon commander was then placed in a tricky position as the initiating device of the Bangalore failed to go off. He then had to go through the minefield to obtain another one and this time he was successful. His platoon carried out its task very effectively, working as if on a training exercise, yet within only fifty metres of an alert enemy. The commander’s bravery and leadership was subsequently recognised by the award of the Croix de Guerre.
Unfortunately, the use of phosphorous grenades thrown by the zealous covering party to hide the breaching team’s movement, served only to draw the attention of the Germans onto their activities. Once the machine gun in the cupola, only thirty metres away, had located the breach any activity in the area drew a lethal hail of bullets.
The first assault platoon moved forward through the breach crawling all the way from the narrow sunken lane. The platoon did get through the gap but they then came under heavy machine-gun fire and a section commander was killed. Lieutenant Powell, the platoon commander, then came forward with a PIAT team. Three shots were fired at the cupola, which was causing most of the trouble. These had no evident effect. The rest of the platoon had now advanced into the trenches in the position but this did little good as the enemy merely withdrew into their concrete shelters and opened fire with machine guns from behind armoured doors at any attempt to move against them. A message was sent back to say the platoon was held up but the runner was killed on the way back and a second runner had to be sent.
Under cover of a further concentration of fire (HE and smoke) the second platoon went in, this time led by the company commander. Once again machine-gun fire opened up and only four men managed to get through the gap in the wire. Alone, they went forward for over 150 metres and took a few prisoners. As they were unable to continue without reinforcements, Lieutenant Powell went back while the others waited for assistance. He returned with three men but found that Lieutenant Tooley and Corporal Stares had both been badly wounded (and later died). Captain Ryley was killed shortly afterwards when returning for more support. Other wounded from the vicinity of the gap were now being dragged back through the corn to the sunken lane from where stretcher-bearers carried them back to the now busy Regimental Aid Post in Colleville. Throughout this period Lieutenant Powell displayed great leadership and courage. He was rightly awarded the MC but was killed at Tinchebray in southern Normandy shortly after the award was announced.
The Second Attack on Hillman
By this time the CO’s carrier and the battery commander’s tank had at last escaped from the traffic jam on the beach. This gave the CO a radio link with the tank squadron through the N0.19 set in the carrier and also provided the battery commander with effective communications to his guns. Before that, communications had been possible to the squadron through the LO’s tank but the CO’s carrier was now able to come right up to a forward position whereas his tank could not come forward without being seen.
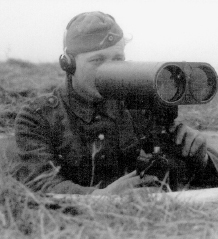
Steel cupola with machine guns and periscope.
As there appeared to be no antitank guns left in action in the position the CO ordered the tanks up to the outer wire in order to give the troops close support. This move did not materially improve the situation as the 75-mm guns were unable to penetrate the emplacements and the enemy was still able to prevent any movement through the breach and into the perimeter by unprotected infantry. Even 17-pounder armour piercing shot only gouged the metal and could not penetrate the steel cupola that was causing most of the trouble. The situation was a stalemate and the CO appreciated that it would not be possible to capture this fortress position without great loss unless the tanks went through the wire, thus enabling the infantry to move up with the tanks up to the emplacements and so destroy or capture the enemy at close quarters. He decided to have a vehicle gap made and to lay on a fresh attack with a repeat bombardment. Colonel Alan Sperling’s recollection of these events was dominated by the calmness of the CO’s planning and orders while under continuous fire.
Yet there was certainly one, perhaps two, antitank guns still in action on Hillman; one tank was hit without damage when firing on the position from the north but when 4 Troop of C Squadron moved off to the east in the open country between Hillman and St Aubin d’Arquenay two tanks were hit resulting in casualties in both vehicles; later in the afternoon one tank was completely knocked out by Hillman’s 75mm gun. The FOO’s tank from 7 Field Regiment supporting the Norfolks was also hit but only lost its radio; meanwhile in one of the myriad small actions which make up momentous battles, 4 Troop had the satisfaction of ‘shooting up’ an antitank gun in the open, catching its crew turning the gun around to take them on!
The CO then ordered Lieutenant Perry, who had now taken over command of A Company, to withdraw his men from the position so as to get them clear for a repeat bombardment and to rest them in the sunken lane. He sent for his attached RE officer, Lieutenant Arthur Heal, and told him the gap had to be widened to nine feet. Heal told the CO that the quickest way to do this was to use flails. He then came up to reconnoiter the position. He and Cpl Boulton and a sapper from his detachment crawled flat on their bellies to find out more about the minefield. It was initially thought that it might have been a dummy one. However, Heal found a mine and started carefully examining it. He had made himself familiar with all types of German mines likely to be found, but here was one that he did not recognise. With some trepidation he pulled it out and studied it more closely: he was relieved to find it was an obsolete British Mk III mine probably captured at Dunkirk. He also discovered that the mines were in four rows at about five metre intervals.
He returned to the CO to report his findings. He was asked how long it would take to make a proper gap. Heal said about an hour but suggested he could do a quicker job using gelignite charges to blow a row of mines providing a gap of about five yards. The tank commander was agreeable to this, so he set off once again with his Lance Corporal working flat on the ground under fire to clear sufficient mines for a tank gap. A rifle platoon and one of the tanks provided covering fire.
Lieutenant Colonel Nigel Tapp (now Major General Sir Nigel Tapp), who was then commanding 7th Field Regiment in support of 185 Brigade, graphically described the local situation at this time. He arrived at Colleville at about 1400 hours to find a scene of great confusion. He recalls seeing two tanks, which had advanced up to the track to Hillman, had been blown up on mines thus blocking the track. There were dead men and burning motorcycles in the street. The Norfolks, part of 185 Brigade, were close behind them and more tanks and vehicles of the 8 Brigade group were blocking the roads leading to the village. Major Dunn, the battery commander with 1 Norfolk, has also described how the FOO from 76th Field Regiment had gone off in his tank thinking that he would deal with a German machine gun post holding up A Company. Shortly afterwards there was a loud explosion and he came back to say his tank had gone up on a mine. Colonel Dick Goodwin has also related this story but added that the squadron LO went off with the battery commander and that it was his tank that went up. The CO described the tank as being a complete writeoff, one track being blown off and the tank burnt out; the LO came back to say he had ‘a slight headache.’
The divisional commander, Tom Rennie, now came up to the CO’s observation post and asked how the battalion was getting on. When he was told the situation he said:
Colonel Dick Goodwin.
‘well you must get it before dark; and in time to allow you to dig in on your consolidated positions. Enemy armour is about and they will probably counter-attack at first light.’
The CO assured him that 1 Suffolk would succeed. He left with a cheery ‘Good luck’. General Rennie would be wounded a few days later driving over a mine and then killed at the Rhine crossing commanding 51st Highland Division the following year.
Shortly afterwards the brigade commander (Brigadier E E E Cass) arrived. The CO asked him for two flails to speed up the process of mine clearance and for further tank support. He agreed to do this and soon afterwards the CO was informed on the radio that two flails were coming up. A Squadron, Staffordshire Yeomanry, were in reserve not far away and they were ordered to come forward and assist. The flails eventually turned up well after a sufficient gap had been cleared to let the tanks enter the position. The squadron commander was just starting to report to Lieutenant Colonel Dick Goodwin when he received urgent orders to redeploy and meet a threatened tank attack by 21st Panzer Division. The squadron rapidly moved off and subsequently knocked out three enemy tanks from positions to the west of Bieville.
While all this was going on, the Norfolks had tried to bypass Hillman in two groups. Two companies led by the second in command followed the line of a track leading southwest from Colleville. They had strict orders not to become involved in the Hillman battle. Their information was that the village of St Aubin d’Arquenay, cleared by the commandos earlier, was still held by the enemy. This was to prove a disaster because the battalion now selected a route that took them across the cornfields between St Aubin and the eastern bunkers at Hillman. Both the leading and the following companies (A and B respectively) got involved in a firefight and both suffered many casualties; in all they probably had over forty killed and wounded – including A Company commander – as they were drawn into a battle that they had no reason to be involved in. Eyewitness accounts state that some casualties were caused by friendly fire from British supporting tanks. Too late the Norfolks had learned that St Aubin was already clear.
By this time it was mid-afternoon (the Staffordshire Yeomanry tanks were recalled at 1615 hours). Arthur Heal and his sappers had, by now, cleared a gap through the minefield sufficiently wide for tanks. Their excellent work under fire from these active enemy positions (one sapper was wounded) was recognised by the award of the MM to corporal Boulton and the Croix de Guerre to Lieutenant Heal.
The CO now called for a repeat bombardment of five minutes HE from the artillery. When this lifted the tanks started to go through the gap. The leading tank however refused to drive over the British dead body still obstructing the path ahead. Corporal Lawson, the section commander, had no intention of losing any more lives and told the tank commander in no uncertain terms to ‘fing well proceed’. The troops followed the tank through the gap and fanned out in either direction using cover from shell holes beyond the perimeter wire. Tank main armament had still proven incapable of penetrating the cupola from which machine gun fire continued to be directed at any dismounted personnel.
Corporal Lawson and Private ‘Tich’ Hunter of 8 Platoon found themselves within twenty metres of the cupola. Suddenly one lone German came running towards them hands raised in surrender. A shot rang out and he was killed. The tension had been too much for one British soldier. Soon afterwards Hunter stood up from his shelter in a bomb hole and slowly and determinedly walked towards the cupola firing his Bren gun from the hip. This had the desired effect as no further resistance came form this direction and the mopping up began. Hunter was awarded the DCM for his bravery. The network of trenches was by now deserted except for one dead German. Hunter jumped down and was looking at the body when Corporal Lawson glancing to the right, saw a lone German, rifle raised. Lawson shouted a warning and the bullet just grazed Hunter’s forehead. The German disappeared round the corner of the trench that led into one of the concreted emplacements. Grenades were dropped down the ventilation shafts that had some effect as their occupants started to come out with hands up in surrender.
The companies then carried out the moppingup with the support of the tanks. Some of these tanks raced ahead alone and had to be recalled. The process was a long and tedious one as the Germans were safely ensconced in their concrete and steel and the area was a large one. The pioneers were called in to use their beehive charges to blow in some of the emplacements. Eventually all firing ceased at about 2000 hours and the position was secured with no further apparent resistance. In addition to the casualties inflicted on the garrison some fifty prisoners were taken.
‘Tich’ Hunter.
The CO had ordered B and D Companies forward to their consolidation areas as soon as he saw that the position was nearing capture. A and C Companies followed, so that the whole battalion was firmly in position and dugin facing Caen just before dark. The mortar platoon and antitank platoon had also been hastily dug in, the antitank platoon suffering one casualty in the process. A gun being towed by a carrier was to be sited at the far corner of the enemy position, but as it was going through the gap in the minefield through which a squadron of tanks had passed without any difficulty, the carrier was blown up by a mine. The carrier and gun were destroyed but there were only minor injuries to the two men in the front of the carrier, the remainder of the crew being on foot.
The squadron from the 13th/18th also withdrew about 1930 hours to rally near battalion HQ where they were able to replenish their ammunition stocks. Apart from the losses to tanks to enemy action, the squadron commander, much to his great annoyance, had the misfortune to lose his tank when it fell into the officers latrine on Hillman where it broke a track. The tanks were later to take up positions below the Periers ridge to counter the threat from 21st Panzer Division. Just after the troops had left Hillman the enemy opened up with artillery and mortars but the shells fell beyond battalion HQ except for one mortar bomb that hit the office truck, setting it on fire and causing three casualties.
Beauvais farm (on the ridge directly to the south of Hillman) was in D Company’s consolidation area. As the leading troops approached it, two enemy riflemen were found in the corn and dispatched. The CSM then said that he could see movement through a window in the farm, about 250 metres away. He fired a round and saw someone fall down. 17 Platoon was given the task of clearing the buildings. They approached via a line of trees but they then had about a hundred metres of open space to cross. No sign of life was to be seen; the Bren guns were positioned to cover the farm from the right flank and the platoon prepared to assault. With a burst from the Brens the platoon was off but they immediately saw on the left, troops climbing out of slit trenches with their hands in the air shouting ‘kamerad’; all surrendered, two officers and forty-eight men in total. They left behind four machine guns and their rifles together with a great many stick grenades. Their packs and parcels were all laid out in threes ready for surrender – by the time the farm was reached. The company commander (Major Papillon) now decided to stand back about 250 metre’s from the farm to dig-in for the night. This was a wise decision as the enemy positions were later mortared, on and off for about an hour with no casualties to D Company.
It was at that stage of consolidation that the Air-Landing Brigade of 6th Airborne Division had appeared overhead. This was a magnificent and heart-warming sight as the enormous flight of Dakotas towing their gliders flew over in perfect formation to land away beyond St. Aubin d’Arquenay. They were followed by a large number of Stirlings dropping coloured parachutes with containers of equipment. One can imagine the dramatic effect that this display of Allied air power gave to the recently bloodied assault troops and the correspondingly depressing effect it must have had on the Germans struggling to reestablish control of a rapidly deteriorating situation.
The battalion stood to that evening from 2230 to 2330 hours and then started patrolling. It had been a long and eventful day. For many it had started at 0330 hours that morning and had included an uncomfortable trip through rough seas in un-seaworthy landing craft. It had ended with all the battalion objectives taken at the cost of seven killed and twenty-five wounded. About 200 prisoners had been taken in addition to the battle casualties inflicted on the enemy. Other losses included one man who died of his wounds and seven others who were less severely wounded from C Squadron 13th/18th Hussars. The detachment from 246 Company RE had one man wounded and the platoon of 2nd Middlesex had one man killed and six wounded in Colleville by a mortar bomb.
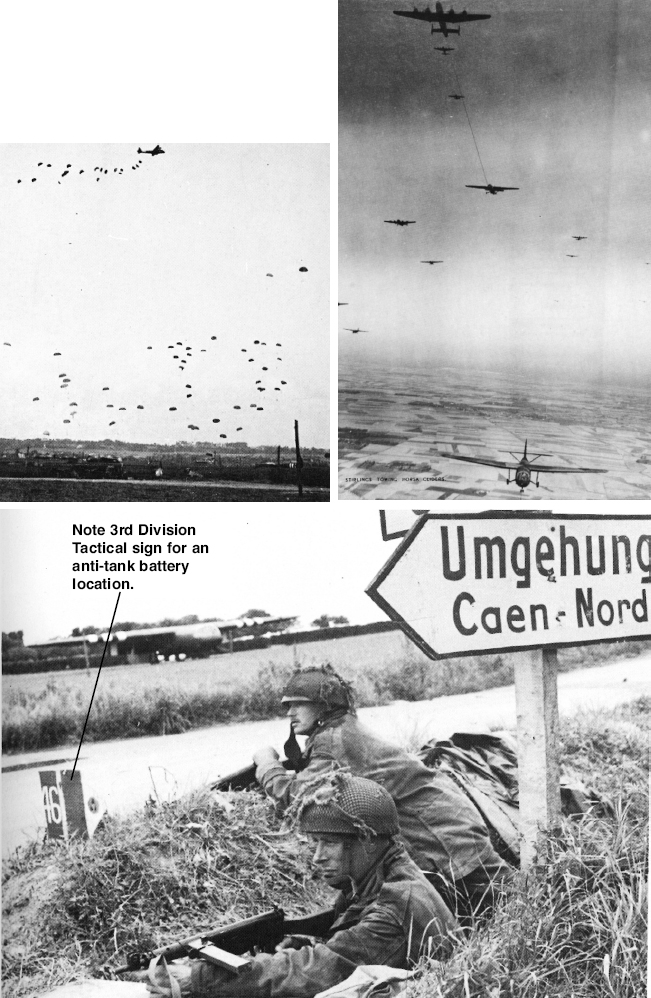
A dramatic display of Allied air power was demonstrated on the afternoon of D-Day when the Air-Landing Brigade of the 6th Airborne Division appeared over the battlefield to reinforce the air landings east of the Orne.
On the face of it, all was quiet on Hillman. The battalion occupied positions all around and over it. But there was still some activity inside the main bunker network. General Richter, commander of 716th Division writing in a report dated 23 June 1944, stated that the resistance nest at Point 61 (confused for Hillman itself) had successfully defended itself and remained in unbroken communications with his divisional HQ.
An extraordinary incident took place at midnight, 6 June, that is worth recounting; at about that time Standartenführer Hubert Meyer of 12th SS Panzer Division walked into Richter’s underground HQ just outside Caen. Richter told Meyer that he had no news. None of his positions were now reporting. No dispatch riders had been able to get through. The situation was entirely confused. Then the telephone rang. It was Oberst Krug, the commander of 736 Grenadier Regiment deep underground in his bunker inside the now overrun Hillman position. He is reported to have said: ‘the enemy are on top of my bunker. I have no means of resisting them and no communications with my men. What shall I do?’ Richter’s helpful reply was: ‘I can give you no more orders. You must make your own decision now. Goodbye.’
SS-Standartenführer Hubert Meyer.
At 0645 hours next morning, Oberst Krug immaculately turned out in his highly polished boots, came out of his underground HQ with his batman and two packed suitcases; three other officers and seventy other ranks then surrendered with him. The prisoners were searched before they were escorted to the beach. The second in command took a briefcase containing maps and documents from Krug, which was then passed back to battalion HQ. The place where the surrendering party emerged was close to the bunker on which the memorial to those who fell on D-Day is erected. Also close-by was a hut containing a great cache of champagne and Vichy water Krug was clearly a man of taste! Other accounts of Oberst Krug refer to much ‘heel clicking’ going on in the village as he said farewell to his men before they moved on. Many in his command had viewed him as an Austrian of the ‘old school’ and very ‘sensible’.
Stand C – Periers Ridge and the German Counter Attack
Route to Stand C
From Hillman retrace your route to the centre of Colleville and turn west on D35. After a short distance (one block) turn left on the D60a towards Periers-sur-le-Dan. Look to you left as you leave the village and note Hillman’s dominating position on the skyline. At the main crossroads (formerly known as Point 61) go straight on along the D220 to the outskirts of Periers and take the right turn at the crossroads on the D222 go up the hill; at the top of the crest (Periers Ridge) stop at Point 55 where the farm track crosses the road.
Orientation
You are now at Point 55 on D222 between Plumetot and Periers-sur-le-Dan at Grid 929611 on a track and road junction facing southwest. You are located about 4,000 metres from Stand A at La Breche d’Hermanville. Caen is nine kilometres further south of the Periers Ridge. Look to the northwest and identify Plumetot. Look southwest and identify Mathieu. Look southeast and locate Periers-sur-le-Dan, Point 61, and Hillman.
The Drive for Caen on D-Day Falters
While the Suffolk’s and 8 Brigade had been fighting their way inland, 185 Brigade had landed and formed up at Hermanville. By 1100 hours it was ready to start its thrust for Caen. The brigade plan had ordered the KSLI to lead, on a general axis from Beauville Lebisey, carried on, and supported by, tanks of the Staffordshire Yeomanry. However, the Yeomanry was still queuing up at the beach exits caught in that mother of all traffic jams. Lieutenant Colonel Maurice commanding the KSLI waited until midday (a 1 hour delay) and was then given permission by his brigade commander, Brigadier KP Smith, to advance on foot. At that moment 7th Field Regiment RA had just got clear of the beach congestion and roared through Hermanville past the KSLI and went into action in the fields south of the village to become the foremost troops on the Divisional axis.
The KSLI started off and before long the Staffordshire Yeomanry caught them up. Near Periers they came upon a German howitzer battery against which a company/squadron attack was mounted. The enemy fought doggedly but eventually a Pole among them was captured who showed Major Wheelock commanding Z Company a route in through the wire at the back of the battery position. The attack went in and by late evening the position was secure. Meanwhile the main body of the KSLI and Staffordshire Yeomanry group had pushed on and secured Bieville by 1600 hours. At about 1615 hours the reconnaissance troop of the Yeomanry then reported that a company of panzers was approaching fast from the direction of Caen. The number of tanks being observed rapidly increased to a total of forty. 21-year-old Lieutenant Harry Jones of the KSLI also witnessed the arrival of the panzers. While standing with his company commander and pouring over a map, a German shell exploded near them:
‘I looked towards the enemy and could not believe my eyes. There advancing round the corner of a wood about five hundred yards away, were five or six German tanks! We hurriedly dispersed and I returned to my platoon...I could still hear the sound of German tanks firing and was relieved to hear the sound of our own anti-tank guns and those of the Staffordshire Yeomanry tanks.’
This was the predicted intervention of 21st Panzer Division and specifically the 1st Abteilung from 22 Regiment commanded by Hauptmann Von Gottberg. The KSLI and Yeomanry hand rapidly deployed to meet the threat. From Bieville north along the Periers Ridge there was now a hastily but well sited anti-tank screen consisting of a squadron of the Yeomanry together with the KSLI’s 6-pounder antitank platoon and a troop of 41st Antitank Battery RA with 17-pounders around Bieville while the Shermans of B Squadron of the Yeomanry were to the north around Periers. In sum a broad and formidable anti-tank screen had been quickly emplaced along the southwestern flank of 3rd Division’s beachhead.
The German Counter-Attack
But why had it taken so long for the Germans to respond in any strength to the threat to Caen? After a night of confusion the 22 Panzer Regiment had been ordered to attack 6th Airborne Division. So, at 0900 hours they were struggling back through Caen over the few remaining bridges towards the airborne bridgehead. At 1030 hours 7th Army then ordered the regiment to turn around and attack the beaches: objective Lion-sur-Mer. By this stage the lead battalion was already in contact with 6th Airborne Division. At 1300 hours the divisional commander – Edgar Feuchtinger then ordered the force to split into three Kampfgruppen two for west of the Orne and one Kampfgruppen under Hans Von Luck committed to recapture the two bridges from the eastern bank. Hans Von Luck recounted to the author how this disorder, regrouping and the constant air attacks took their toll on the force’s effectiveness and tempo. The move from the east bank of the Orne was hampered by the loss of the Orne bridges. This forced the columns to move via Colombelles and Caen in order to reach Lebisey Ridge. Refugees impeded their journey along with debris filled streets, and a further Allied air attack on Caen around 1330 hours. Then as the armoured columns exited the city they were engaged by eight rocket-firing Typhoons that knocked out six tanks.
General Edgar Feuchtinger, commander of 21st Panzer Division inspects one of his assault-gun units.
By the time von Oppeln-Bronikowski had brought his depleted tank regiment — now consisting of three tank battalions (Abteilung I, II and III), the fourth being attached to Von Luck’s Panzergrenadier Regiment 125 — to Lebisey Ridge at about 1600 hours he was surprised to find General Marcks, commander of 84th Corps, waiting for him. After further dividing his tank assets between Kampfgruppe Rauch (one tank Abteilung) and his own Kampfgruppe Oppeln (the remaining two Abteilung), the Corps Commander briefed him saying, ‘Oppeln, if you don’t succeed in throwing the British into the sea we shall have lost the war!’ With the order ‘Panzer marsch’ given at 1620 hours they set off in two powerful assault groups:
Oberst Hermann von Oppeln-Bronikowski.
Kampfgruppe Rauch: West
2 Armoured infantry battalions
1 Tank Abteilung
1 Armoured engineers battalion
1 Artillery Battalion
Kampfgruppe Oppeln: East
2 Tank Abteilung
1 Armoured infantry battalion
1 Engineer battalion
1 Artillery (armoured) Battalion
Having negotiated their way around the German anti-tank obstacle sited just to the north of Lebisey, the right hand, eastern, column hit Bieville and the British anti-tank screen head-on; two panzers were knocked out by the Yeomanry and a further two tanks destroyed by the KSLI antitank gunners. The remaining panzers swung to the west pursued by two troops of A Squadron who knocked out four more enemy tanks and a further two fell to the No. 4 gun of 41 Battery. The panzers continued northwest and ran straight into B Squadron who were waiting for them hulldown behind Periers ridge.
An account from 21st Panzer Division’s unofficial history states:
‘The British positions were tactically well chosen and their fire both heavy and accurate. The first mark IV was blazing before a single [German] tank had the chance to fire a shot. The remainder moved forward firing to where the enemy were thought to be; but the English weapons were well concealed and within a few minutes we had lost six tanks, meanwhile, sweeping round to the left of Periers rise, were the thirty-five tanks led by Hauptmann von Gottberg; they attacked point 61 held by a squadron of the Staffordshire. The position was the same. The fire of the English from their outstandingly well-sited defensive positions was murderous.’
This group was also repulsed losing ten tanks. Within a short space of time, the armoured regiment of 21st Panzer Division had lost a total of sixteen tanks, a decisive moral defeat from which it never really recovered. In an account given in Alexander McKee’s Caen Anvil of Victory and by Kortenhaus in his privately published history of 21st Panzer Division they state:
‘The long wait from the early morning in addition to the diversion via Colombelles had consumed fourteen hours and given the enemy time to build up a strong line of defence. The one and only chance on D-Day had been lost. Never again was there to be such an opportunity.’
While very successful for 3rd Division this brief skirmish had now settled the fate of Caen. The account continues:
‘The British position was already precarious but appeared worse than it was...at 2000 hours the mechanised infantry of I Battalion Panzer Grenadier Regiment 192, [under Oberst Rauch] reached the sea between Lion-sur-Mer and Luc-sur-Mer a few miles to the west and linked up with the Germans [from 111 Battalion 736 Regiment] still holding out in their coastal defences.’
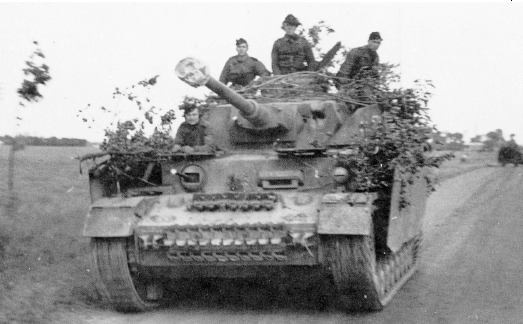
Panzer IVs of 22nd Regiment, 21st Panzer Division, moving against the invasion front.
General Rennie responded to this armoured wedge by pulling the Hussars from Hillman, and deploying them in defensive positions on the ridgeline. He warned his tank commanders to expect a further counterattack by 21st Panzer Division.
On the other side of the Orne, Werner Kortenhaus was with Kampfgruppe Von Luck at St. Honorine, waiting to counterattack the weakening parachutists. With his II Battalion from the 125th Regiment already tied down in close combat with 6th Airborne Division, and after a long delay awaiting the regrouped and reassigned tanks from the panzer regiment, he launched his attack on the bridges. Assaulting from the Line of March his men could hear Von Oppeln’s battle already taking place across the Orne on Periers ridge at about the same time. They made good progress until, as Hans Von Luck described it: ‘All hell broke loose. The heaviest naval guns, up to 38cm in calibre, artillery, and fighter-bombers plastered us without pause. Hans was just behind his own recce advance guard and saw the disaster.
The force pulled back to dig in and contain the enemy bridgehead. von Luck recalled that at about 2100 hours they were all witnesses to what appeared to the Germans to be a lightening response to 21st Panzer Division’s counter attack. This was the pre-planned fly-in of 6th Airborne Division’s Air-Landing Brigade with Stirlings, Halifaxes, Dakotas and Albermarles towing Horsa and Hamilcar gliders containing the heavier weapons and equipment. ‘No one who saw it will ever forget it’, declared Kortenhaus, one of Von Luck’s men. ‘Suddenly the hollow roaring of countless airplanes and then we saw them, hundreds of them towing great gliders filling the sky.’ They came down in various landing zones on both sides of the Orne, some passing directly over Leutenant Holler’s anti-tank guns still fighting on at Bènouville against 6th Airborne Division. The sky was also filled with coloured parachutes each indicating essential supplies including ammunition for the beleaguered airborne forces astride the River. An uncanny silence seemed to descend upon everything and everyone as both sides watched in awe and consternation. Holler recollected:
‘We all looked up and there they were just above us. Noiselessly those giant wooden boxes sailed in over our heads to land, when men and equipment then came pouring out of them. We lay on our backs and fired and fired and fired into those gliders until we could not work the bolt of our rifles anymore. Our 2 cm flak troop shot some down and damaged many more but with such masses it seemed to make little difference.
These gliders were apparently landing behind the Germans who had now reached the coast. This caused the immediate abandonment and withdrawal of the counterattack force west of the Orne; another group of gliders landing east of the Orne bumped down directly in the path of Kampfegruppen Von Luck not more than 100 metres from the seventeen tanks attached from the 4th Company of the 22nd Panzer Regiment. Kortenhaus recalled:
‘It was a unique opportunity, but there was a wait before the order came crackling in my earphones: ‘tanks advance.’ And then the air was alive with calls of: ‘eagle to all, eagle to all, come in please!’ engines roared into life flaps clanged shut and we rolled in cautious tempo and attack formation towards Herouvilette. But before we had even fired a shot darkness had fallen over the rolling tank formations and then warning lights shot up we were attacking positions held by our own panzer grenadiers! Baffled the men shook their heads...And that was all that we, a strong tank company, achieved on this decisive day.’
As the last gliders were landing, the Warwickshires from 185 Brigade group, arrived in Bènouville to relieve the airborne forces on the Orne bridges and take over the battle with Holler’s grenadiers who had been pressing hard on the canal bridge (Pegasus Bridge). In the pre-D-Day divisional plan the Warwicks should have been in Caen by now, but they were actually only half way to the city having been re-tasked in the heat of battle with a very different mission. Here they were at Bènouville having lost their Forward Observation Officer, so that they could no longer call for artillery support.

Oberstleutnant Hans von Luck consults a map and instructs his officers during the counter-attack against the British Bridgehead in Sword sector.
Across the very fluid and confused front line, the first tank Holler saw rolled into view opposite a house sixty metres away across a park. It halted directly in front of the muzzle of one of his 75-mm self propelled guns which was camouflaged as a large bush. But the muzzle could not be depressed sufficiently, and to start up the engine would have given their position away so the crew put their shoulders to the gun and rolled it forward. Holler described the situation:
‘The suspense was dramatic but we managed it, and without being seen, either. Then Corporal Wleck cranked the gun handles frantically until the muzzle bore. Meanwhile, the English commander had got out of his turret, and walked up to the house to talk to the occupants; obviously, he hoped they would tell him where we were. As our first shell hit, the petrol and ammunition exploded with such violence that the house beside the tank collapsed in ruins. Clearly, the English still hadn’t a clue as to where we were; they fired wildly, at extreme range, and in all directions except at the ‘nearest nearness’, and under cover of the uproar, we were able to start up and get away.’
Consolidation
Holler cursed his lack of armoured support. Colonel Jim Eadie of the Staffordshire Yeomanry would have echoed his bitterness because at dusk his leading tanks had successfully advanced six miles from the beaches and were now at Lebisey, looking down at the divisional objective, the burning city of Caen, but without sufficient infantry support. The presence of 21st Panzer Division’s two Kampfgruppe on his open right flank was the deciding factor, and he withdrew his force to Bieville. ‘Many weeks of desperate fighting were to elapse before the regiment again stood on that high ground,’ wrote a brigade historian. Similarly, Panzer Regiment 22 was reviewing the situation. The German Main Defensive Line had been ripped open by 3rd Division, the static positions of 716th Infantry Division destroyed, captured, or bypassed; there were no infantry reserves, and the tanks of the counterattack force had been ordered to dig-in and hold a defensive line instead of fighting a battle of manoeuvre.
In those few hours, the future of Caen had been decided: it had not fallen with ease – it would now be liberated over a month later, after being martyred or gratuitously murdered as some French citizens saw it. Already, many of the inhabitants had guessed the impending fate of their city and refugees now started to flee from their as yet undamaged homes. Many more would stay behind and face a more deadly outcome in the days and weeks ahead. Apart from the 200 suspected resistance workers promptly executed by the Germans in Caen prison on the morning of D-Day, many residents thought that their liberation was imminently at hand!
Meanwhile the KSLI had pushed one company forward at some cost through Beuville towards Lebisey, where it became involved in a heavy firefight, losing its company commander (Major Steel). It was then ordered to withdraw and consolidate for the night. The newly arrived enemy in Lebisey now consisted of the Panzergrenadiers of 21st Panzer Division, who were energetically digging in on the high ground north of Caen. Meanwhile the Norfolks had reached a point between Beuville and Bènouville, having suffered many casualties on the way, and the Royal Warwicks had cleared the route from St. Aubin to Bènouville and Blainville, mopping up snipers as they went. And as midnight approached the weary units of 185 Brigade dug in.
9 Brigade, on the other hand, had come ashore at 1300 hours and as Brigadier Cunningham went forward to Hermanville to contact 8 Brigade, he described the scene:
‘On reaching the northern outskirts of Hermanville I was amazed to see standing inside the wall of an orchard not only General Tom Rennie but John Crocker, in their red hats. I said “I have never before been beaten into action by my divisional and corps commanders” and we had a good laugh about it. These two highly responsible and competent men realised that the moment was an extremely critical one, and they deemed it necessary to be in a position where they could give an immediate decision on any matter, perhaps affecting the whole course of the battle.
‘They told me to cancel my original role of going straight down on the right to get Carpiquet and if possible Caen, and instead to get across to Pegasus Bridge to help the airborne who were hard pressed. This was disappointing, as 9 Brigade had their run down the right flank all buttoned up. However, these two officers would not have taken a major decision of that nature if they had not considered it essential. They knew that it would mean that Carpiquet would not be taken that night, unless 9 Canadian Brigade could get it alone.
‘It cannot be emphasised too strongly that the commanders were on the spot to make their decision; it must have been a very hard order to give knowing what it would entail.
‘My armour had not then landed, and they said I had better wait for that before moving, so on the way back to the beach I did no more than warn the KOSB that we had to get across to assist 6th airborne at Pegasus Bridge. My armour was still trying to find a place to land when I viewed it from the shore, so I returned to my brigade HQ. On arrival there, I left my carrier and went towards my armoured command vehicle. My antitank gunner and my intelligence staff moved to join me there. At that moment a stick of mortar bombs landed on us killing six and wounding six. I was wounded and unable to convey the new instructions to my staff. Colonel Dennis Orr late of the Scots Fusiliers had gone over with me as my second-in-command but between my leaving my brigade HQ and returning to it, he had been ordered to go over to Pegasus Bridge to (I think) report on the situation, certainly not to take command.
When I was wounded he was not present to take over, and in fact I was told it was a very long time before he managed to get back. The result was a long hiatus when the brigade should have been moving and nothing happened. In short, if a number two is considered worthwhile, do not use him for some other job instead.
In the event, the Lincolns were left at Cresserons to secure the right flank with a gap remaining between the British and Canadian divisions, now being exploited by General Marcks. Meanwhile, the RUR dug in north east of Periers, while the KOSB moved across to occupy St. Aubin and the high ground overlooking Bènouville. Here, 17 Field Company RE were working furiously to build rafts and relief Bailey bridges across the Caen canal and river Orne. Sapper operations had been hampered by delays in clearing equipment from the beaches and heavy casualties, among the latter being the CRE, OC 17 Field Company, and two reconnaissance officers. Fortunately the captured bridges were held and remained intact.
So ended Rommel’s longest day. Casualties in the Sword sector had not been as heavy as many feared, and although the immediate objective – Caen – had not been taken it had been screened to an extent. A breach five miles deep by four miles wide had been made in the Atlantic Wall by a reinforced infantry division. They had fought-off a powerful armoured counter-attack – the only cohesive response from the Germans on D-Day. As the troops wearily dug in for the night the men of 3rd Division knew that although they had accomplished much, it was only the beginning. D + 1 would soon be upon them and as Harry Jones described his feelings about that evening in his personal memoir after the war, this would be the ‘longest night’.
During that first, tense night in Normandy, the enemy would be working hard to seal off the invasion area while the Allies would be adjusting plans to meet the new circumstances of a severely foreshortened beachhead. To the north of Caen the newly regrouped grenadier battalions of 21st Panzer Division were already fortifying the ridge from Lebisey to La Londe thereby dominating and protecting the approaches to Caen. Hurrying into position on their left were the fresh troops from the 12th SS Hitler Jugend Panzer Division. The British 3rd Division was to find these two formations an altogether different proposition from the coastal defense troops met on the foreshore on D-Day.